
Introduction
There’s something undeniably magical about a bucket of KFC fried chicken. That iconic blend of eleven herbs and spices, the perfectly crispy skin, and the juicy, tender meat beneath – it’s a taste that has captivated generations. While the Colonel’s secret recipe remains under lock and key, the allure of recreating that classic flavor at home is a culinary quest many of us embark on. This article isn’t just about making fried chicken; it’s about capturing the essence of that beloved KFC experience right in your own kitchen.
Our goal today is to guide you through crafting a homemade fried chicken that evokes the comforting, familiar taste of KFC. We’ll delve into the crucial steps, from a tenderizing marinade to a well-seasoned flour dredge and the perfect frying technique. Prepare to delight your family and friends with a batch of golden-brown, flavorful fried chicken that might just make them believe you’ve cracked the code.
This copycat recipe is designed to bring you as close as possible to the original, focusing on robust flavors and that signature crispy texture. Forget soggy, bland chicken; we’re aiming for perfection. So, roll up your sleeves, gather your ingredients, and get ready to transform simple chicken pieces into a culinary masterpiece that pays homage to one of the world’s most famous fast-food traditions.
Nutritional Information
Per serving (approximate values for one drumstick):
- Calories: 320
- Protein: 25g
- Carbohydrates: 18g
- Fat: 16g
- Fiber: 1g
- Sodium: 650mg
Ingredients
For the Chicken and Marinade:
- 8-10 pieces bone-in, skin-on chicken (drumsticks and thighs work best)
- 2 cups buttermilk (or 2 cups milk + 2 tablespoons white vinegar/lemon juice, let sit 5 minutes)
- 1 tablespoon hot sauce (optional, for a subtle kick)
- 1 teaspoon salt
- 1/2 teaspoon black pepper
For the Seasoned Flour Dredge:
- 2 cups all-purpose flour
- 1/2 cup cornstarch (for extra crispiness)
- 2 tablespoons salt
- 1 tablespoon freshly ground black pepper
- 1 tablespoon paprika
- 1 tablespoon garlic powder
- 1 tablespoon onion powder
- 1 teaspoon dried thyme
- 1 teaspoon dried oregano
- 1 teaspoon ground ginger
- 1/2 teaspoon cayenne pepper (adjust to your spice preference)
- 1/2 teaspoon dried basil
- 1/2 teaspoon celery salt
- 1/4 teaspoon white pepper
For Frying:
- 6-8 cups vegetable oil, canola oil, or peanut oil (enough to submerge chicken halfway)
Instructions
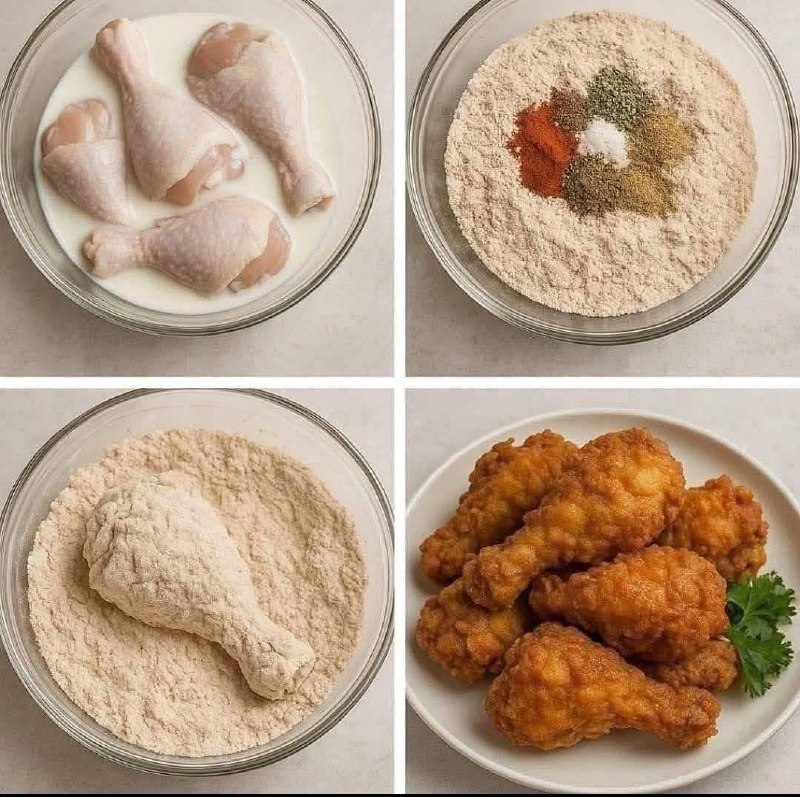
- Prepare the Chicken and Marinade: Thoroughly wash the chicken pieces and pat them dry with paper towels. In a large bowl or a resealable plastic bag, combine the buttermilk, hot sauce (if using), salt, and black pepper. Add the chicken pieces, ensuring they are fully submerged in the marinade. Cover the bowl or seal the bag and refrigerate for at least 4 hours, or preferably overnight, for maximum flavor and tenderness.
- Prepare the Seasoned Flour: In a large, shallow dish or another resealable plastic bag, whisk together the all-purpose flour, cornstarch, salt, black pepper, paprika, garlic powder, onion powder, dried thyme, dried oregano, ground ginger, cayenne pepper, dried basil, celery salt, and white pepper. Mix thoroughly until all spices are evenly distributed throughout the flour. This is your secret blend!
- Set Up for Dredging: Remove the chicken from the refrigerator. Place a wire rack over a baking sheet; this will be used for the dredged chicken.
- Dredge the Chicken (First Coat): Working with one piece of chicken at a time, remove it from the buttermilk marinade, allowing any excess to drip off. Place the chicken piece into the seasoned flour mixture. Toss and press the flour onto the chicken, ensuring it is completely coated. Shake off any excess flour and place the chicken on the wire rack. Repeat with all chicken pieces.
- Double Dredge (for Extra Crispiness): For an even crispier crust, you can double dredge. Once all chicken pieces have their first coat of flour, return each piece to the leftover buttermilk marinade (briefly dip it, don’t let it soak). Then, place it back into the seasoned flour mixture and coat thoroughly again, pressing the flour onto the chicken. Shake off excess and return to the wire rack. This double coating creates more nooks and crannies for ultimate crunch.
- Rest the Dredged Chicken: Allow the dredged chicken to rest on the wire rack for at least 15-30 minutes at room temperature. This crucial step helps the flour coating adhere better to the chicken, preventing it from falling off during frying and resulting in a crispier crust.
- Heat the Oil: In a large, heavy-bottomed pot or Dutch oven, pour enough vegetable oil to reach about 2-3 inches deep. Attach a deep-fry thermometer to the side of the pot. Heat the oil over medium-high heat until it reaches a temperature of 325-350°F (160-175°C). Maintaining the correct oil temperature is vital for perfectly cooked chicken.
- Fry the Chicken: Carefully lower 3-4 pieces of chicken into the hot oil, ensuring not to overcrowd the pot. Overcrowding will drop the oil temperature too quickly, leading to soggy, greasy chicken. Fry the chicken for about 6-8 minutes per side, turning occasionally, until it is golden brown and cooked through. The internal temperature should reach 165°F (74°C). Drumsticks typically take 12-15 minutes, and thighs 15-18 minutes, but always rely on a thermometer.
- Drain and Rest: Once cooked, carefully remove the chicken from the oil using tongs and place it on a clean wire rack set over a baking sheet lined with paper towels. This allows excess oil to drain off and helps maintain crispiness. Continue frying the remaining chicken in batches, ensuring the oil returns to the correct temperature between each batch.
- Serve Immediately: Serve your homemade KFC-style fried chicken hot and enjoy the crispy, flavorful goodness!
Cooking Tips and Variations
Achieving that perfect KFC-style fried chicken involves a few key techniques and considerations. First and foremost, the quality of your chicken matters. Opt for fresh, bone-in, skin-on chicken pieces. While drumsticks and thighs are often favored for their juiciness, breasts and wings can also be used, though cooking times will vary. Ensure your chicken is thoroughly patted dry before marinating; this helps the marinade adhere better and prevents excess moisture from diluting your flavors.
The marinade is a critical step. Buttermilk is preferred because its mild acidity tenderizes the chicken without breaking down the proteins too much, resulting in incredibly moist meat. If you don’t have buttermilk, a homemade substitute of milk and vinegar or lemon juice works wonderfully. Don’t skimp on marinating time; overnight is ideal, but at least 4 hours will make a noticeable difference in both flavor and tenderness. For an extra kick, consider adding a pinch of white pepper to the marinade, a subtle spice often associated with authentic fried chicken recipes.
When it comes to the seasoned flour, think of it as your flavor powerhouse. Don’t be afraid to adjust the spice levels to your liking. If you prefer more heat, increase the cayenne pepper. For a smokier flavor, a touch of smoked paprika can be a great addition. The cornstarch in the dredge is your secret weapon for unparalleled crispiness; it creates a lighter, more delicate crust than flour alone. Ensure all ingredients are thoroughly mixed to guarantee an even distribution of flavor on every piece.
The dredging technique is crucial for that craggy, crispy texture. Pressing the flour mixture firmly onto the chicken ensures a thick, well-adhered coating. The double dredge method, dipping back into the buttermilk and then flour again, is highly recommended for maximum crunch. After dredging, allowing the chicken to rest on a wire rack for 15-30 minutes is not optional; it’s essential. This resting period allows the moisture from the chicken to be absorbed by the flour, creating a “glue” that prevents the coating from sloughing off in the hot oil. This step alone can elevate your fried chicken from good to absolutely fantastic.
Frying temperature control is paramount. Invest in a good deep-fry thermometer. If the oil is too cold, the chicken will absorb too much oil and become greasy and soggy. If it’s too hot, the outside will burn before the inside is cooked through. Aim for a consistent 325-350°F (160-175°C). Fry in batches to maintain the oil temperature; overcrowding the pot will cause the temperature to drop significantly. After each batch, allow the oil to come back up to temperature before adding more chicken. Don’t forget to use tongs to gently turn the chicken for even browning. Once golden brown and cooked through, always use a meat thermometer to check for an internal temperature of 165°F (74°C) at the thickest part of the chicken, avoiding the bone.
For variations, consider a spicy fried chicken by increasing the cayenne pepper and adding a pinch of red pepper flakes to the flour mixture. You could also experiment with different dried herbs like sage or marjoram for a slightly different aromatic profile. For a gluten-free version, substitute the all-purpose flour with a gluten-free all-purpose blend that contains a mix of starches and gums, though the texture may vary slightly. Another delicious twist is to add a tablespoon of brown sugar to the flour mixture for a subtle sweetness that caramelizes beautifully during frying, adding another layer of flavor to the crust.
Storage and Reheating
Proper storage and reheating are key to enjoying your delicious homemade fried chicken even after the first meal. Once the fried chicken has completely cooled down to room temperature, it should be stored in an airtight container in the refrigerator. This helps to prevent moisture absorption and keeps the chicken fresh. Properly stored fried chicken will typically last for 3-4 days in the refrigerator. Avoid leaving it out at room temperature for more than two hours, as this can lead to bacterial growth and spoilage.
For longer storage, fried chicken can also be frozen. Once cooled, wrap individual pieces tightly in plastic wrap, then place them in a freezer-safe bag or airtight container. This method helps to prevent freezer burn. Frozen fried chicken can be stored for up to 2-3 months. When you’re ready to enjoy it, thaw the chicken in the refrigerator overnight before reheating.
Reheating fried chicken to maintain its crispiness can be a challenge, but with the right methods, it’s absolutely achievable. The best way to reheat fried chicken is in the oven or an air fryer. Avoid the microwave, as it will inevitably make the chicken soggy and rubbery, ruining that delightful crispy crust you worked so hard to achieve.
To reheat in the oven:
- Preheat your oven to 375°F (190°C).
- Place the cold fried chicken pieces on a wire rack set over a baking sheet. This allows air to circulate around the chicken, helping the skin crisp up.
- Heat for 15-20 minutes, or until the chicken is heated through and the skin is crispy again. For frozen chicken, it may take 25-30 minutes. Always check the internal temperature to ensure it reaches at least 165°F (74°C).
To reheat in an air fryer:
- Preheat your air fryer to 350°F (175°C).
- Place the fried chicken pieces in a single layer in the air fryer basket, ensuring not to overcrowd it. Work in batches if necessary.
- Heat for 8-12 minutes, flipping halfway through, until the chicken is hot and crispy. Frozen chicken might require a few extra minutes. Again, verify the internal temperature.
Both methods will bring your fried chicken back to a delicious, crispy state, making your leftovers just as enjoyable as the fresh batch.
Frequently Asked Questions
What kind of oil is best for frying chicken?
For best results, use a neutral-flavored oil with a high smoke point. Vegetable oil, canola oil, and peanut oil are all excellent choices. Peanut oil is particularly favored by many for its ability to fry at high temperatures without breaking down and imparting a clean flavor. Avoid olive oil or butter, as they have lower smoke points and will burn easily.
How do I know when the chicken is fully cooked?
The most reliable way to determine if your fried chicken is fully cooked is by using a meat thermometer. Insert the thermometer into the thickest part of the chicken, avoiding the bone. The internal temperature should reach 165°F (74°C). Visually, the chicken should be golden brown and the juices should run clear when pierced.
Can I make this recipe in an air fryer instead of deep frying?
While you can make fried chicken in an air fryer, the texture and flavor will not be identical to true deep-fried chicken. An air fryer will produce a crispy result, but it won’t have the same rich, deep-fried crunch and juicy interior. If using an air fryer, preheat to 375°F (190°C), lightly spray the dredged chicken with oil, and cook for 25-30 minutes, flipping halfway, until golden and cooked through. You may need to adjust cooking times based on the size of your chicken pieces and your specific air fryer model.
Can I prepare the chicken ahead of time?
Yes, you can prepare certain components ahead of time. The chicken can be marinated in the buttermilk mixture for up to 24 hours in the refrigerator. The seasoned flour dredge can also be mixed and stored in an airtight container at room temperature for several weeks. However, it is best to dredge the chicken just before frying and allow it to rest for at least 15-30 minutes before cooking for the crispiest results.


