
Introduction
Get ready to whisk yourself away to a tropical paradise with every bite of this incredible Pineapple Coconut Dream Cake! This layered dessert is a symphony of flavors and textures, combining the bright, tangy sweetness of pineapple with the creamy, aromatic allure of coconut. It’s a treat that feels both decadent and refreshingly light, making it an absolute showstopper for any gathering, a perfect ending to a summer barbecue, or simply a delightful indulgence on a warm afternoon. Forget complicated baking – this dream cake is designed to be approachable yet impressive, delivering maximum flavor with minimal fuss.
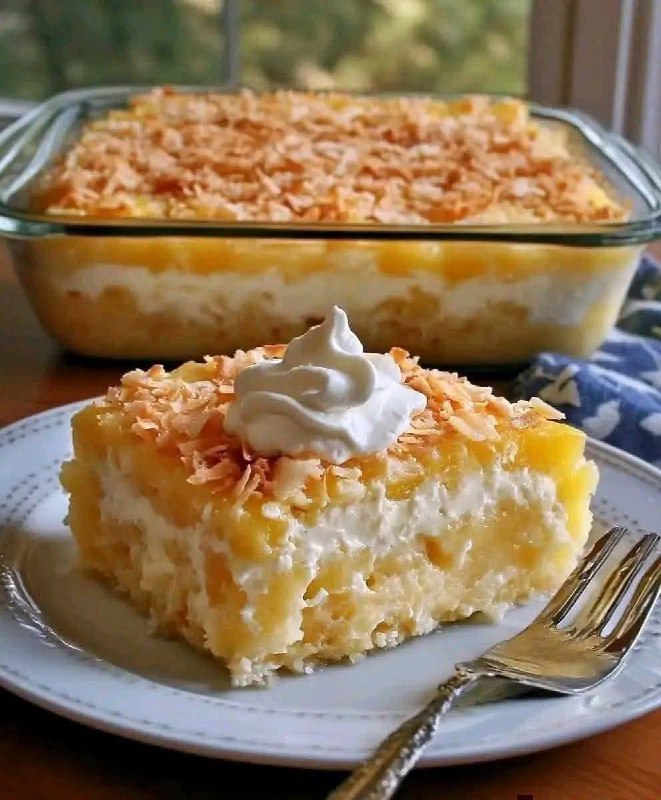
What makes this Pineapple Coconut Dream Cake so special is its harmonious blend of tropical notes, evoking images of sun-drenched beaches and swaying palm trees. The star ingredients, pineapple and coconut, are expertly layered with a luscious, creamy base and often a tender cake or crust, culminating in a dessert that’s both comforting and exotic. The beautiful golden toasted coconut flakes sprinkled generously on top not only add a delightful crunch but also a visual flourish that promises a taste of the tropics. It’s the kind of dessert that elicits gasps of delight when presented and murmurs of contentment with every spoonful.
Whether you’re a seasoned baker or a kitchen novice, you’ll find joy in creating this Pineapple Coconut Dream Cake. It’s a fantastic recipe to have in your repertoire, especially for those moments when you need a dessert that feels special without demanding hours of intricate work. The chilling time is perhaps the “hardest” part, but it’s essential for allowing all those wonderful flavors to meld and the cake to set into its dreamy, sliceable form. Prepare to fall in love with this tropical delight – it truly is a dream come true!
Nutritional Information
Per serving (approximate values):
- Calories: 420
- Protein: 5g
- Carbohydrates: 55g
- Fat: 20g
- Fiber: 3g
- Sodium: 280mg
Ingredients
- 1 (20-ounce) can crushed pineapple in juice, undrained
- 1 (14-ounce) can sweetened condensed milk
- 1 (8-ounce) package cream cheese, softened
- 1 (3.4-ounce) package instant vanilla pudding mix
- 1 cup cold milk (whole or 2%)
- 1 (8-ounce) container frozen whipped topping, thawed (like Cool Whip)
- 1 teaspoon coconut extract (optional, but highly recommended)
- 1 (13.29-ounce) package shortbread cookies or graham crackers, finely crushed (about 2 ½ cups crumbs)
- ½ cup unsalted butter, melted
- 1 ½ cups sweetened shredded coconut, divided
- ½ cup chopped pecans or macadamia nuts, toasted (optional)
- Fresh pineapple wedges or maraschino cherries, for garnish (optional)
Instructions
- Prepare the Crust: In a medium bowl, combine the finely crushed shortbread cookies or graham cracker crumbs with the melted butter. Mix until well combined and the crumbs are moistened. Press the mixture firmly and evenly into the bottom of a 9×13-inch baking dish. Use the back of a spoon or your fingers to ensure a compact and level crust. Place the baking dish in the refrigerator to chill while you prepare the filling.
- Toast the Coconut (if using): Preheat your oven to 325°F (160°C). Spread 1 cup of the sweetened shredded coconut evenly on a baking sheet. Bake for 5-8 minutes, stirring occasionally, until the coconut is golden brown and fragrant. Watch it carefully as coconut can burn quickly. Remove from oven and let cool completely. This toasted coconut will be used for topping.
- Prepare the Pineapple Layer: In a large mixing bowl, combine the undrained crushed pineapple with the sweetened condensed milk. Stir well to ensure the two ingredients are thoroughly mixed. Set this tropical mixture aside.
- Make the Cream Cheese Pudding Layer: In a separate large mixing bowl, using an electric mixer on medium speed, beat the softened cream cheese until smooth and creamy, about 2-3 minutes. Scrape down the sides of the bowl as needed.
- Add Pudding and Milk: To the cream cheese, add the instant vanilla pudding mix and the cold milk. Beat on low speed until just combined, then increase to medium speed and beat for 2-3 minutes until the mixture is thick and smooth.
- Fold in Whipped Topping and Extract: Gently fold in half of the thawed whipped topping (about 4 ounces) into the cream cheese pudding mixture until no streaks remain. If using, fold in the coconut extract at this stage. Be careful not to overmix, as this can deflate the whipped topping.
- Assemble the First Layer: Retrieve the chilled crust from the refrigerator. Evenly spread the entire cream cheese pudding mixture over the prepared crust. Use an offset spatula or the back of a spoon to create a smooth, level layer.
- Add the Pineapple Layer: Carefully spoon the pineapple and sweetened condensed milk mixture over the cream cheese pudding layer. Spread it gently and evenly across the entire surface, being mindful not to disturb the layer beneath too much.
- Top with Remaining Whipped Topping: Gently spread the remaining half of the thawed whipped topping over the pineapple layer. Again, be gentle to keep the layers distinct.
- Garnish and Chill: Sprinkle the cooled toasted coconut evenly over the top of the cake. If desired, sprinkle with toasted pecans or macadamia nuts. Cover the baking dish tightly with plastic wrap.
- Chill Thoroughly: Refrigerate the Pineapple Coconut Dream Cake for at least 4 hours, or preferably overnight. This chilling time is crucial for the cake to set properly, for the flavors to meld, and for the crust to soften slightly.
- Serve: Once thoroughly chilled, slice the cake into squares and serve. Garnish with fresh pineapple wedges or maraschino cherries if desired. Enjoy your tropical dream!
Cooking Tips and Variations
Perfecting Your Crust: For an extra buttery and firm crust, you can briefly bake the crust (after pressing it into the pan) at 350°F (175°C) for 8-10 minutes before chilling. Let it cool completely before adding the filling. If you want a gluten-free option, use gluten-free shortbread cookies or graham crackers for the crust.
Toasting Coconut Like a Pro: When toasting coconut, watch it like a hawk! It can go from perfectly golden to burnt in seconds. Besides the oven, you can also toast coconut in a dry skillet over medium-low heat, stirring constantly. This method offers more control but requires constant attention. The golden color and nutty aroma are your cues.
Draining Pineapple: While the recipe calls for undrained crushed pineapple, if you prefer a slightly less “wet” pineapple layer, you can gently drain about half of the juice from the can before mixing it with the condensed milk. Don’t over-drain, as some moisture is needed for flavor and texture.
Cream Cheese Temperature: Ensure your cream cheese is truly at room temperature before beating it. This prevents lumps and ensures a smooth, creamy texture in your filling. If it’s too cold, it won’t incorporate properly.
Whipped Topping vs. Homemade Whipped Cream: While thawed whipped topping (like Cool Whip) is convenient and very stable, you can absolutely use homemade whipped cream. If doing so, stabilize it with a teaspoon of cornstarch or a packet of whipped cream stabilizer per 2 cups of heavy cream to prevent it from weeping or deflating over time. Beat 2 cups of cold heavy cream with ½ cup powdered sugar and 1 teaspoon vanilla extract until stiff peaks form.
Flavor Boosters: The coconut extract is highly recommended as it intensifies the tropical coconut flavor. For an extra layer of flavor, consider adding a pinch of ground ginger or a tiny amount of lime zest to the cream cheese layer. A splash of rum extract could also add a fun, adult twist.
Nutty Additions: Toasted pecans or macadamia nuts add a wonderful crunch and depth of flavor. You can mix them into the crust, sprinkle them over the top with the toasted coconut, or even fold a small amount into the pineapple layer for added texture.
Layering Technique: When spreading the layers, especially the pineapple over the cream cheese, use a gentle hand and an offset spatula. Start spreading from the center outwards to minimize disturbance to the layer underneath. Don’t worry if it’s not perfectly pristine; the flavors will still be incredible.
Individual Servings: For a fancy presentation, you can make individual Pineapple Coconut Dream Cups. Layer the crust, cream cheese mixture, pineapple mixture, and whipped topping in small dessert cups or mason jars. Adjust chilling time as needed.
Storage and Reheating
Storage: The Pineapple Coconut Dream Cake should always be stored in the refrigerator. Cover the baking dish tightly with plastic wrap or transfer individual slices to an airtight container. When properly stored, the cake will remain fresh and delicious for 3-5 days. The flavors tend to deepen and meld beautifully over time, making it almost better on the second day!
Freezing: This cake can be frozen, though the texture of the whipped topping and cream cheese layer might change slightly upon thawing. To freeze, ensure the cake is completely set and chilled. Wrap the entire cake (or individual slices) tightly in several layers of plastic wrap, then an additional layer of aluminum foil. Freeze for up to 1 month. Thaw overnight in the refrigerator before serving. The crust may become a bit softer after freezing and thawing, but the flavors will still be delightful.
Reheating: This is a no-bake, chilled dessert, so reheating is not necessary or recommended. It is best enjoyed cold, straight from the refrigerator. Reheating would melt the delicate layers and ruin the texture.
Frequently Asked Questions
Can I use fresh pineapple instead of canned?
Yes, you absolutely can use fresh pineapple! For best results, finely chop about 2 cups of fresh pineapple. You will likely want to cook it down slightly in a saucepan with a tablespoon or two of sugar until some of its liquid releases and it softens a bit, then cool it completely before mixing with the sweetened condensed milk. This helps to break down the enzymes that can sometimes curdle dairy and also enhances its sweetness. Ensure it’s very well-drained after cooking to prevent a soggy cake layer.
Why did my cream cheese layer turn out lumpy?
Lumpy cream cheese is almost always due to the cream cheese not being softened enough. It’s crucial for the cream cheese to be at true room temperature before you start beating it. If it’s too cold, it won’t blend smoothly with the other ingredients, resulting in a lumpy texture. To speed up softening, you can unwrap the cream cheese and microwave it on low power (e.g., 50% power) for 15-30 seconds, checking frequently, until just soft but not melted.
How far in advance can I make this cake?
This Pineapple Coconut Dream Cake is an excellent make-ahead dessert! You can prepare it up to 24-48 hours in advance. In fact, making it a day ahead allows all the flavors to meld beautifully and the layers to set perfectly, resulting in an even more delicious and cohesive cake. Just make sure to keep it tightly covered in the refrigerator until serving.
Can I make this a gluten-free dessert?
Absolutely! To make this Pineapple Coconut Dream Cake gluten-free, simply substitute the regular shortbread cookies or graham crackers with a gluten-free variety for the crust. All other ingredients in the recipe are typically gluten-free, but always double-check the labels on your pudding mix and whipped topping to ensure they meet your dietary needs.


