
Introduction
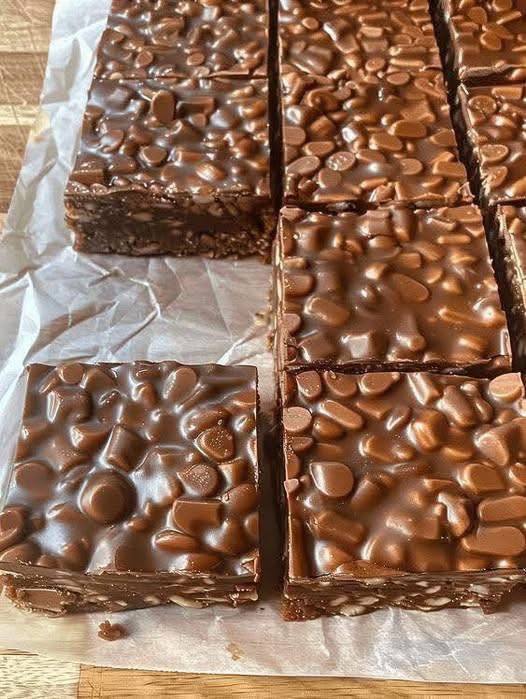
Craving a quick and satisfying treat that hits all the right notes? Look no further than these irresistible No-Bake Chocolate Peanut Butter Crunch Bars! Imagine a decadent base of creamy peanut butter, perfectly sweetened and mingled with crispy rice cereal, all topped with a generous layer of rich, smooth chocolate. These bars are the ultimate indulgence for anyone who loves the classic combination of chocolate and peanut butter, but without the fuss of baking. They’re a true crowd-pleaser, delivering a delightful texture contrast of crunchy, chewy, and melt-in-your-mouth goodness in every single bite.
What makes these bars truly special is their incredible ease of preparation. As the name suggests, there’s absolutely no oven time required, making them perfect for busy schedules, hot summer days, or when you just need a dessert in a flash. From start to finish, you can have a batch of these glorious treats chilling in your fridge in under 30 minutes, ready to be devoured. They’re a fantastic option for impromptu gatherings, lunchbox treats, or simply satisfying that sudden sweet craving. The simple steps and minimal equipment needed mean even novice cooks can achieve dessert perfection with confidence.
Beyond their convenience, these No-Bake Chocolate Peanut Butter Crunch Bars offer a symphony of flavors and textures that are hard to resist. The salty-sweet balance of the peanut butter base provides a wonderful foundation, while the crisp rice cereal adds that essential, addictive crunch. Then comes the luxurious chocolate topping, sealing the deal with its smooth, bittersweet embrace. Each component plays a crucial role in creating a harmonious and utterly delicious experience. Get ready to impress your taste buds and everyone around you with this effortlessly amazing dessert!
Nutritional Information
Per serving (approximate values):
- Calories: 320
- Protein: 8g
- Carbohydrates: 35g
- Fat: 18g
- Fiber: 3g
- Sodium: 180mg
Ingredients
- 1 cup (250g) creamy peanut butter (natural or regular, avoid oil-separated varieties for best results)
- 1/2 cup (113g) unsalted butter, melted
- 1 cup (200g) powdered sugar (confectioners’ sugar)
- 1 teaspoon vanilla extract
- 3 cups (75g) crisp rice cereal
- 1 1/2 cups (255g) semi-sweet chocolate chips (or milk chocolate chips for a sweeter topping)
- 1/2 cup (120g) creamy peanut butter (for the chocolate topping)
- 2 tablespoons (28g) unsalted butter (for the chocolate topping)
- 1/4 teaspoon sea salt (optional, for sprinkling)
Instructions
- Prepare Your Pan: Line an 8×8 inch (20×20 cm) square baking pan with parchment paper, leaving an overhang on two sides to easily lift the bars out later. This is a crucial step for clean removal and cutting.
- Melt the Base Ingredients: In a large microwave-safe bowl, combine the 1 cup of creamy peanut butter and 1/2 cup of melted butter. Microwave on high for 30-60 seconds, stirring halfway through, until smooth and well combined. Alternatively, use a double boiler on the stovetop over low heat.
- Mix the Base: Remove the bowl from the microwave (or stovetop). Add the powdered sugar and vanilla extract to the peanut butter mixture. Stir vigorously until everything is thoroughly combined and smooth.
- Add the Cereal: Gently fold in the crisp rice cereal until it is evenly coated with the peanut butter mixture. Be careful not to crush the cereal too much, as you want to maintain its crunch.
- Press into Pan: Transfer the peanut butter cereal mixture into the prepared 8×8 inch pan. Using the back of a spoon, a spatula, or your hands (lightly greased if sticking), press the mixture down firmly and evenly into the bottom of the pan. Make sure it’s packed tightly to ensure the bars hold together well. Set aside.
- Prepare the Chocolate Topping: In another microwave-safe bowl, combine the 1 1/2 cups of chocolate chips, 1/2 cup of creamy peanut butter, and 2 tablespoons of unsalted butter.
- Melt the Topping: Microwave on high for 1-2 minutes, stirring every 30 seconds, until the chocolate is completely melted and the mixture is smooth and glossy. Be careful not to overheat, as chocolate can seize. Alternatively, melt using a double boiler over low heat, stirring constantly.
- Pour the Topping: Pour the melted chocolate mixture evenly over the pressed peanut butter base in the pan. Use an offset spatula or the back of a spoon to spread it to the edges, creating a smooth, even layer.
- Chill to Set: Place the pan in the refrigerator for at least 1-2 hours, or until the chocolate topping is completely firm and set. For faster setting, you can place it in the freezer for about 30-45 minutes.
- Cut and Serve: Once fully chilled and firm, use the parchment paper overhangs to carefully lift the entire slab of bars out of the pan and place it on a cutting board. For clean cuts, use a large, sharp knife. You can run the knife under hot water and wipe it dry between cuts for even smoother edges. Cut into 16 squares (4×4) or 20-24 smaller rectangles, depending on your desired serving size. If desired, sprinkle with a pinch of sea salt before the chocolate fully sets for an extra flavor boost.
Cooking Tips and Variations
Tips for Best Results:
- Quality Ingredients Matter: While these bars are simple, using good quality peanut butter and chocolate will significantly impact the final flavor. Opt for a creamy peanut butter that’s not overly oily or dry.
- Firm Pressing is Key: When pressing the peanut butter base into the pan, make sure it’s packed down very firmly. This prevents the bars from crumbling when cut and ensures a sturdy base.
- Don’t Overheat Chocolate: When melting the chocolate topping, go slowly and stir frequently. Overheated chocolate can become grainy or seize, making it difficult to spread smoothly. If it seems too thick, you can add a tiny bit more melted butter or a neutral oil (like coconut oil) to thin it out, a teaspoon at a time.
- Warm Knife for Clean Cuts: For perfectly neat squares, run your knife under hot water, wipe it dry, and then make your cuts. Repeat this process for each cut. This helps the knife glide through the cold chocolate without cracking it.
- Chill Thoroughly: Patience is a virtue here! Ensure the bars are fully chilled and firm before attempting to cut them. Cutting too soon will result in a messy, crumbly outcome.
- Salt is Your Friend: A tiny sprinkle of flaky sea salt over the chocolate topping just before it sets can elevate the flavors, balancing the sweetness and enhancing the chocolate and peanut butter notes.
Recipe Variations:
- Chocolate Choice: Experiment with different types of chocolate for the topping. Dark chocolate chips will yield a richer, less sweet bar, while milk chocolate chips will make it sweeter and creamier. You could even use white chocolate for a different aesthetic and flavor profile.
- Nut Butter Alternatives: If you have a peanut allergy or simply want to try something new, almond butter or cashew butter can be substituted for peanut butter in both the base and the topping. Ensure they are creamy and not overly oily.
- Add-Ins to the Base: For extra texture and flavor, consider folding in a handful of mini chocolate chips, chopped roasted peanuts, or even a tablespoon of shredded coconut into the peanut butter cereal base.
- Topping Embellishments: Before the chocolate topping sets, get creative! Sprinkle with chopped peanuts, mini M&Ms, sprinkles, a drizzle of melted white chocolate, or more crisp rice cereal for a decorative touch.
- Spice It Up: A pinch of cinnamon or a tiny dash of cayenne pepper (for a “mexican hot chocolate” vibe) can be added to the chocolate topping for an unexpected twist.
- Gluten-Free Option: Ensure your crisp rice cereal is certified gluten-free if you need to accommodate dietary restrictions. Most major brands offer gluten-free versions.
Storage and Reheating
These No-Bake Chocolate Peanut Butter Crunch Bars are incredibly easy to store and maintain their deliciousness for several days, making them perfect for meal prepping your sweet cravings! Reheating is generally not necessary or recommended, as they are best enjoyed chilled.
- Airtight Container: Once cut, arrange the bars in a single layer in an airtight container. If you need to stack them, place a piece of parchment paper or wax paper between layers to prevent them from sticking together.
- Refrigeration: Store the airtight container of bars in the refrigerator. This is the optimal way to keep them fresh, firm, and prevent the chocolate from melting or softening. They will maintain their best texture and flavor for up to 1 week.
- Freezing for Longer Storage: For longer storage, these bars freeze beautifully. Place the cut bars in a single layer on a baking sheet and freeze until solid (about 1-2 hours). Once solid, transfer them to a freezer-safe airtight container or freezer bag, again separating layers with parchment paper. They can be stored in the freezer for up to 2-3 months.
- Thawing Frozen Bars: When you’re ready to enjoy a frozen bar, simply take it out of the freezer and let it thaw at room temperature for about 10-15 minutes, or in the refrigerator for 30 minutes. They will still retain their delicious crunch and flavor.
- Room Temperature: While they are fine to sit out at room temperature for a party or serving for an hour or two, prolonged exposure to warmth will cause the chocolate topping to soften and potentially melt, making them messy and less firm. It’s always best to keep them chilled.
Frequently Asked Questions
Can I use natural peanut butter for this recipe?
Yes, you can use natural creamy peanut butter, but be aware that some natural brands can be very oily or very dry. For the best results in the base, choose a natural peanut butter that is well-stirred and not too separated. If it’s very runny, you might need to add a touch more powdered sugar to the base mixture to achieve the right consistency. For the chocolate topping, a slightly thicker natural peanut butter can work well, but ensure it melts smoothly with the chocolate and butter.
My chocolate topping seized and became grainy. What went wrong?
Chocolate seizing usually happens when it’s overheated or comes into contact with even a tiny amount of water. When melting chocolate, always use a clean, dry bowl and spatula. If using a microwave, melt in short bursts (30 seconds) and stir well between each, even if it doesn’t look fully melted. The residual heat will continue to melt the chocolate. If using a double boiler, ensure the bottom of the bowl does not touch the simmering water, and no steam or water gets into the chocolate. If your chocolate does seize, you can sometimes rescue it by stirring in a teaspoon or two of hot, neutral oil (like vegetable or coconut oil) or melted butter, but it may not be as smooth as intended.
How far in advance can I make these bars?
These No-Bake Chocolate Peanut Butter Crunch Bars are a fantastic make-ahead dessert! You can prepare them up to 3-4 days in advance and store them in an airtight container in the refrigerator. They actually improve slightly in flavor as the ingredients meld together, and staying in the fridge ensures they remain perfectly firm and ready to eat. For longer storage, you can freeze them for up to 2-3 months, as detailed in the storage instructions.


