
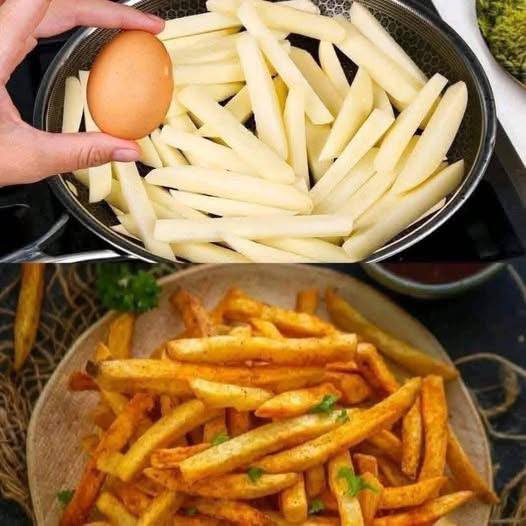
Crispy Homemade French Fries with Egg
Who doesn’t love a plate of perfectly golden, irresistibly crispy French fries? While store-bought frozen fries can satisfy a craving, nothing quite compares to the fresh, wholesome goodness of homemade. But what if we told you there’s a secret ingredient that can elevate your homemade fries from good to absolutely legendary, adding an extra layer of crispiness and a subtle richness you won’t find anywhere else? Enter the humble egg – our unexpected culinary hero in this recipe for Crispy Homemade French Fries with Egg.
This isn’t just another French fry recipe; it’s a game-changer. We’re taking the classic double-fry technique, beloved by chefs for its ability to create that magical crispy exterior and fluffy interior, and introducing an egg wash step that transforms the texture and flavor profile. The egg creates a delicate, almost tempura-like coating that locks in moisture and ensures an unparalleled crunch with every bite, making these fries truly stand out. Forget soggy, bland fries – prepare for a symphony of textures and flavors that will make these your new go-to side dish or snack.
Making fries from scratch might seem daunting, but with our detailed guide, you’ll master the art of the perfect fry in no time. We’ll walk you through everything from selecting the right potato to the crucial double-fry process, ensuring your kitchen becomes a haven for the most delicious, restaurant-quality fries you’ve ever tasted. Get ready to impress your family and friends with a batch of fries so good, they’ll demand the secret!
Nutritional Information
Per serving (approximate values):
- Calories: 350
- Protein: 5g
- Carbohydrates: 40g
- Fat: 20g
- Fiber: 4g
- Sodium: 250mg
Ingredients
- 4 large Russet potatoes (about 2-2.5 lbs)
- 1 large egg
- 1 tablespoon cold water
- 6-8 cups high smoke point oil (such as peanut, canola, or vegetable oil) for frying
- 1 teaspoon fine sea salt, or to taste
- 1/2 teaspoon black pepper, or to taste
- Optional: 1/2 teaspoon garlic powder
- Optional: 1/4 teaspoon paprika
- Optional: Fresh parsley, chopped, for garnish
Instructions
- Prepare the Potatoes: Wash the potatoes thoroughly. You can peel them or leave the skin on for a more rustic feel; the choice is yours. Using a sharp knife or a mandoline, cut the potatoes lengthwise into 1/4 to 1/2-inch thick sticks. Aim for uniform size to ensure even cooking.
- Soak the Potatoes: Place the cut potato sticks into a large bowl and cover them completely with cold water. Let them soak for at least 30 minutes, or up to several hours in the refrigerator. This step is crucial as it removes excess starch, which prevents the fries from sticking together and helps achieve that desirable crispiness. Change the water once or twice if soaking for an extended period.
- Dry the Potatoes: After soaking, drain the potatoes thoroughly. Spread them out in a single layer on clean kitchen towels or paper towels. Pat them completely dry. This step is vital; any residual water can cause the hot oil to splatter dangerously and will prevent the fries from crisping properly.
- First Fry (Blanching): Pour the frying oil into a large heavy-bottomed pot or Dutch oven, ensuring it’s no more than halfway full to prevent overflow. Heat the oil over medium-high heat to 300°F (150°C). Use a candy thermometer or deep-fry thermometer to monitor the temperature accurately.
- Carefully add a single layer of dried potato sticks to the hot oil, ensuring not to overcrowd the pot. Overcrowding will lower the oil temperature too much, resulting in soggy fries. Fry the potatoes for 5-7 minutes, or until they are soft, slightly translucent, and cooked through but not yet browned. This is the blanching step, which cooks the inside of the potato.
- Using a slotted spoon or spider, remove the blanched fries from the oil and transfer them to a wire rack set over a baking sheet to drain excess oil. Allow them to cool completely, at least 15-20 minutes. You can even refrigerate them for an hour or more at this stage, which can further improve crispiness.
- Prepare the Egg Wash: While the blanched fries are cooling, crack the egg into a medium-sized bowl. Add 1 tablespoon of cold water and whisk thoroughly until the egg and water are well combined.
- Coat with Egg Wash: Once the blanched fries are cool, gently transfer them to the bowl with the egg wash. Toss them very carefully to ensure each fry is lightly coated with the egg mixture. You want a thin, even layer, not globs of egg. The egg wash should just barely coat the fries.
- Second Fry (Crisping): Increase the oil temperature to 375°F (190°C). This higher temperature is what will create the crispy, golden-brown exterior.
- Working in batches, carefully add the egg-coated fries to the hot oil. Fry for 3-5 minutes, stirring occasionally, until the fries are beautifully golden brown and incredibly crispy. The egg wash will create a fantastic crust.
- Season and Serve: Once crispy, remove the fries from the oil with a slotted spoon and transfer them back to the wire rack set over the baking sheet to drain any excess oil. Immediately sprinkle generously with salt, pepper, garlic powder, and paprika (if using). Toss gently to distribute the seasoning evenly.
- Serve your Crispy Homemade French Fries with Egg hot, garnished with fresh chopped parsley if desired, and with your favorite dipping sauces.
Cooking Tips and Variations
To truly master the art of these crispy homemade French fries, attention to detail and a few clever tricks can make all the difference. The type of potato you choose is paramount. Russet potatoes, with their high starch content and low moisture, are the undisputed champions for frying. Their texture breaks down beautifully during the first fry, creating that fluffy interior, while their dry nature allows for an incredibly crispy exterior during the second fry. Avoid waxy potatoes like red or new potatoes, as they tend to be too moist and will result in soggy fries.
Maintaining the oil temperature is not just a tip; it’s a golden rule for perfect fries. Investing in a good deep-fry thermometer is highly recommended. If the oil is too cold, the fries will absorb too much oil and become greasy and limp. If it’s too hot, the outsides will burn before the insides are cooked through. The two-stage frying process with specific temperatures (300°F for the first fry, 375°F for the second) is non-negotiable for achieving that ideal crispy-on-the-outside, fluffy-on-the-inside texture. Don’t be tempted to skip the cooling period between fries; it allows the internal moisture to redistribute and ensures a better texture.
When it comes to the egg wash, less is more. You want a very thin, almost imperceptible coating on each fry. If your egg wash seems too thick, you can add another teaspoon of cold water to thin it out slightly. The goal is to provide a delicate barrier that crisps up beautifully, not a thick batter. Make sure to toss the blanched fries gently in the egg wash to avoid breaking them. Also, don’t let the fries sit in the egg wash for too long before the second fry, as they can become soggy.
For variations, consider experimenting with different seasonings. Beyond the classic salt and pepper, a dash of smoked paprika can add a wonderful depth of flavor. Cajun seasoning, Old Bay seasoning, or even a sprinkle of finely grated Parmesan cheese immediately after frying can transform your fries. For a spicy kick, add a pinch of cayenne pepper or chili powder to your seasoning mix. Another delightful variation is to add a small amount of garlic powder or onion powder to the egg wash itself for a subtle aromatic boost. You could also try making sweet potato fries using this method; however, adjust the frying times as sweet potatoes cook differently and tend to brown faster due to their sugar content.
Serving these fries immediately is crucial for optimal enjoyment. Their crispiness is at its peak right out of the fryer. While they are delicious on their own, consider pairing them with a variety of dipping sauces. Classic ketchup is always a winner, but don’t shy away from homemade aioli, a spicy sriracha mayo, a tangy ranch dressing, or even a simple malt vinegar for that authentic British fish and chips vibe. For a more gourmet touch, a truffle aioli or a roasted garlic dip would be exceptional. You can also serve them as a hearty side to burgers, sandwiches, or grilled meats, or even as a standalone appetizer for a casual gathering.
Storage and Reheating
While French fries are undeniably best enjoyed fresh out of the fryer, sometimes you might have leftovers. Storing and reheating them properly can help preserve some of their deliciousness, though they will likely never be as crispy as when they were first made.
To store leftover French fries, allow them to cool completely to room temperature. This is important to prevent condensation, which can make them even soggier. Once cool, transfer them to an airtight container or a resealable plastic bag. Store them in the refrigerator for up to 3-4 days. Avoid storing them uncovered, as this will lead to them drying out.
Reheating French fries effectively is key to bringing back some of their crispiness. The microwave is generally not recommended, as it tends to make them soft and rubbery. The best methods involve dry heat:
- Oven Reheating: Preheat your oven to 400°F (200°C). Spread the leftover fries in a single layer on a baking sheet. For best results, place them on a wire rack set over a baking sheet to allow air circulation. Heat for 5-10 minutes, flipping halfway through, until they are hot and have regained some of their crispiness. Keep a close eye on them to prevent burning.
- Air Fryer Reheating: This is arguably the best method for reheating fries. Preheat your air fryer to 350-375°F (175-190°C). Place the fries in a single layer in the air fryer basket (you may need to do this in batches). Air fry for 3-6 minutes, shaking the basket once or twice, until they are hot and crispy. The air fryer does an excellent job of circulating hot air, mimicking the deep-frying effect.
- Toaster Oven Reheating: Similar to a regular oven, a toaster oven can also work well for smaller batches. Preheat to 400°F (200°C) and toast for 5-8 minutes, checking frequently.
- Stovetop Reheating: You can also reheat fries in a skillet on the stovetop. Heat a small amount of oil (about 1-2 teaspoons) in a non-stick skillet over medium-high heat. Add the fries in a single layer and cook for 3-5 minutes, tossing frequently, until hot and crispy. This method can give them a nice, even crisp.
No matter the reheating method, season them lightly with a pinch of fresh salt if needed after reheating, as some of the original seasoning might have diminished.
Frequently Asked Questions
Why do I need to soak the potatoes in cold water?
Soaking potatoes in cold water is a crucial step that removes excess starch from the surface of the potato. This starch, if left on, can cause the fries to stick together during frying and can also lead to a gummy texture rather than a crispy one. By removing it, you ensure a cleaner, crispier, and more evenly cooked fry with a beautiful golden-brown color.
Can I use a different type of potato besides Russet?
While Russet potatoes are highly recommended for their high starch and low moisture content, which is ideal for crispy fries, you can experiment with other varieties. Yukon Gold potatoes can also yield good results, offering a slightly creamier interior. However, avoid waxy potatoes like red or new potatoes, as their higher moisture content and lower starch will likely result in softer, less crispy fries that are prone to becoming soggy.
Is the egg wash absolutely necessary, or can I skip it?
The egg wash is the “secret ingredient” that makes these fries special, contributing to an extra layer of crispiness and a subtle richness that sets them apart from traditional homemade fries. While you can certainly make delicious homemade fries without it, the egg wash creates a delicate, almost tempura-like coating that enhances the texture and helps lock in moisture, resulting in an exceptionally crispy exterior. We highly recommend trying it at least once to experience the unique difference it makes.
What is the best type of oil for frying, and can I reuse it?
For deep frying, it’s best to use oils with a high smoke point and a neutral flavor, such as peanut oil, canola oil, vegetable oil, or sunflower oil. These oils can withstand high temperatures without breaking down or imparting undesirable flavors to your food. Yes, you can reuse frying oil! After frying, let the oil cool completely. Then, carefully strain it through a fine-mesh sieve lined with cheesecloth to remove any food particles. Store the strained oil in an airtight container in a cool, dark place (or even the refrigerator) for up to 3-5 uses, depending on what you fried. Discard the oil if it looks cloudy, smells rancid, or starts to foam excessively when heated.


