Introduction
Imagine a dessert so utterly smooth, so luxuriously creamy, it melts in your mouth with every bite. Now imagine achieving that divine experience without ever needing to turn on your oven. Welcome to the world of Velvety No-Bake Cheesecake! This isn’t just a dessert; it’s a revelation, offering all the rich, comforting flavor of a classic cheesecake with none of the fuss. Perfect for scorching summer days when the thought of a hot kitchen is unbearable, or for those busy weeks when you need an impressive treat that practically makes itself, this no-bake wonder delivers on its promise of velvety perfection.
What makes this cheesecake truly special is its incredible texture. Unlike baked cheesecakes that can sometimes be dense or prone to cracking, our no-bake version achieves an airy, cloud-like consistency that’s still wonderfully rich and satisfying. The “velvety” in the title isn’t just a descriptor; it’s a guarantee. Each layer, from the buttery graham cracker crust to the silken cream cheese filling and the delicate whipped topping, contributes to an unforgettable sensory experience. It’s elegant enough for a dinner party, yet simple enough for a weeknight indulgence, proving that sometimes, the best things in life are indeed the easiest.
You’ll fall in love with the sheer convenience and delightful taste of this recipe. It’s a make-ahead marvel, allowing you to prepare it hours, or even a day, in advance, freeing you up to enjoy your guests or simply relax. The simple ingredients combine to create a sophisticated flavor profile that appeals to everyone, from cheesecake connoisseurs to those new to the dessert. Get ready to impress yourself and your loved ones with a dessert that looks stunning, tastes incredible, and requires minimal effort – the ultimate win-win in the world of sweet treats.
Nutritional Information
Per serving (approximate values):
- Calories: 420
- Protein: 7g
- Carbohydrates: 38g
- Fat: 28g
- Fiber: 1g
- Sodium: 250mg
Ingredients
- For the Crust:
- 1 ½ cups (about 10-12 full sheets) graham cracker crumbs
- ¼ cup granulated sugar
- ½ cup (1 stick) unsalted butter, melted
- For the Velvety Cheesecake Filling:
- 2 (8-ounce) blocks cream cheese, softened to room temperature
- 1 cup granulated sugar
- 1 teaspoon pure vanilla extract
- ¼ cup fresh lemon juice (optional, for a brighter flavor)
- 1 ½ cups heavy cream, very cold
- For the Whipped Topping and Garnish:
- 1 cup heavy cream, very cold
- ¼ cup powdered sugar
- ½ teaspoon pure vanilla extract
Instructions
- Begin by preparing the crust. In a medium bowl, combine the graham cracker crumbs and ¼ cup granulated sugar. Pour in the ½ cup of melted butter and stir with a fork until the crumbs are evenly moistened and resemble wet sand.
- Press the crumb mixture firmly and evenly into the bottom of an 8×8 inch square baking dish or a 9-inch springform pan. Use the bottom of a flat glass or a measuring cup to help compact the crust, creating a solid base. Place the prepared crust in the refrigerator to chill while you prepare the filling, allowing it to firm up.
- Next, prepare the velvety cheesecake filling. In a large bowl, using an electric mixer on medium speed, beat the softened cream cheese until it is completely smooth and creamy, about 2-3 minutes. Make sure there are no lumps.
- Add 1 cup of granulated sugar, 1 teaspoon of vanilla extract, and the optional ¼ cup of lemon juice to the cream cheese. Continue beating on medium speed until well combined and smooth, scraping down the sides of the bowl as needed.
- In a separate, very cold bowl (preferably chilled in the freezer for 10-15 minutes), whip the 1 ½ cups of very cold heavy cream using an electric mixer on high speed. Beat until stiff peaks form. Be careful not to overbeat, as it can turn granular.
- Gently fold about one-third of the whipped cream into the cream cheese mixture using a rubber spatula. This will lighten the cream cheese base. Once incorporated, gently fold in the remaining whipped cream until no streaks remain and the mixture is light and airy. Be careful not to deflate the whipped cream.
- Retrieve the chilled crust from the refrigerator. Pour the velvety cheesecake filling evenly over the prepared crust. Use an offset spatula or the back of a spoon to smooth the top.
- Cover the baking dish or springform pan loosely with plastic wrap and refrigerate for at least 6 hours, or preferably overnight, to allow the cheesecake to set completely. This chilling time is crucial for a firm, sliceable cheesecake.
- Once the cheesecake has thoroughly chilled and set, prepare the whipped topping. In another very cold bowl, combine the 1 cup of very cold heavy cream, ¼ cup of powdered sugar, and ½ teaspoon of vanilla extract.
- Whip on high speed with an electric mixer until medium-stiff peaks form. The topping should be light and fluffy.
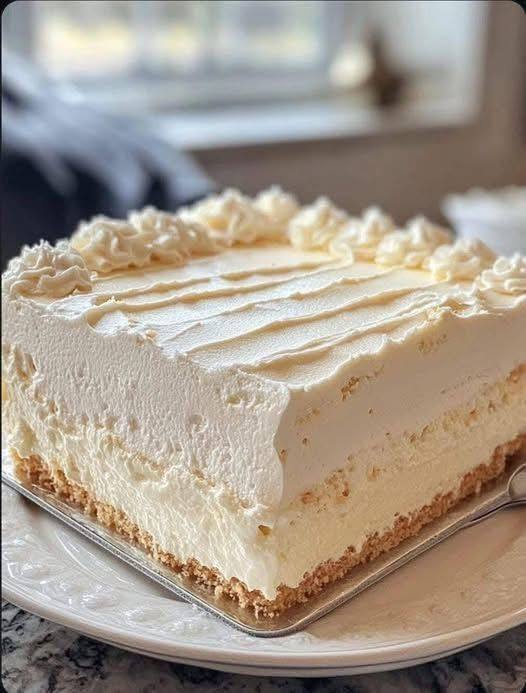
- Spread the prepared whipped topping evenly over the set cheesecake. For a decorative touch like the image, you can use an offset spatula to create gentle diagonal waves across the surface. For piped rosettes, transfer some of the whipped cream to a piping bag fitted with a star tip and pipe along the edges.
- Slice the Velvety No-Bake Cheesecake into desired portions and serve immediately. For the cleanest slices, dip a sharp knife in hot water and wipe it clean between each cut.
Cooking Tips and Variations
To achieve the perfect Velvety No-Bake Cheesecake, ensure your cream cheese is at true room temperature. This is perhaps the most critical step for a lump-free, smooth filling. If your cream cheese is cold, it will be difficult to beat smooth and can result in a grainy texture. Take it out of the refrigerator at least an hour or two before you plan to start, or if you’re short on time, unwrap it and microwave it on low power (10-15 seconds at a time) until just softened, not melted. When whipping the heavy cream, use a very cold bowl and beaters; chilling them in the freezer for 10-15 minutes beforehand can significantly speed up the whipping process and yield a more stable whipped cream. Be careful not to overmix the heavy cream for the filling, as it can separate; stop as soon as stiff peaks form. When folding the whipped cream into the cream cheese mixture, do so gently and in stages to maintain the airiness and lightness of the filling. Over-mixing at this stage will deflate the cream and lead to a denser cheesecake.
The chilling time is non-negotiable for this recipe. While 6 hours is the minimum, an overnight chill (8-12 hours) will guarantee a perfectly firm and sliceable cheesecake. Patience is key here! For easy removal and clean slices, especially if using a regular square baking dish, line the pan with parchment paper, leaving an overhang on two sides. This creates “slings” that allow you to lift the entire cheesecake out of the pan before slicing. If using a springform pan, simply unlatch the sides once set. To get those beautiful, clean slices, run a thin, sharp knife under hot water, wipe it dry, and then make your cut. Repeat this process for each slice.
This Velvety No-Bake Cheesecake is incredibly versatile, allowing for a myriad of flavor variations. For a brighter, zestier profile, incorporate 1-2 teaspoons of finely grated lemon zest (in addition to or instead of the lemon juice) into the cream cheese mixture. Orange zest or lime zest would also be delightful. For a more intense vanilla flavor, consider using vanilla bean paste instead of extract, or even scraping the seeds from half a vanilla bean into the filling. Chocolate lovers can fold in ¼ cup of mini chocolate chips or finely chopped white chocolate into the filling. For a fruity twist, swirl in ½ cup of fruit puree (like raspberry, strawberry, or mango) into the filling just before chilling, or drizzle it over individual slices when serving. A touch of almond extract (¼ teaspoon) can also add a unique depth of flavor. Experiment with different crusts too: chocolate wafer crumbs, shortbread cookie crumbs, or even crushed pretzels for a sweet and salty contrast.
Storage and Reheating
This Velvety No-Bake Cheesecake is best enjoyed chilled. Store any leftovers in an airtight container in the refrigerator for up to 3-4 days. It’s important to keep it covered tightly to prevent it from absorbing any odors from other foods in the fridge and to maintain its fresh taste and texture. If leaving it uncovered, the top layer can dry out or develop a film. While the cheesecake is best in the first few days, it remains delicious for the full storage period. There is no reheating required or recommended for this dessert, as it is designed to be served cold. Reheating would cause the creamy filling to melt and lose its structure, completely altering the desired velvety texture.
This cheesecake is also an excellent make-ahead dessert. You can prepare the entire cheesecake, including the whipped topping, up to 24 hours in advance. If you want to prepare it further in advance, you can make the crust and filling and chill it for up to 2 days, then add the fresh whipped topping just a few hours before serving. This ensures the whipped topping remains light and fluffy. For longer storage, you can freeze this no-bake cheesecake. To freeze, ensure the cheesecake is fully set and chilled. Place it uncovered in the freezer for about 1-2 hours until firm. Then, wrap it tightly in several layers of plastic wrap, followed by a layer of aluminum foil. You can store it in the freezer for up to 1 month. When ready to serve, transfer the frozen cheesecake to the refrigerator and let it thaw overnight (8-12 hours) before unwrapping and adding any fresh garnishes. The texture may be slightly different after freezing and thawing, but it will still be delicious.
Frequently Asked Questions
Can I use a different type of cookie for the crust?
Absolutely! While graham crackers are classic, you can easily substitute them with other cookies. Chocolate wafer cookies, digestive biscuits, shortbread cookies, or even vanilla wafers would make excellent crusts. Just ensure you have 1 ½ cups of finely crushed crumbs and adjust the melted butter slightly if needed; some cookies may absorb more or less butter than graham crackers.
My cheesecake filling seems too soft; what went wrong?
The most common reason for a soft no-bake cheesecake is insufficient chilling time. It truly needs at least 6 hours, but overnight (8-12 hours) is ideal for the stabilizers in the cream cheese and the whipped cream to fully set. Another factor could be over-folding the whipped cream into the cream cheese mixture, which can deflate the air and reduce its setting power. Ensure your heavy cream is whipped to stiff peaks before folding it in.
Can I make this dairy-free or gluten-free?
Yes, with some substitutions! For a gluten-free version, use gluten-free graham crackers or other gluten-free cookies for the crust. For a dairy-free version, you would need to use dairy-free cream cheese alternatives (ensure they are suitable for no-bake recipes, as some behave differently), and a dairy-free heavy cream alternative (like coconut cream, chilled overnight and scooping out the thick cream). Be aware that the texture and flavor may vary slightly from the traditional recipe.
How do I prevent my whipped topping from weeping or deflating?
To prevent weeping or deflating, ensure your heavy cream is very cold when you whip it, and avoid over-whipping. Adding powdered sugar (which contains cornstarch) helps stabilize the whipped cream. If you’re making the cheesecake far in advance, it’s best to add the whipped topping no more than a few hours before serving. For maximum stability, you can also add a tiny pinch of cream of tartar (about ⅛ teaspoon) or a teaspoon of unflavored gelatin (dissolved properly) to your heavy cream before whipping, though this is usually not necessary for short-term stability.