Introduction
Welcome to the captivating world of sourdough starter, a living, breathing culture that forms the heart and soul of incredible homemade bread and so much more! Far from being just another ingredient, sourdough starter is a magical alchemy of flour and water, teeming with wild yeasts and beneficial bacteria that transform simple dough into loaves with unparalleled flavor, texture, and a distinctive tangy aroma. It’s a testament to ancient baking traditions, a natural leavening agent that predates commercial yeast by millennia, offering a depth of taste and a healthier, more digestible product.
Why embark on the journey of creating your own sourdough starter? Beyond the inherent satisfaction of crafting something truly alive from scratch, making your own starter unlocks a universe of culinary possibilities. Imagine the pride of pulling a perfectly crusted, airy loaf of sourdough bread from your oven, knowing you nurtured the very essence that made it rise. But it’s not just for bread; this versatile culture can elevate pancakes, waffles, pizza dough, crackers, and even desserts, infusing them with a unique character that store-bought leaveners simply can’t replicate. While it requires a bit of patience and consistent care, the process is incredibly rewarding, suitable for enthusiastic beginners and seasoned bakers alike, promising a connection to your food that is both profound and delicious.
This comprehensive guide will demystify the art of creating and maintaining your own sourdough starter, affectionately known as “the mother.” We’ll walk you through each day of its development, from its humble beginnings as a simple mixture of flour and water to a vibrant, bubbly culture ready to leaven your culinary creations. Get ready to embrace the rhythm of feeding, observing, and nurturing this fascinating organism, and prepare to elevate your baking to an entirely new level. Your sourdough journey starts here!
Nutritional Information
Per serving (approximate values for 50g active starter, based on 100% hydration with all-purpose flour):
- Calories: 80
- Protein: 3g
- Carbohydrates: 17g
- Fat: 0.5g
- Fiber: 1g
- Sodium: 1mg
Ingredients
- 1 cup (120g) unbleached all-purpose flour OR whole wheat flour (or a 50/50 mix)
- 1 cup (240g) filtered or unchlorinated room temperature water
Instructions
- Day 1: The Beginning
- In a large glass jar (at least 1-quart capacity), combine 60g (½ cup) unbleached all-purpose flour (or whole wheat) and 60g (¼ cup) filtered, room temperature water.
- Mix thoroughly with a spatula or spoon until no dry lumps of flour remain. The mixture should have the consistency of a thick batter.
- Scrape down the sides of the jar to keep it tidy.
- Cover the jar loosely with a breathable lid (e.g., cheesecloth secured with a rubber band, a coffee filter, or a Mason jar lid flipped upside down to allow air exchange).
- Place the jar in a warm spot, ideally between 70-78°F (21-26°C), away from direct sunlight.
- Let it rest for 24 hours.
- Day 2: Waiting & Watching
- After 24 hours, check your starter. You might see a few small bubbles, or it might look exactly the same. This is normal! Wild yeast and bacteria are just beginning to wake up.
- Do not feed the starter today. Simply give it a quick stir.
- Re-cover loosely and return it to its warm spot for another 24 hours.
- Day 3: The First Feedings Begin!
- By Day 3, you should hopefully see some signs of activity: a few more bubbles, perhaps a slight increase in volume, and a slightly yeasty or sweet smell. If you see a thin layer of dark liquid on top (called “hooch”), don’t worry, just stir it in.
- Discarding: This is a crucial step. Discard all but 60g (about ¼ cup) of your starter. You can weigh it directly in the jar, or pour out most of it until roughly 60g remains.
- First Feeding: To the remaining 60g of starter, add 60g (½ cup) unbleached all-purpose flour and 60g (¼ cup) filtered, room temperature water.
- Mix well until smooth, scraping down the sides.
- Mark the height of the starter on the jar with a rubber band or marker so you can track its rise.
- Cover loosely and return to its warm spot for 12-24 hours. You should start seeing more significant activity within this timeframe.
- Day 4: Consistent Feeding
- Your starter should be showing more vigorous activity today, potentially doubling in size and becoming very bubbly. It might have a more tangy, yogurt-like smell.
- Repeat the feeding process: Discard all but 60g of starter.
- Feed the remaining 60g with 60g (½ cup) unbleached all-purpose flour and 60g (¼ cup) filtered, room temperature water.
- Mix well, mark the height, cover loosely, and return to its warm spot.
- Repeat this feeding every 12-24 hours, depending on how quickly your starter consumes its food and rises. If it doubles and falls within 12 hours, feed twice a day. If it takes longer, once a day is fine. Consistency is key!
- Day 5-7+: Active & Ready!
- Continue the daily (or twice-daily) feeding routine.
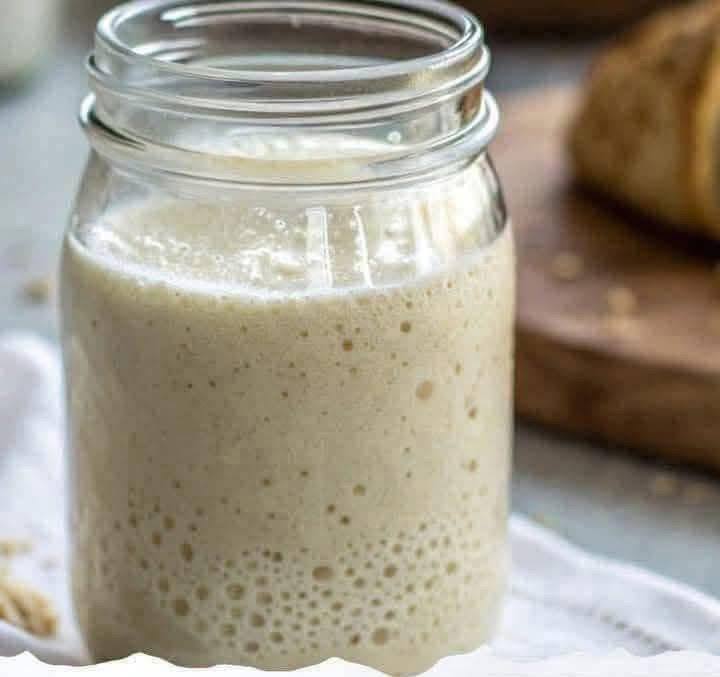
- By Day 5-7 (or sometimes longer, don’t get discouraged if it takes a bit more time!), your starter should be consistently doubling or tripling in size within 4-8 hours after feeding. It will be full of bubbles, smell pleasantly yeasty and tangy, and have a dome-like top when at its peak.
- The Float Test: To confirm your starter is ready for baking, perform the float test. Take a small spoonful of your starter at its peak (when it’s most bubbly and risen). Gently drop it into a glass of room temperature water. If it floats, your starter is active and ready to bake with! If it sinks, it needs more time and possibly more consistent feeding.
- Once your starter consistently passes the float test, it is considered mature and ready for use. Congratulations!
Cooking Tips and Variations
- Use a Kitchen Scale: This is the most crucial tip! Measuring ingredients by weight (grams) is significantly more accurate and consistent than by volume (cups), leading to better results for your starter and subsequent bakes. Invest in a digital kitchen scale.
- Warm Environment: Wild yeast thrives in warmth. If your kitchen is cool (below 70°F/21°C), find a warmer spot for your starter. Options include: inside a microwave or oven (turned OFF, with the light on for gentle warmth), on top of your refrigerator, or in a proofing box.
- Water Quality: Chlorine in tap water can inhibit yeast activity. Always use filtered, bottled, or previously boiled and cooled tap water (to allow chlorine to dissipate).
- Flour Type Matters: While all-purpose flour works, whole wheat or rye flour contain more nutrients and beneficial microbes, which can give your starter a faster, stronger start. Many bakers begin with whole wheat for the first few days and then transition to all-purpose. You can also use a 50/50 mix. Consistency in flour type during maintenance is generally recommended.
- Marking the Jar: Using a rubber band around the jar to mark the starter’s height immediately after feeding is incredibly helpful. It allows you to easily track how much it rises and falls, indicating its activity level.
- Smell Test: A healthy starter should smell pleasant – yeasty, slightly sour, like ripe fruit, or even like good yogurt. If it smells like nail polish remover (acetone) or paint thinner, it’s very hungry. If it smells distinctly rancid or putrid, something is wrong, and it might be best to discard and start over.
- Patience and Observation: Every starter is unique, and environmental conditions vary. Don’t be discouraged if your starter doesn’t follow the exact timeline. Observe its behavior, listen to what it’s telling you (through bubbles, rise, and smell), and adjust feeding frequency if needed.
- Don’t Fear Discard: Discarding a portion of your starter before each feed is essential. It prevents the starter from becoming too acidic, ensures there’s enough food for the remaining microbes, and keeps your starter from growing to an unmanageable size. If you hate waste, search for “sourdough discard recipes” – there are delicious options for pancakes, crackers, muffins, and more!
- Hydration Level: This recipe creates a 100% hydration starter (equal parts flour and water by weight). This is the most common and versatile type. You can adjust hydration later if you wish for specific baking needs, but 100% is excellent for beginners.
Storage and Reheating
Once your sourdough starter is active and mature, you have several options for storage, depending on how frequently you plan to bake.
Countertop Storage (for frequent use)
If you bake daily or every other day, you can keep your active starter on the countertop.
- Feeding Schedule: Feed your starter every 12-24 hours with a 1:1:1 ratio (1 part starter : 1 part flour : 1 part water by weight). For example, if you keep 50g of starter, feed it with 50g flour and 50g water.
- Container: Keep it in a glass jar with a loose-fitting lid to allow for gas exchange.
- Benefits: Always ready to bake, very active.
- Drawbacks: Requires frequent feeding, produces more discard.
Refrigerator Storage (for less frequent use – “hibernation”)
This is the most common method for home bakers who bake once a week or less. Cold temperatures slow down microbial activity significantly.
- Preparation: Feed your starter as usual, let it sit at room temperature for 1-2 hours until you see definite signs of activity (small bubbles), then place it in the refrigerator.
- Feeding Schedule: Feed your starter once a week. Take it out of the fridge, let it come to room temperature for 1-2 hours, then discard and feed it (e.g., 1:1:1 ratio). Let it sit at room temperature for 4-6 hours (or until active again) before returning it to the fridge.
- Container: A glass jar with a loose lid or one that’s slightly ajar.
- Benefits: Low maintenance, less discard.
- Drawbacks: Requires several hours to “wake up” before baking, may take 1-2 feedings to regain full strength after a long period in the fridge.
Long-Term Storage (Freezing or Drying)
These methods are for very long-term storage or if you need to travel and don’t want to bring your starter.
- Freezing: Feed your starter, let it become active, then spread a thin layer on parchment paper or pour small portions into ice cube trays. Freeze until solid, then transfer to an airtight freezer bag or container. To revive, thaw a piece, then feed it consistently on the countertop for a few days.
- Drying: Feed your starter, let it become active, then spread a thin layer on parchment paper. Let it air dry completely at room temperature for 1-2 days until it’s brittle and flakes easily. Break it into pieces and store in an airtight container at room temperature. To revive, rehydrate with equal parts water, then feed consistently for several days until active.
- Benefits: Can last for months or even years, excellent backup.
- Drawbacks: Revival process takes several days and is not always 100% successful.
Reheating: Sourdough starter is not “reheated” in the traditional sense. When a starter is stored in the refrigerator, it needs to be “woken up” and fed at room temperature for several hours (or even a day or two with multiple feedings) to regain its full leavening power before being used in a recipe.
Frequently Asked Questions
Why is my starter not bubbling?
Lack of bubbling is a common concern, especially in the early stages. There are several reasons this might happen. First, patience is key; it can take 3-5 days to see significant activity, and sometimes longer. Ensure your environment is warm enough (70-78°F or 21-26°C is ideal) as cold temperatures slow yeast activity. Make sure you are using filtered or unchlorinated water, as chlorine can inhibit microbes. Lastly, consistent feeding with the correct ratios of flour and water is crucial. If you’re discarding too little or feeding too infrequently, your starter might be starving or too acidic.
What is “hooch” and what should I do about it?
Hooch is the dark liquid that can sometimes form on top of your sourdough starter. It’s a natural byproduct of fermentation and indicates that your starter is hungry. The color can range from clear to dark brown/black. Clear hooch means it’s mildly hungry, while dark hooch means it’s very hungry and likely needs a feeding sooner. In most cases, you can simply stir the hooch back into the starter before discarding and feeding. However, if the hooch is black, moldy, or smells truly foul (beyond a strong acidic smell), it might be best to discard the entire starter and begin anew.
Can I use different types of flour for my starter?
Yes, absolutely! While unbleached all-purpose flour is a common and reliable choice, many bakers prefer to use whole wheat or rye flour, especially in the initial stages. Whole grain flours contain more nutrients, including beneficial microbes and enzymes in the bran and germ, which can kickstart fermentation more quickly and create a more robust starter. You can start with whole wheat or rye for the first few days and then transition to all-purpose, or maintain your starter with a blend of flours, or stick to one type. Consistency in the type of flour used during regular feedings is generally recommended for predictable results.
My starter smells like nail polish remover. Is it ruined?
A strong smell resembling nail polish remover (acetone) or even paint thinner indicates that your starter is very hungry and is producing acetic acid as it runs out of food. It’s not ruined! This is a sign that it needs a feeding. You can simply discard and feed it as usual. If this smell is persistent, you might need to increase your feeding frequency or slightly adjust your feeding ratio to provide more flour (food) for the microbes. With consistent, regular feeding, this smell should dissipate, and your starter will return to a more pleasant yeasty or tangy aroma.