Imagine a cake so utterly delicate, so impossibly soft, it practically melts on your tongue. That, my friends, is the magic of Soft Milk Sponge Cake. This isn’t your dense, heavy pound cake; it’s an ethereal creation, light as a cloud, with a subtle sweetness and a comforting milky essence that whispers of home and happy memories. It’s the kind of cake that makes any moment feel a little more special, whether it’s a quiet afternoon tea or a celebratory gathering.
What makes this cake so irresistible? It’s all in the texture. Achieving that signature airy, bouncy crumb is a testament to careful technique and a few key ingredients working in harmony. This cake is beloved across cultures, particularly in Asian baking, where its delicate nature is highly prized. It’s not just a dessert; it’s a canvas for your culinary creativity, delicious on its own, yet robust enough to pair with fresh fruits, creams, or even a simple dusting of powdered sugar. Get ready to fall in love with a cake that redefines “soft.”
The beauty of the Soft Milk Sponge Cake lies in its seeming simplicity, yet the reward is truly extraordinary. It’s a versatile star that can grace any table, from a casual family breakfast to an elegant dinner party. The process of making it is surprisingly approachable, even for novice bakers, and the joy of pulling a perfectly golden, impossibly soft cake from the oven is unparalleled. So, gather your ingredients, clear your counter, and let’s embark on a delicious journey to bake this delightful, melt-in-your-mouth masterpiece.
Nutritional Information
Per serving (approximate values for a slice, assuming 12 servings from a 9-inch cake):
- Calories: 250
- Protein: 5g
- Carbohydrates: 35g
- Fat: 10g
- Fiber: 0.5g
- Sodium: 120mg
Ingredients
- 6 large eggs, separated
- 1 cup (200g) granulated sugar, divided
- 1/2 cup (120ml) whole milk
- 1/4 cup (60ml) vegetable oil (or melted unsalted butter)
- 1 teaspoon vanilla extract
- 1 cup (120g) cake flour, sifted
- 1 teaspoon baking powder
- 1/4 teaspoon salt
- 1/2 teaspoon cream of tartar (optional, for stabilizing egg whites)
Instructions
- Preheat Oven and Prepare Pan: Preheat your oven to 325°F (160°C). Grease and flour a 9-inch round cake pan (or line the bottom with parchment paper and grease the sides). For best results with sponge cakes, you can also line the sides with parchment paper extending above the rim.
- Prepare Milk Mixture: In a small saucepan or microwave-safe bowl, gently heat the milk and vegetable oil (or melted butter) until warm to the touch, but not simmering. Stir in the vanilla extract. Set aside to cool slightly.
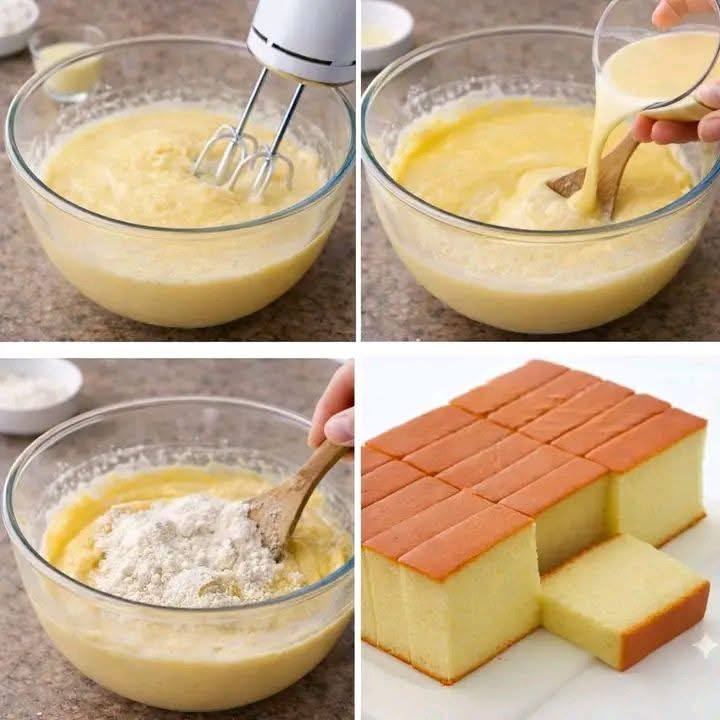
- Whisk Egg Yolks: In a large bowl, whisk the egg yolks with 1/2 cup (100g) of the granulated sugar until the mixture is pale yellow and slightly thickened. This should take about 2-3 minutes with a hand whisk, or 1-2 minutes with an electric mixer.
- Combine Wet Ingredients: Gradually pour the warm milk and oil mixture into the egg yolk mixture, whisking continuously until well combined.
- Combine Dry Ingredients: In a separate bowl, sift together the cake flour, baking powder, and salt. Sifting is crucial for an airy cake.
- Incorporate Dry into Wet: Gradually add the sifted dry ingredients to the wet egg yolk mixture, whisking gently until just combined and no lumps of flour remain. Be careful not to overmix at this stage; overmixing can develop gluten and lead to a tough cake.
- Whip Egg Whites: In a very clean, dry bowl (preferably a metal or glass bowl), beat the egg whites with an electric mixer on medium speed until foamy. Add the cream of tartar (if using) and gradually add the remaining 1/2 cup (100g) of granulated sugar, one tablespoon at a time, while continuing to beat. Increase the speed to high and beat until stiff, glossy peaks form. The meringue should be firm and hold its shape when the whisk is lifted.
- Lighten the Batter: Take about one-third of the whipped egg whites and gently fold them into the egg yolk batter. This step helps to lighten the batter and make it easier to incorporate the remaining egg whites without deflating them.
- Fold in Remaining Egg Whites: Add the remaining whipped egg whites to the batter. Using a rubber spatula, carefully fold the egg whites into the batter using a gentle, sweeping motion, turning the bowl as you go. Be very gentle and try not to deflate the egg whites. Stop folding as soon as no streaks of white remain.
- Pour into Pan: Pour the batter into the prepared cake pan. Gently tap the pan on the counter a few times to release any large air bubbles.
- Bake: Bake for 30-35 minutes, or until a wooden skewer inserted into the center comes out clean and the top springs back when lightly touched. The cake should be golden brown.
- Cool the Cake: Once baked, immediately invert the cake pan onto a wire rack (you can rest it on bottle necks or elevated surfaces if your pan doesn’t have feet) and let it cool completely upside down. This prevents the cake from collapsing and helps maintain its height and airy texture.
- Serve: Once completely cool, carefully run a knife around the edges of the pan, invert the cake onto a plate, and then flip it back onto a serving platter. Slice and serve!
Cooking Tips and Variations
Achieving that perfect, cloud-like texture in your Soft Milk Sponge Cake is all about precision and gentle handling. Here are some essential tips to ensure your cake turns out beautifully every time:
- Room Temperature Ingredients are Key: This is perhaps the most crucial tip for any baking, but especially for sponge cakes. Room temperature eggs whip up to a greater volume, and room temperature milk and oil emulsify better, leading to a smoother, more uniform batter. Plan ahead and take your eggs and milk out of the refrigerator at least 30 minutes to an hour before you start baking.
- Sift Your Flour (and other dry ingredients!): Don’t skip this step! Sifting cake flour, baking powder, and salt together not only removes any lumps but also aerates the dry ingredients, making them lighter and easier to incorporate into the wet batter. This helps prevent overmixing and ensures a tender crumb.
- Whip Egg Whites to Perfection: The volume and stability of your meringue are critical for the cake’s lift and airy texture. Ensure your bowl and beaters are absolutely clean and free of any grease or egg yolk, as even a tiny amount can prevent the whites from whipping properly. Beat until firm, glossy peaks form that hold their shape. The cream of tartar helps stabilize the egg whites, making them less likely to deflate.
- Gentle Folding is Non-Negotiable: Once your egg whites are whipped, the goal is to incorporate them into the batter without deflating all that precious air you’ve worked so hard to create. Use a rubber spatula and a gentle, “cut-and-fold” motion. Slice down through the center of the batter, then sweep your spatula across the bottom of the bowl and up the side, turning the bowl as you go. Stop as soon as no streaks of white remain; over-folding will lead to a dense cake.
- Don’t Overmix the Batter: When combining the dry ingredients with the wet ingredients, mix only until just combined. Overmixing develops gluten in the flour, which can result in a tough, chewy cake rather than a tender, soft one.
- Accurate Oven Temperature: An accurate oven temperature is vital for even baking and proper rising. If your oven tends to run hot or cold, consider using an oven thermometer. Baking at too high a temperature can cause the cake to rise too quickly and then collapse, while too low can result in a dry cake.
- Cooling Upside Down: This might seem unusual, but inverting the cake immediately after baking and letting it cool upside down on a wire rack is essential for sponge cakes. This prevents the cake from shrinking or collapsing under its own weight as it cools, helping it maintain its height and delicate structure.
Variations:
- Lemon Zest: Add 1-2 teaspoons of finely grated lemon zest to the egg yolk mixture for a bright, citrusy note.
- Matcha Green Tea: Substitute 1-2 tablespoons of cake flour with matcha powder for a beautiful color and earthy flavor. Sift the matcha with the flour.
- Cocoa Powder: For a chocolate version, substitute 2-3 tablespoons of cake flour with unsweetened cocoa powder.
- Almond Extract: Replace vanilla extract with almond extract for a nutty flavor profile.
- Coffee: Dissolve 1-2 teaspoons of instant coffee powder in the warm milk mixture for a subtle coffee flavor.
- Serving Suggestions: While delicious plain, this cake is fantastic dusted with powdered sugar, served with fresh berries and whipped cream, or as the base for a trifle or strawberry shortcake.
Storage and Reheating
Storing your Soft Milk Sponge Cake properly ensures it retains its delicate texture and fresh taste for as long as possible. Reheating is generally not recommended for this type of cake, as it can alter the texture, but there are exceptions.
Storage:
- Room Temperature: For best results and to maintain its signature softness, store the cake at room temperature. Place the cooled cake in an airtight container or cover it tightly with plastic wrap. It will stay fresh and soft for 2-3 days. Avoid refrigerating plain sponge cake if possible, as the cold air can dry it out and make it dense.
- Refrigeration (if frosted): If your cake is frosted with a cream cheese frosting, fresh cream, or a perishable filling, it must be refrigerated. Place it in an airtight container to protect it from absorbing odors from other foods. When ready to serve, let it come to room temperature for about 30 minutes to an hour before eating to allow the flavors and texture to soften. It will last 3-4 days in the refrigerator.
- Freezing: Soft Milk Sponge Cake can be frozen for longer storage. Ensure the cake is completely cooled. You can freeze it whole, in halves, or in individual slices. Wrap the cake tightly in plastic wrap, then wrap it again in aluminum foil to prevent freezer burn. Place it in a freezer-safe bag or container. It can be frozen for up to 1-2 months.
Reheating:
- From Room Temperature: This cake is best enjoyed at room temperature. No reheating is necessary.
- From Refrigeration: If refrigerated, allow the cake to sit at room temperature for at least 30 minutes before serving. This helps the cake regain its soft texture and enhances its flavor.
- From Freezer: To thaw, unwrap the frozen cake and let it sit at room temperature for several hours (or overnight in the refrigerator for larger cakes) until completely defrosted. Do not attempt to thaw it in the microwave, as this can make it rubbery. Once thawed, serve immediately. Reheating a thawed cake in the oven or microwave is generally not recommended as it will likely dry out the delicate crumb.
Frequently Asked Questions
Why did my sponge cake collapse or become dense?
There are a few common culprits for a collapsed or dense sponge cake. The most frequent reasons include overmixing the batter after adding the flour, which develops gluten and makes the cake tough. Another major factor is deflating the egg whites during folding; if you’re not gentle, all that precious air will escape. Insufficiently whipped egg whites (not reaching stiff peaks) or an oven temperature that’s too low can also cause the cake to lack structure and collapse. Lastly, opening the oven door too early in the baking process can cause a sudden temperature drop, leading to deflation.
Can I make this cake without cream of tartar?
Yes, you can absolutely make this cake without cream of tartar. Cream of tartar is an acidic ingredient that helps to stabilize the egg whites, allowing them to whip up to a greater volume and hold their peaks longer, making them more resilient to deflating during folding. If you don’t have it, ensure your egg whites are whipped to very firm, glossy peaks, and be extra gentle when folding them into the batter. Some bakers substitute a tiny pinch of salt or a teaspoon of lemon juice or white vinegar (per egg white) to achieve a similar stabilizing effect, but it’s not strictly necessary if you’re careful.
What’s the difference between cake flour and all-purpose flour for this recipe?
The difference is significant for a soft sponge cake! Cake flour has a lower protein content (around 7-9%) compared to all-purpose flour (10-12%). Lower protein means less gluten development when mixed, which results in a much more tender, lighter, and finer crumb – exactly what you want in a soft sponge cake. All-purpose flour will yield a denser, chewier cake. If you only have all-purpose flour, you can create a makeshift cake flour by removing 2 tablespoons of all-purpose flour from each cup and replacing it with 2 tablespoons of cornstarch, then sifting them together thoroughly.
How can I prevent the cake from sticking to the pan?
To prevent sticking, proper pan preparation is crucial. First, grease the pan generously with butter or cooking spray. Then, dust it with a light coating of flour, tapping out any excess. For sponge cakes, an even more reliable method is to line the bottom of the pan with parchment paper. Cut a circle of parchment paper to fit the bottom, place it in the greased pan, and then grease and flour the sides of the pan. For extra assurance, especially with tall sponge cakes, you can also line the sides of the pan with parchment paper, allowing it to extend above the rim. This gives the cake something to cling to as it rises and makes removal much easier after cooling.