Introduction
There’s something undeniably magical about the aroma of freshly baked bread wafting through your home. It’s a scent that instantly conjures feelings of comfort, nostalgia, and simple joy. While store-bought bread is convenient, nothing compares to the soft, tender crumb and irresistible crust of a homemade loaf. Forget the preservatives and questionable ingredients; with this recipe for Soft Homemade White Bread, you’re in for a treat that’s both deeply satisfying to make and utterly delicious to eat.
Homemade white bread isn’t just about the end product; it’s about the journey. The simple act of combining flour, yeast, sugar, and milk, watching the dough transform under your hands as you knead, and seeing it miraculously double in size, is a truly rewarding experience. This isn’t a complicated, intimidating recipe. In fact, it’s designed to be approachable for bakers of all skill levels, offering clear, easy-to-follow steps that guarantee success. Whether you’re a seasoned bread maker or a curious beginner, you’ll find joy in crafting this classic.
What can you expect from this Soft Homemade White Bread? Imagine a loaf that’s incredibly light, fluffy, and tender on the inside, with a perfectly golden-brown, subtly chewy crust. It’s the kind of bread that’s ideal for everything from classic peanut butter and jelly sandwiches to a hearty grilled cheese, or simply toasted and slathered with butter and jam. It’s versatile, comforting, and destined to become a staple in your kitchen. Get ready to impress your taste buds and fill your home with the most wonderful scent imaginable!
Nutritional Information
Per serving (approximate values, for 1/12th of a loaf):
- Calories: 180 kcal
- Protein: 6g
- Carbohydrates: 32g
- Fat: 3g
- Fiber: 1g
- Sodium: 250mg
Ingredients
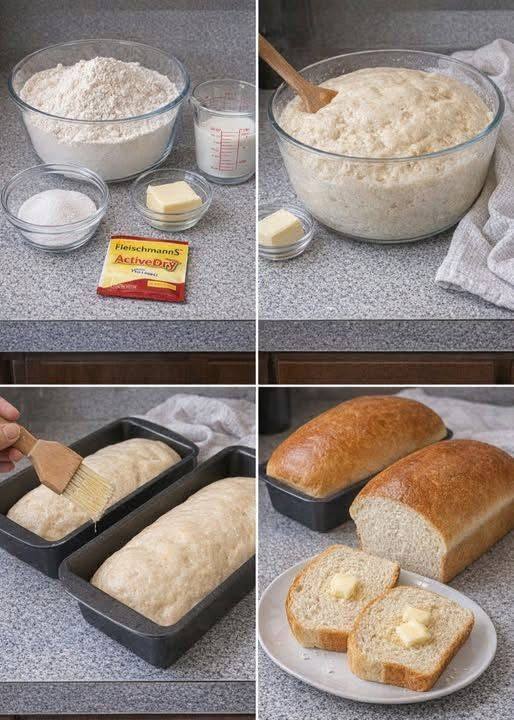
- 2 ¼ teaspoons active dry yeast (one 0.25 oz packet)
- 1 cup warm whole milk (105-115°F / 40-46°C)
- ¼ cup warm water (105-115°F / 40-46°C)
- ¼ cup granulated sugar
- 1 ½ teaspoons salt
- 3 tablespoons unsalted butter, melted and cooled slightly, plus extra for greasing
- 3 ½ to 4 cups all-purpose flour, plus more for dusting
Instructions
- In a large mixing bowl, combine the warm milk, warm water, and granulated sugar. Sprinkle the active dry yeast over the top of the liquid. Let it sit for 5-10 minutes until the mixture becomes foamy. This indicates that your yeast is active and ready to go.
- Once the yeast is active, stir in the salt and the slightly cooled melted butter.
- Gradually add 3 cups of the all-purpose flour, one cup at a time, mixing with a sturdy spoon or a stand mixer with a dough hook until just combined.
- Continue adding flour, about ¼ cup at a time, until the dough comes together and pulls away from the sides of the bowl. The dough should be soft and slightly sticky, but not overly wet.
- Turn the dough out onto a lightly floured surface. Knead the dough by hand for 8-10 minutes, or with a stand mixer fitted with a dough hook on medium-low speed for 6-8 minutes. The dough should become smooth, elastic, and spring back when gently poked.
- Lightly grease a large clean bowl with butter or cooking spray. Place the kneaded dough in the bowl, turning it once to coat the top. Cover the bowl with plastic wrap or a clean kitchen towel.
- Allow the dough to rise in a warm place for 1 to 1 ½ hours, or until it has doubled in size. This is the first rise, also known as bulk fermentation.
- Once doubled, gently punch down the dough to release the air. Turn the dough out onto a lightly floured surface.
- Shape the dough into a loaf. You can do this by gently flattening the dough into a rectangle, then rolling it tightly from one long side to the other, pinching the seam closed. Tuck the ends under to create a neat loaf shape.
- Lightly grease a 9×5-inch loaf pan. Carefully place the shaped dough into the prepared loaf pan, seam-side down.
- Cover the loaf pan loosely with plastic wrap or a clean kitchen towel. Allow the dough to rise again in a warm place for 30-45 minutes, or until it has nearly doubled in size and looks puffy. This is the second rise, or proofing.
- While the dough is proofing, preheat your oven to 375°F (190°C).
- Once the dough has risen, you can optionally brush the top with a little melted butter or an egg wash (1 egg whisked with 1 tablespoon water) for a richer golden crust.
- Bake in the preheated oven for 30-35 minutes, or until the crust is golden brown and the internal temperature of the bread reaches 200-210°F (93-99°C) when measured with an instant-read thermometer.
- Remove the loaf from the oven and immediately turn it out onto a wire rack to cool completely. This is a crucial step to prevent the bottom of the bread from becoming soggy and to ensure the interior sets properly.
- Wait until the bread is completely cool before slicing (at least 1-2 hours). Slicing warm bread can result in a gummy texture.
Cooking Tips and Variations
For the fluffiest, most tender bread, always ensure your yeast is active. If your yeast doesn’t foam up after 5-10 minutes in the warm liquid, it’s likely dead, and your bread won’t rise. Start again with fresh yeast. The temperature of your liquids is key: too hot will kill the yeast, too cold won’t activate it. Aim for a comfortable bathwater temperature.
When kneading, resist the urge to add too much flour. A slightly sticky dough will result in a more tender crumb. If you’re kneading by hand, flour your hands instead of the surface if the dough is too sticky. The dough should be elastic and smooth when fully kneaded. To test, poke it gently with your finger; it should spring back slowly.
A warm, draft-free environment is ideal for rising dough. You can create one by preheating your oven to its lowest setting for a few minutes, then turning it off and placing the covered bowl inside. Alternatively, a microwave with a cup of hot water inside can also work wonders. Don’t rush the rise; allowing the dough to double in size is essential for a light texture.
For a softer crust, brush the baked loaf with melted butter as soon as it comes out of the oven. If you prefer a chewier, slightly crispier crust, skip the butter brush. To check for doneness, tap the bottom of the loaf; it should sound hollow. The internal temperature is the most reliable indicator.
To vary this recipe, consider adding a tablespoon of dried herbs like rosemary or thyme to the dough for a savory loaf. For a slightly sweeter bread, you can increase the sugar by a tablespoon or two. For a fiber boost, substitute up to 1 cup of the all-purpose flour with whole wheat flour, but be prepared for a slightly denser loaf and potentially needing a little more liquid.
Storage and Reheating
Once completely cooled, your Soft Homemade White Bread can be stored at room temperature for 3-4 days. For best results, keep it in an airtight container, a bread box, or a sealed plastic bag. Avoid refrigerating homemade bread, as it tends to dry out and become stale more quickly in the cold environment.
If you won’t be eating the entire loaf within a few days, homemade bread freezes beautifully. Once cooled, slice the bread and place the slices in a freezer-safe bag or wrap the entire loaf tightly in plastic wrap, then aluminum foil. It can be stored in the freezer for up to 3 months. To enjoy, simply take out the desired number of slices and toast them directly from frozen, or thaw the entire loaf at room temperature for a few hours.
To reheat a whole loaf of slightly stale bread, you can wrap it loosely in aluminum foil and warm it in a preheated oven at 300°F (150°C) for 10-15 minutes, or until warmed through. This will help to soften the crust and refresh the crumb. For individual slices, a toaster or toaster oven works perfectly to bring back that warm, fresh-baked feel.
Frequently Asked Questions
Why did my bread not rise?
The most common reasons for bread not rising are inactive yeast (check the expiration date and ensure your warm liquids are not too hot or too cold) or an improper rising environment (too cold or too drafty). Ensure your yeast is foamy before adding other ingredients, and find a warm, cozy spot for your dough to proof.
Can I make this bread in a bread machine?
While this recipe is designed for oven baking, you can adapt it for a bread machine on the “dough” cycle. Add liquids first, then dry ingredients, with yeast last. Once the dough cycle is complete, remove the dough, shape it, let it perform its second rise in a loaf pan, and then bake it in a conventional oven as directed.
How do I get a soft crust?
To achieve a super soft crust, brush the top of the baked loaf with melted butter immediately after removing it from the oven. Then, cover the hot loaf with a clean kitchen towel while it cools on the wire rack. The steam trapped by the towel will help soften the crust even further.