Introduction
There’s something undeniably magical about the aroma of freshly baked bread wafting through your home. It’s a scent that promises comfort, warmth, and deliciousness. Our Rustic Garlic Herb Bread delivers on all those promises and more. This isn’t just any bread; it’s a celebration of simple, wholesome ingredients transformed into a masterpiece of flavor and texture. Imagine a crusty exterior, deeply golden and satisfyingly chewy, giving way to an incredibly soft, airy interior, each bite infused with the pungent warmth of garlic and the fragrant embrace of fresh herbs. It’s the kind of bread that begs to be torn, not sliced, and shared among loved ones.
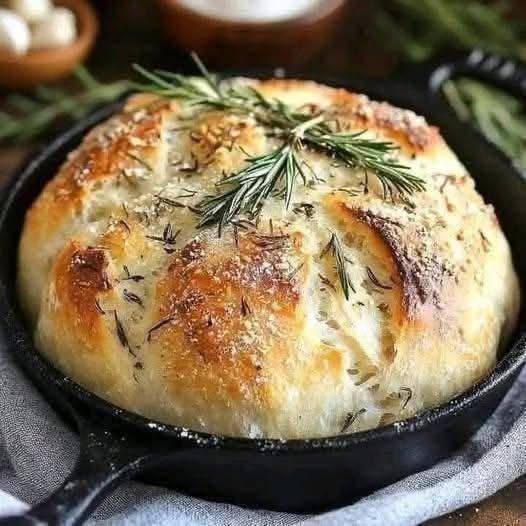
What makes this particular garlic herb bread truly special is its rustic charm and approachable baking method. You don’t need to be a seasoned baker to achieve spectacular results. By utilizing the magic of a skillet or Dutch oven, we create a baking environment that mimics a professional bread oven, ensuring an enviable crust with minimal effort. This method locks in moisture, giving you that perfect balance of crispness and tenderness. Whether you’re serving it alongside a hearty pasta dish, using it to sop up a flavorful stew, or simply enjoying it as a stand-alone appetizer with a good olive oil, this bread is destined to become a staple in your kitchen.
This Rustic Garlic Herb Bread isn’t just food; it’s an experience. It’s about slowing down, enjoying the process, and savoring the incredible flavors that come from a few simple ingredients. The combination of aromatic garlic, earthy rosemary, and a hint of olive oil creates a symphony for the senses. It’s crusty on the outside, soft on the inside, and bursting with flavor – perfect as a side or a show-stopping appetizer that will impress everyone at your table.
Nutritional Information
Per serving (approximate values):
- Calories: 280
- Protein: 9g
- Carbohydrates: 45g
- Fat: 7g
- Fiber: 2g
- Sodium: 450mg
Ingredients
- 3 cups (360g) bread flour, plus more for dusting
- 1 teaspoon instant or active dry yeast
- 1 ½ teaspoons fine sea salt
- 1 ½ cups (360ml) warm water (105-115°F / 40-46°C)
- 3 tablespoons olive oil, divided, plus more for greasing
- 4-5 cloves garlic, minced
- 2 tablespoons fresh rosemary, finely chopped (or 1 tablespoon dried)
- 1 teaspoon dried oregano (optional)
- ½ teaspoon black pepper
- Flaky sea salt, for topping
Instructions
- Prepare the Dough: In a large mixing bowl, combine the bread flour, yeast, and fine sea salt. Whisk briefly to combine.
- Add Water and Olive Oil: Pour in the warm water and 2 tablespoons of the olive oil. Using a wooden spoon or a sturdy spatula, mix until a shaggy, cohesive dough forms. The dough will be sticky.
- First Rise (Bulk Fermentation): Cover the bowl tightly with plastic wrap or a clean kitchen towel. Let the dough rise at room temperature (around 70-75°F / 21-24°C) for 1.5 to 2 hours, or until it has doubled in size and looks bubbly. If your kitchen is cooler, it might take longer.
- Prepare the Garlic Herb Infusion: While the dough is rising, in a small bowl, combine the remaining 1 tablespoon of olive oil, minced garlic, chopped rosemary, dried oregano (if using), and black pepper. Stir well and set aside to allow the flavors to meld.
- Shape the Dough: Once the dough has doubled, gently scrape it out onto a lightly floured surface. Avoid overworking it to retain the air bubbles. Gently fold the edges of the dough towards the center to form a rough ball or round shape. Don’t worry about perfection; rustic is the goal!
- Second Rise (Proofing in Skillet): Lightly grease a 10-inch cast iron skillet or a 6-quart Dutch oven with a little olive oil. Carefully transfer the shaped dough into the skillet or Dutch oven.
- Add Garlic Herb Topping: Spoon the garlic herb olive oil mixture evenly over the top of the dough. Gently spread it with the back of the spoon, trying not to deflate the dough too much.
- Second Rise (Continued): Loosely cover the skillet/Dutch oven with plastic wrap or a clean kitchen towel. Let the dough rise again in a warm place for another 30-45 minutes, or until visibly puffy.
- Preheat Oven & Skillet: About 20 minutes before the end of the second rise, place your empty cast iron skillet or Dutch oven (if using a Dutch oven, include the lid) into your cold oven. Preheat the oven to 450°F (230°C). Preheating the skillet/Dutch oven ensures a fantastic crispy crust.
- Score the Dough: Once the oven and skillet are preheated and the dough has completed its second rise, carefully remove the hot skillet/Dutch oven from the oven (use oven mitts!). Gently place the risen dough *into* the hot skillet/Dutch oven. Using a sharp knife or a bread lame, make 2-3 shallow cuts (about ½ inch deep) across the top of the dough. This helps it expand evenly during baking.
- Bake (Covered): If using a Dutch oven, place the lid on. If using a skillet, you can cover it tightly with aluminum foil or place an oven-safe bowl over it to trap steam. Bake for 25 minutes covered.
- Bake (Uncovered): After 25 minutes, carefully remove the lid or foil. Continue baking uncovered for another 15-20 minutes, or until the bread is deeply golden brown on top and sounds hollow when tapped on the bottom. The internal temperature should be around 200-210°F (93-99°C).
- Cool: Carefully remove the bread from the skillet/Dutch oven and transfer it to a wire rack to cool for at least 30 minutes before slicing or tearing. This cooling period is crucial for the internal crumb to set and for the crust to remain crisp. Sprinkle with flaky sea salt while still warm, if desired.
Cooking Tips and Variations
Achieving that perfect rustic loaf is easier than you think, especially with a few insider tips. For the crispiest crust, don’t skip preheating your cast iron skillet or Dutch oven in the oven before adding the dough. This creates an immediate burst of heat that helps form a beautiful, crackly crust. When scoring the dough, use a very sharp knife or a bread lame – quick, decisive cuts are better than hesitant ones. This allows the bread to expand properly during baking and prevents uncontrolled cracks. For an even more intense garlic flavor, you can gently warm the olive oil with the minced garlic for a few minutes before adding the herbs, allowing the garlic to infuse the oil more deeply, then let it cool before topping the dough.
Fresh herbs truly make a difference in this recipe, but if you only have dried, use half the amount of fresh herbs specified. Rosemary is classic, but feel free to experiment! Thyme, oregano, or a blend of Italian herbs would also be delicious. For a cheesy twist, sprinkle ½ cup of grated Parmesan cheese over the top of the dough along with the garlic herb mixture before the second rise. You could also fold in ½ cup of chopped sun-dried tomatoes or a handful of pitted, chopped Kalamata olives into the dough during the initial mixing stage for added flavor and texture. For a sweet and savory variation, try adding a tablespoon of honey to the dough mixture and a sprinkle of red pepper flakes with the herbs for a subtle kick. To tell if your bread is done, besides the golden color and hollow sound, an instant-read thermometer inserted into the center should register between 200-210°F (93-99°C).
Serving this bread warm is key to enjoying its full glory. It pairs wonderfully with a simple bowl of olive oil for dipping, especially if you add a pinch of red pepper flakes to the oil. It’s the ultimate companion to pasta dishes, soaking up rich sauces, or alongside hearty stews and soups. For a sophisticated appetizer, slice it thick and use it as a base for bruschetta with fresh tomatoes and basil. Don’t be afraid to pull it apart with your hands – that’s the true rustic experience!
Storage and Reheating
To keep your Rustic Garlic Herb Bread fresh, allow it to cool completely before storing. Store the bread at room temperature in an airtight container or a bread bag. This will help maintain its softness and prevent it from drying out. It will stay fresh for 2-3 days. If you want to store it for longer, you can freeze the bread. Once cooled, wrap the entire loaf or individual slices tightly in plastic wrap, then again in aluminum foil. It can be frozen for up to 3 months.
For reheating, if frozen, allow the bread to thaw at room temperature. To bring back that lovely crust and warm, soft interior, preheat your oven to 350°F (175°C). You can either place the whole loaf directly on the oven rack for about 10-15 minutes, or wrap it loosely in foil for a softer crust. If reheating slices, a toaster oven works wonderfully for a quick crisp-up. Avoid microwaving, as it can make the bread chewy and tough.
Frequently Asked Questions
Can I make this bread without a cast iron skillet or Dutch oven?
While a cast iron skillet or Dutch oven is highly recommended for achieving the best crust, you can still bake this bread on a baking sheet. Preheat your oven to 450°F (230°C) with a baking stone or an empty baking sheet inside for at least 30 minutes. Carefully transfer the dough to the hot baking surface. To create steam, which helps with the crust, you can place a pan of hot water on the bottom rack of your oven during the first 15-20 minutes of baking. The crust might not be as intensely crispy, but it will still be delicious.
What’s the difference between instant yeast and active dry yeast?
Instant yeast can be mixed directly with the dry ingredients, as it doesn’t require proofing (dissolving in warm water first). Active dry yeast, on the other hand, typically needs to be dissolved in warm water with a pinch of sugar for 5-10 minutes until foamy before being added to the rest of the ingredients. This recipe uses warm water as a liquid ingredient, so if you’re using active dry yeast, you can dissolve it in the warm water first before adding to the flour, or just mix it in with the dry ingredients and let the longer rising time compensate. Either will work for this recipe, but instant yeast is a bit more forgiving.
My dough isn’t rising. What went wrong?
Several factors can affect dough rising. The most common issues are inactive yeast (check the expiration date!), water that’s too hot (which kills the yeast) or too cold (which slows it down significantly), or a cold kitchen environment. Ensure your warm water is between 105-115°F (40-46°C). If your kitchen is cold, try placing the dough in a slightly warm (but not hot) oven that has been turned off, or near a sunny window. Give it more time; sometimes dough just needs a bit longer to rise, especially in cooler conditions.
Can I make this dough ahead of time?
Yes, you can! After the first rise, instead of shaping and doing a second rise, you can punch down the dough gently, cover it tightly, and refrigerate it for up to 24 hours. The cold temperature will slow down the yeast activity. When you’re ready to bake, take the dough out of the refrigerator, shape it, add the topping, and let it come to room temperature and complete its second rise (this might take 1-2 hours) before baking as directed. This is a great way to spread out your baking process.