Introduction
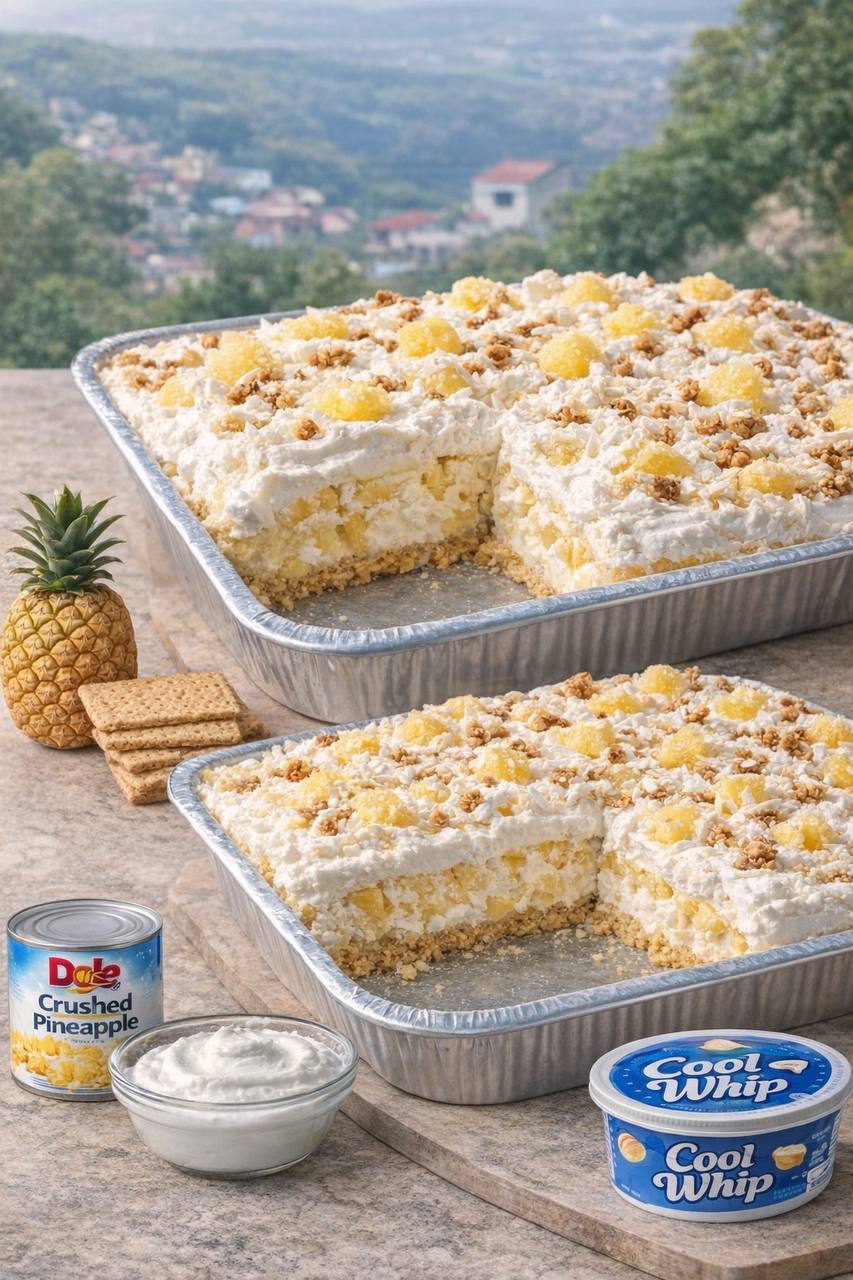
Imagine a dessert that’s effortlessly elegant, bursting with tropical sunshine, and requires absolutely no oven time. Sounds like a dream, right? Well, prepare to meet your new favorite no-bake sensation: the Pineapple Vanilla Icebox Dessert! This delightful creation is the epitome of easy indulgence, combining the bright, tangy sweetness of pineapple with a rich, creamy vanilla embrace, all nestled on a perfectly crisp graham cracker crust. It’s a refreshing escape, perfect for those warm-weather gatherings, backyard barbecues, or simply when you’re craving something sweet and satisfying without the fuss.
What makes this Pineapple Vanilla Icebox Dessert truly special is its incredible simplicity and make-ahead convenience. Forget about complicated techniques or hours spent in the kitchen; this recipe is designed for maximum flavor with minimal effort. Each spoonful delivers a harmonious blend of textures – the delicate crunch of the crust, the juicy burst of crushed pineapple, and the velvety smoothness of the vanilla cream. It’s a crowd-pleaser that appeals to all ages, striking that perfect balance between sweet and tangy, rich and light. Plus, the longer it chills, the better it gets, making it an ideal candidate for entertaining or simply prepping a delicious treat for the week ahead.
Whether you’re a seasoned baker or a kitchen novice, this Pineapple Vanilla Icebox Dessert is guaranteed to impress. Its vibrant flavors transport you to a tropical paradise, while its cool, creamy nature provides welcome relief on a hot day. Get ready to fall in love with a dessert that proves less is often more, delivering big on taste and texture with an ease that will have you making it again and again.
Nutritional Information
Per serving (approximate values):
- Calories: 350
- Protein: 4g
- Carbohydrates: 45g
- Fat: 18g
- Fiber: 2g
- Sodium: 250mg
Ingredients
- 1 ½ cups graham cracker crumbs (from about 10-12 full graham cracker sheets)
- ½ cup unsalted butter, melted
- 2 (20-ounce) cans crushed pineapple in juice, well-drained
- 1 (8-ounce) package cream cheese, softened
- 1 (3.4-ounce) package instant vanilla pudding mix
- 1 cup cold milk (whole or 2%)
- 1 (12-ounce) container frozen whipped topping (like Cool Whip), thawed in the refrigerator
- 1 teaspoon pure vanilla extract
- ¼ cup granulated sugar (optional, for extra sweetness in the pineapple layer)
- Extra graham cracker crumbs or toasted coconut for garnish (optional)
- Fresh pineapple chunks or maraschino cherries for garnish (optional)
Instructions
- Prepare the Crust: In a medium bowl, combine the graham cracker crumbs and melted butter. Mix until the crumbs are evenly moistened. Press the mixture firmly and evenly into the bottom of a 9×13-inch baking dish. You can use the back of a spoon or the bottom of a glass to really pack it down. Place the pan in the refrigerator while you prepare the other layers.
- Drain the Pineapple Thoroughly: This step is crucial! Open both cans of crushed pineapple and pour them into a fine-mesh sieve set over a bowl. Using the back of a spoon or a spatula, press down firmly on the pineapple to extract as much liquid as possible. You want the pineapple to be as dry as you can get it to prevent a soggy dessert. You can even let it sit and drain for 15-20 minutes, pressing occasionally.
- Prepare the Cream Cheese Mixture: In a large mixing bowl, using an electric mixer, beat the softened cream cheese until smooth and creamy, about 1-2 minutes. Add the instant vanilla pudding mix and the cold milk. Beat on low speed until just combined, then increase to medium speed and beat for 2-3 minutes, or until the mixture is thick and smooth. Stir in the vanilla extract.
- Fold in Whipped Topping: Gently fold about two-thirds of the thawed whipped topping into the cream cheese mixture until no streaks remain. Be careful not to overmix, as this will deflate the whipped topping. Reserve the remaining one-third of the whipped topping for the top layer.
- Assemble the First Layers: Remove the crust from the refrigerator. Spread the well-drained crushed pineapple evenly over the graham cracker crust. If desired, you can sprinkle ¼ cup of granulated sugar over the pineapple for extra sweetness, though it’s often sweet enough from the canned fruit.
- Add the Creamy Layer: Carefully spread the cream cheese and whipped topping mixture evenly over the pineapple layer. Use an offset spatula or the back of a spoon to create a smooth, even surface.
- Top with Remaining Whipped Topping: Gently spread the reserved one-third of the whipped topping over the creamy vanilla layer, creating the final top layer.
- Chill Thoroughly: Cover the baking dish tightly with plastic wrap. Refrigerate the Pineapple Vanilla Icebox Dessert for at least 6 hours, but preferably overnight. This chilling time is essential for the dessert to set properly, allowing the flavors to meld and the layers to firm up, making it easier to cut and serve.
- Garnish and Serve: Just before serving, remove the plastic wrap. Garnish the top with extra graham cracker crumbs, toasted coconut, fresh pineapple chunks, or maraschino cherries, if desired. Cut into squares and serve cold.
Cooking Tips and Variations
Chilling is Key: Do not skimp on the chilling time! A minimum of 6 hours, and ideally overnight, is crucial for this icebox dessert to set perfectly. This allows the pudding to fully thicken, the cream cheese mixture to firm up, and the flavors to meld beautifully. Rushing this step will result in a messy, unset dessert that’s difficult to cut and serve.
Drain Pineapple Thoroughly: This is the most important tip to prevent a soggy dessert. Canned crushed pineapple contains a lot of juice. After placing it in a fine-mesh sieve, press down firmly with a spoon or spatula to extract as much liquid as possible. You can even let it sit and drain for 20-30 minutes, pressing occasionally, to ensure it’s as dry as possible. Excess moisture will make your crust and creamy layers watery.
Softened Cream Cheese: Ensure your cream cheese is at room temperature before you start mixing. This will help it cream smoothly with the pudding mix and milk, preventing lumps in your creamy layer. If it’s too cold, you’ll end up with a lumpy, inconsistent texture.
Gentle Folding: When incorporating the whipped topping into the cream cheese mixture, fold it gently. Overmixing will deflate the whipped topping, resulting in a less airy and fluffy texture in your creamy layer.
Even Layers: Use an offset spatula or the back of a spoon to spread each layer smoothly and evenly. This not only makes for a more aesthetically pleasing dessert but also ensures each bite gets a balanced mix of flavors and textures.
Crust Variations: While graham cracker crumbs are classic, you can experiment with other cookie crumbs for the crust. Try crushed vanilla wafers, shortbread cookies, ginger snaps (for a hint of spice), or even chocolate wafers for a different twist. Just ensure you mix them with melted butter to form a pressable crust.
Fruit Variations: If you’re not a fan of pineapple or want to try something new, other well-drained canned fruits can work. Consider crushed mango, peaches, or mandarin oranges. Just be sure they are thoroughly drained to avoid excess moisture.
Creamy Layer Enhancements: For an extra rich and tangy flavor, you can add a tablespoon of fresh lemon juice to the cream cheese mixture. If you prefer a homemade whipped cream, you can use 2 cups of heavy cream, whipped with ¼ cup powdered sugar and 1 teaspoon vanilla extract, instead of the thawed whipped topping. Just be aware homemade whipped cream can be less stable over time.
Topping Ideas: Get creative with your garnishes! Toasted coconut flakes add a lovely texture and tropical flavor. Chopped macadamia nuts or pecans can provide a satisfying crunch. A drizzle of caramel or white chocolate sauce just before serving can also elevate the presentation and taste. For a pop of color, fresh mint leaves or a few maraschino cherries look wonderful.
Sweetness Adjustment: The sweetness of this dessert can be adjusted to your preference. If your crushed pineapple is packed in syrup, it will be sweeter. If you prefer a less sweet dessert, you can omit the optional ¼ cup of granulated sugar in the pineapple layer. For a sweeter dessert, you can add a tablespoon or two of powdered sugar to the creamy layer when you’re mixing the cream cheese and pudding.
Pan Choice: A 9×13-inch baking dish is standard. A glass dish allows you to see the beautiful layers, which is great for presentation. If you’re making it for a potluck or picnic, a disposable foil pan works perfectly for easy transport and cleanup.
Storage and Reheating
Storage: This Pineapple Vanilla Icebox Dessert is best stored in the refrigerator. Cover the baking dish tightly with plastic wrap or aluminum foil to prevent it from absorbing refrigerator odors and to keep it fresh. When properly stored, it will last for 3-4 days in the refrigerator. The crust might soften slightly over time, but the flavors will continue to meld and develop.
Freezing: While icebox desserts are often served chilled, this particular recipe is not ideal for freezing. The texture of the whipped topping and cream cheese mixture can become grainy or watery once thawed, and the pineapple can release more moisture, making the dessert soggy. It’s best enjoyed fresh from the refrigerator.
Reheating: Since this is a no-bake, chilled dessert, it is not meant to be reheated. It should always be served cold. Remove it from the refrigerator about 15-20 minutes before serving, especially if it’s been chilling overnight, to allow it to soften just slightly for easier cutting and a more pleasant texture.
Frequently Asked Questions
Can I use fresh pineapple instead of canned?
While fresh pineapple offers a bright flavor, it contains an enzyme called bromelain which can break down dairy proteins, potentially preventing the creamy layers from setting properly or making them bitter. For this icebox dessert, it is highly recommended to stick with canned crushed pineapple, as the heating process during canning deactivates this enzyme. If you absolutely want to use fresh, you would need to cook it first to deactivate the enzyme, then cool and drain thoroughly.
Why is my icebox dessert not setting?
There are a few common reasons for an unset icebox dessert. The most frequent culprit is insufficient chilling time. This dessert requires a minimum of 6 hours, but ideally overnight, to properly firm up. Another reason could be that the instant pudding mix was not properly activated (e.g., using warm milk instead of cold, or not beating long enough). Finally, if the crushed pineapple was not drained thoroughly, the excess moisture can prevent the creamy layers from setting as firmly as they should.
Can I make this dessert dairy-free or gluten-free?
Yes, with some modifications. For a dairy-free version, you can use dairy-free graham cracker crumbs, dairy-free cream cheese alternatives (ensure they are suitable for baking/no-bake recipes), and dairy-free whipped topping (such as coconut whipped cream or a plant-based whipped topping). For gluten-free, use gluten-free graham cracker crumbs. Always check ingredient labels to ensure all components meet your dietary needs.