Introduction
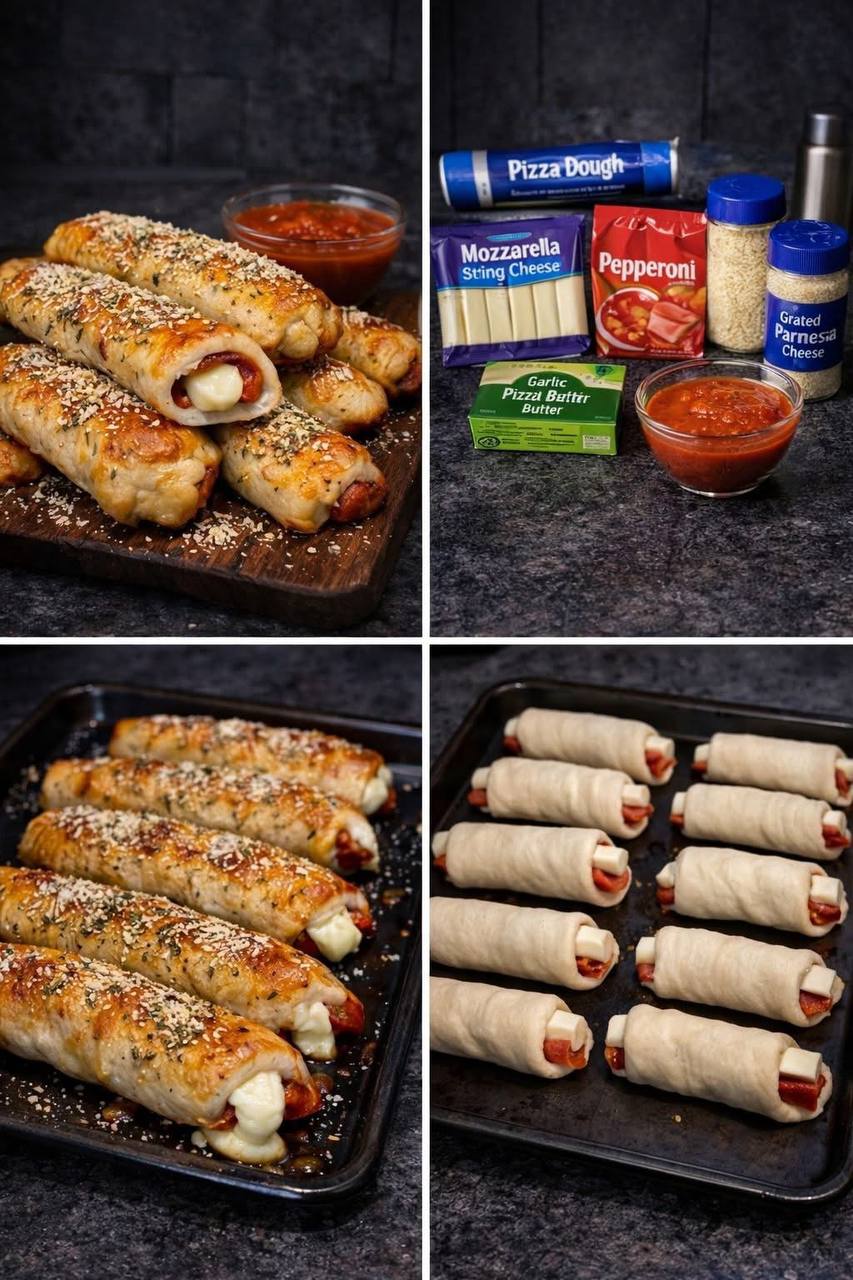
Get ready to unleash a new level of snack obsession with these incredible Pepperoni Pizza Breadsticks! Imagine the crispy, golden-brown embrace of a perfectly baked breadstick, giving way to a molten, gooey core of savory mozzarella cheese and spicy, salty pepperoni. It’s the ultimate marriage of two beloved comfort foods – pizza and breadsticks – rolled into one irresistible, handheld delight. These aren’t just any breadsticks; they’re a flavor explosion waiting to happen, promising that satisfying pull of melted cheese with every bite, all encased in a garlicky, herb-infused crust.
What makes these Pepperoni Pizza Breadsticks so special? Beyond their undeniable deliciousness, it’s their sheer simplicity and adaptability. Forget the hassle of making pizza from scratch; we’re leveraging the magic of store-bought pizza dough and a few pantry staples to create a crowd-plepleaser in record time. They’re the perfect solution for those sudden pizza cravings, an instant hit for game nights, movie marathons, or a fun family dinner appetizer. They’re quick enough for a weeknight, impressive enough for guests, and endlessly customizable to suit any palate.
Prepare yourself for a culinary adventure that’s as easy as it is delicious. We’re talking about taking humble ingredients and transforming them into golden, cheesy, pepperoni-packed masterpieces that will disappear faster than you can say “extra marinara.” From the moment the aroma of garlic and baking dough fills your kitchen, you’ll know you’re in for a treat. Get ready to roll, bake, and dive into the cheesy, savory goodness that is Pepperoni Pizza Breadsticks – your new go-to snack sensation!
Nutritional Information
Per serving (approximate values for 1 breadstick):
- Calories: 180-220
- Protein: 8-12g
- Carbohydrates: 18-22g
- Fat: 9-13g
- Fiber: 1-2g
- Sodium: 400-600mg
Ingredients
- 1 can (13.8 oz) refrigerated pizza dough (e.g., Pillsbury or similar brand)
- 12 mozzarella string cheese sticks
- 60-70 slices pepperoni (about 3-4 oz, depending on size)
- 2 tablespoons unsalted butter, melted
- 1 teaspoon garlic powder (or 2 tablespoons prepared garlic pizza butter)
- 1/2 teaspoon dried Italian seasoning (or oregano/parsley flakes)
- 1/4 cup grated Parmesan cheese
- Marinara sauce or pizza sauce, for dipping
Instructions
- Preheat your oven to 400°F (200°C). Line a large baking sheet with parchment paper or a silicone baking mat to prevent sticking and ensure easy cleanup.
- Unroll the refrigerated pizza dough onto a lightly floured surface or directly onto your prepared baking sheet. Using a pizza cutter or a sharp knife, cut the dough lengthwise into 12 equal strips. If your dough is rectangular, you might cut it into 3 sections lengthwise, then each section into 4 strips.
- For each breadstick, take one strip of pizza dough. Lay out 5-6 slices of pepperoni slightly overlapping in a line down the center of the dough strip.
- Place one mozzarella string cheese stick directly on top of the pepperoni slices, centered along the dough strip.
- Carefully fold one long edge of the pizza dough over the string cheese and pepperoni. Then, fold the other long edge over, pressing firmly to seal the dough around the fillings. Make sure the ends are also pinched closed to prevent the cheese from leaking out during baking. Roll the sealed dough gently to create a uniform breadstick shape.
- Repeat the process for the remaining dough strips, pepperoni, and string cheese. Arrange the assembled breadsticks on the prepared baking sheet, leaving about an inch of space between each one to allow for even baking.
- In a small bowl, combine the melted butter, garlic powder, and dried Italian seasoning (if using homemade garlic butter). If using pre-made garlic pizza butter, ensure it’s melted.
- Brush the tops and sides of each breadstick generously with the garlic butter mixture.
- Sprinkle the grated Parmesan cheese evenly over all the buttered breadsticks.
- Bake for 12-18 minutes, or until the breadsticks are golden brown, puffed up, and the cheese is visibly melted and bubbling. Keep an eye on them towards the end of the baking time, as ovens can vary. If they’re browning too quickly, you can loosely tent them with foil.
- Once baked, carefully remove the breadsticks from the oven. Let them cool on the baking sheet for a few minutes before transferring them to a serving platter. This allows the cheese to set slightly, making them easier to handle.
- Serve hot with a side of warm marinara sauce or pizza sauce for dipping. Enjoy your homemade Pepperoni Pizza Breadsticks!
Cooking Tips and Variations
Achieving pepperoni pizza breadstick perfection is easier than you think, especially with a few handy tips and creative variations. First and foremost, when handling the dough, ensure your surface is lightly floured to prevent sticking. The key to a non-leaky breadstick is a tight seal. After rolling the dough around the pepperoni and cheese, pinch all seams firmly, especially the ends. If the dough feels a bit stiff, let it sit at room temperature for 5-10 minutes before unrolling; this makes it more pliable and easier to work with. Don’t overfill your breadsticks; too much filling can make them difficult to roll and more prone to bursting during baking. For the best golden-brown finish, ensure you brush generously with the garlic butter mixture. You can even add a touch of olive oil to the butter for extra crispiness. Remember to rotate your baking sheet halfway through the baking time to ensure even browning across all breadsticks.
The beauty of these breadsticks lies in their versatility. While pepperoni and mozzarella are a classic pairing, feel free to get creative with your fillings. For a spicier kick, add a pinch of red pepper flakes to your garlic butter or sprinkle them over the pepperoni before rolling. You can also experiment with other cheeses; a blend of mozzarella and provolone, or even a sprinkle of sharp cheddar, can add depth. For veggie lovers, finely diced bell peppers, black olives, or sautéed mushrooms can be added alongside the pepperoni. Just make sure any vegetable additions are finely chopped and relatively dry to avoid excess moisture. If you want to make them heartier, consider adding cooked, crumbled sausage or finely diced cooked ham. For a different flavor profile, swap out the Italian seasoning for a blend of garlic and onion powder, or even a smoked paprika for a subtle smoky note. You can also sprinkle a little extra Parmesan cheese directly onto the dough strip before adding the fillings for an extra layer of cheesy goodness inside. Don’t be afraid to make these your own – the possibilities are endless!
Storage and Reheating
These Pepperoni Pizza Breadsticks are undeniably best enjoyed fresh from the oven, when the cheese is at its gooey, melty peak and the crust is perfectly crisp. However, if you find yourself with leftovers (a rare occurrence, we predict!), they can be stored and reheated for later enjoyment. To store, allow the breadsticks to cool completely to room temperature. Once cooled, place them in an airtight container or a resealable plastic bag. They will keep well in the refrigerator for up to 3-4 days. For longer storage, you can freeze them. Arrange the cooled breadsticks in a single layer on a baking sheet and freeze until solid (about 1-2 hours), then transfer them to a freezer-safe bag or container. They can be frozen for up to 1-2 months.
When it comes to reheating, the goal is to revive that delicious gooey center and crispy exterior without drying them out. If reheating from the refrigerator, the best method is to use your oven or a toaster oven. Preheat your oven to 350°F (175°C). Place the breadsticks directly on a baking sheet and heat for 8-12 minutes, or until warmed through and crisped to your liking. For a quicker option, you can use an air fryer at 350°F (175°C) for 3-5 minutes. The microwave is generally not recommended as it can make the dough soft and chewy and the cheese less appealing, but if it’s your only option, heat in 30-second intervals until warm. If reheating from frozen, there’s no need to thaw. Simply place the frozen breadsticks on a baking sheet in a preheated 375°F (190°C) oven and bake for 15-25 minutes, or until hot throughout and golden brown. Keep an eye on them to prevent over-browning, and consider covering them loosely with foil if they start to brown too quickly before the center is fully heated. Serve with fresh marinara for the best experience.
Frequently Asked Questions
Can I make these ahead of time?
Yes, you can! You can assemble the breadsticks up to the point of baking, brush them with garlic butter, and then cover them loosely with plastic wrap. Refrigerate for up to 2-3 hours before baking. This is a great tip for party prep. Just add a few extra minutes to the baking time if they are going into the oven cold from the fridge.
What if I don’t have string cheese?
No problem! You can use regular block mozzarella cheese. Simply cut the block into 12 sticks that are roughly the same size and shape as string cheese. Shredded mozzarella can also work, but it’s a bit messier and harder to keep contained; you’ll need to pile it carefully down the center of the dough strip and ensure a very tight seal to prevent it from oozing out.
My cheese is leaking out during baking, what went wrong?
Cheese leakage usually happens if the dough isn’t sealed tightly enough around the fillings. Make sure to pinch all the seams firmly, especially the ends of the breadsticks, before baking. Sometimes, overfilling with too much pepperoni or cheese can also make it harder to get a good seal, so try to stick to the recommended amounts.
Can I use homemade pizza dough for this recipe?
Absolutely! While store-bought dough is recommended for convenience, homemade pizza dough will work beautifully. Just ensure it’s rolled out to a consistent thickness (about 1/4 inch) before cutting into strips. The baking time might vary slightly depending on the dough’s thickness, so keep an eye on them.