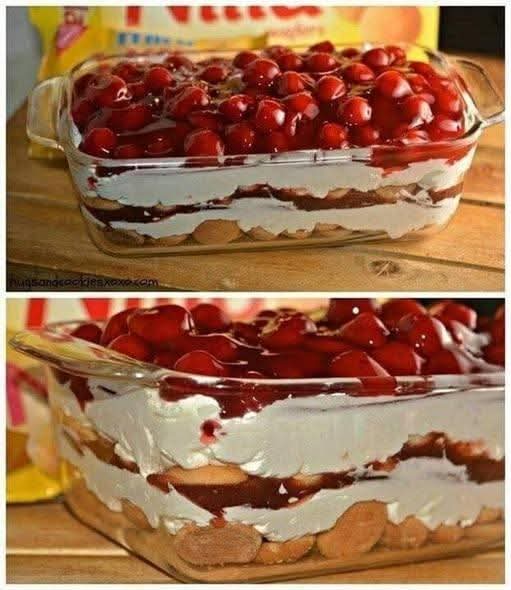
No-Bake Cherry Delight Trifle: The Creamy, Layered Dessert Everyone Loves
If you’re looking for a quick, impressive, and absolutely irresistible dessert, this No-Bake Cherry Delight Trifle is guaranteed to steal the show. With its layers of soft vanilla wafers, creamy cheesecake filling, sweet cherry pie topping, and rich cherry sauce dripping through every bite, this dessert is a perfect combination of texture and flavor. It looks stunning in a clear dish, requires zero baking, and can be assembled in minutes. Whether you’re hosting a family gathering, preparing for a holiday meal, or just craving something sweet and refreshing, this layered cherry dessert is always a crowd favorite.
What Makes This Cherry Trifle So Special
This recipe is a no-bake masterpiece—simple enough for beginners but elegant enough to serve at any celebration. The vanilla wafers soften into a cake-like texture as they sit, the creamy filling gives it a velvety richness, and the cherries add a beautiful pop of color and sweetness. Every slice reveals stunning layers, making it look like something straight out of a bakery display case. The ingredients are easy to find, the steps are straightforward, and the flavor is unforgettable.
Ingredients for No-Bake Cherry Delight Trifle
- 1 box vanilla wafers (like Nilla Wafers)
- 2 cans cherry pie filling
- 1 package cream cheese (8 oz), softened
- 1 cup powdered sugar
- 1 teaspoon vanilla extract
- 2 cups cold heavy whipping cream
or 1 tub whipped topping (like Cool Whip) - Optional: 2 tablespoons milk (to thin the cream cheese if needed)
H2: How to Make Cherry Delight Trifle Step by Step
Preparing the Creamy Layer
In a medium bowl, beat the softened cream cheese until smooth and free of lumps. Add the powdered sugar and vanilla extract, mixing until creamy. If the mixture is too thick, add a splash of milk to loosen it. In a separate bowl, whip the heavy cream until stiff peaks form, then gently fold it into the cream cheese mixture. This creates a light, fluffy filling that spreads beautifully and holds its shape in the layers.
H2: Building the Layers
First Layer: Vanilla Wafers
Start by placing vanilla wafers in a single layer on the bottom of a glass baking dish. They don’t need to be perfect—any gaps will fill in as they soften. These cookies act as the “cake” base for the dessert.
Second Layer: Creamy Filling
Spread a thick layer of the cream cheese mixture over the wafers, making sure to cover them completely. This creamy layer creates a smooth base for the cherry filling and ensures every bite has a rich, velvety texture.
Third Layer: Cherry Filling
Spread a generous layer of cherry pie filling over the cream. Let the cherries stay visible—they add color and make the dessert beautiful.
Repeat the layers:
- Vanilla wafers
- Cream cheese mixture
- Cherry filling
Finish with a thick, glossy layer of cherries on top.
H2: Chilling the Dessert
Refrigerate the trifle for at least 4 hours, but overnight is best. The longer it chills, the more the wafers soften and absorb the flavors, creating a cake-like texture. Chilling also helps the layers firm up for clean, beautiful slices.
H2: Serving Suggestions
This No-Bake Cherry Delight is best served cold. Use a large spoon or spatula to scoop out generous portions so each serving gets all the layers. It pairs perfectly with:
- A cup of coffee
- Hot tea
- Vanilla ice cream
- A drizzle of white chocolate for extra sweetness
If serving for guests, garnish with extra whipped cream and a few whole cherries on top.
H2: Why This Recipe Always Works
This dessert succeeds because it’s simple, balanced, and customizable. The cream layer brings richness without being heavy, and the cherries add natural tartness that prevents the dessert from being overly sweet. The wafers provide structure and transform into a tooth-soft cake that melts in your mouth. Every bite has creaminess, fruitiness, and soft cookie texture—it’s everything a layered dessert should be.
H2: Tips for the Best Results
- Make sure the cream cheese is completely soft before mixing to avoid lumps.
- Chill the dessert long enough for the layers to set (4 hours minimum).
- Use a glass dish to show off the layers.
- Fold whipped cream gently to keep the filling light and airy.
- Don’t skip the vanilla wafers—they add the perfect texture.
H2: Variations You Can Try
Strawberry Trifle
Replace cherry pie filling with strawberry topping for a fresh, summery version.
Blueberry Delight
Use blueberry pie filling for a darker, richer fruit layer.
Chocolate Cherry Trifle
Add a drizzle of chocolate ganache between the layers for a Black Forest-inspired dessert.
Lemon Cherry Layer
Mix lemon zest into the cream layer for a bright, refreshing twist.
Crunchy Topping
Add crushed pecans, walnuts, or graham cracker crumbs on top for extra crunch.
H2: Storage Information
Store the trifle covered in the refrigerator for up to 3 days. The layers continue to soften over time, making it even more delicious on day two. Freezing is not recommended, as the cream layer may separate.
Conclusion
This No-Bake Cherry Delight Trifle is everything you want in a dessert—easy, beautiful, creamy, fruity, and absolutely delicious. Its layers of vanilla wafers, whipped cream cheese filling, and glossy cherries make it a showstopper for any occasion. Whether you’re making it for holidays, birthdays, potlucks, or Sunday dinner, this dessert delivers perfection every single time. Simple ingredients and no baking make it beginner-friendly, yet the final result tastes like a gourmet treat. Prepare it today and enjoy a sweet, refreshing dessert that everyone will remember long after the last spoonful is gone.