Introduction
Prepare to have your dessert world rocked! We’re diving into a delightful treat that captures all the classic charm of a Boston Cream Pie but with one incredible twist: no baking required! That’s right, forget turning on the oven, especially on a sweltering day, because this No-Bake Boston Cream Cake delivers layers of creamy vanilla custard, a soft cake-like base, and a luscious chocolate glaze, all assembled with effortless grace. It’s the ultimate dessert hack for anyone who loves the iconic flavors of Boston Cream but prefers a simpler, cooler approach to confectionary magic.
Imagine sinking your spoon into a perfect individual portion, each bite a symphony of textures and tastes. The tender, soaked “cake” layer provides a comforting foundation, giving way to a rich, velvety custard that’s sweet and utterly satisfying. Capping it all off is a glossy, decadent chocolate glaze that sets beautifully, adding just the right amount of bittersweet contrast. This isn’t just a dessert; it’s an experience, a nostalgic nod to a beloved classic transformed into an accessible, stress-free masterpiece. Whether you’re a seasoned baker or a complete novice, this recipe is designed for success, promising a show-stopping dessert that looks as impressive as it tastes.
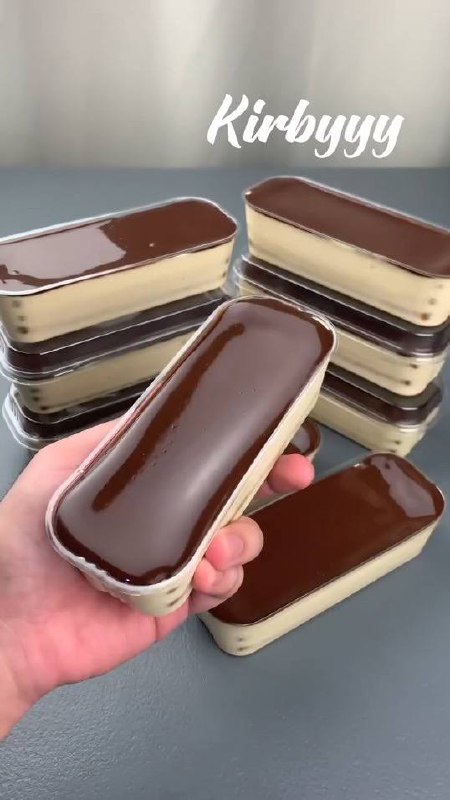
You’ll absolutely love this No-Bake Boston Cream Cake for its sheer convenience and undeniable deliciousness. It’s the perfect solution for impromptu gatherings, summer picnics, or simply satisfying that sweet craving without the fuss. The individual servings, as pictured, make it ideal for parties, allowing guests to easily grab their own elegant portion. It’s also fantastic for meal prep, giving you a ready-to-enjoy treat throughout the week. Get ready to impress your friends, family, and most importantly, yourself, with this incredibly easy, utterly irresistible dessert that proves you don’t need an oven to create something truly extraordinary.
Nutritional Information
Per serving (approximate values):
- Calories: 380
- Protein: 7g
- Carbohydrates: 50g
- Fat: 18g
- Fiber: 2g
- Sodium: 150mg
Ingredients
- For the “Cake” Base:
- 24-30 (about 7-8 ounces) ladyfingers or thin slices of store-bought vanilla sponge cake
- 1/2 cup strong brewed coffee, cooled (or milk, if preferred)
- 2 tablespoons granulated sugar (optional, for coffee soak)
- 1 teaspoon vanilla extract (optional, for coffee soak)
- For the Creamy Custard Filling:
- 2 cups whole milk
- 1/2 cup granulated sugar
- 1/4 cup cornstarch
- 1/4 teaspoon salt
- 2 large egg yolks
- 2 tablespoons unsalted butter
- 1 teaspoon vanilla extract
- 1 cup heavy cream, cold
- 2 tablespoons powdered sugar
- For the Glossy Chocolate Glaze:
- 4 ounces semi-sweet chocolate, finely chopped
- 1/2 cup heavy cream
- 1 tablespoon unsalted butter
- 1 tablespoon light corn syrup (optional, for extra shine)
- 1/2 teaspoon vanilla extract
Instructions
- Prepare the “Cake” Base:
- If using ladyfingers, gently split them in half lengthwise. If using sponge cake, cut into thin, rectangular pieces that will fit your serving containers.
- In a shallow dish, combine the cooled brewed coffee (or milk), granulated sugar (if using), and vanilla extract (if using). Stir until sugar dissolves.
- Quickly dip each ladyfinger half (or sponge cake piece) into the coffee mixture, ensuring it’s moistened but not soggy. Place one layer of soaked ladyfingers or cake pieces at the bottom of each individual serving container, trimming to fit if necessary. You may need to break some pieces to fill gaps. Aim for a relatively even layer. Set aside.
- Make the Creamy Custard Filling:
- In a medium saucepan, whisk together the whole milk, granulated sugar, cornstarch, and salt until the cornstarch is fully dissolved and there are no lumps.
- Heat the mixture over medium heat, stirring constantly with a whisk, until it thickens and comes to a boil. Once boiling, continue to cook and whisk for 1 minute to ensure the cornstarch is fully activated.
- Remove the saucepan from the heat. In a small bowl, lightly whisk the egg yolks. Gradually temper the egg yolks by slowly whisking about 1/2 cup of the hot milk mixture into the yolks. This prevents the yolks from scrambling.
- Pour the tempered egg yolk mixture back into the saucepan with the remaining hot milk mixture. Return the saucepan to medium-low heat and cook, stirring constantly, for another 1-2 minutes, until the custard thickens further and coats the back of a spoon. Do not boil.
- Remove from heat and stir in the unsalted butter and vanilla extract until fully incorporated and melted.
- Pour the hot custard into a clean bowl. Press a piece of plastic wrap directly onto the surface of the custard to prevent a skin from forming. Refrigerate for at least 2-3 hours, or until completely chilled and set.
- Once the custard is thoroughly chilled, in a separate cold bowl, whip the cold heavy cream with the powdered sugar until stiff peaks form.
- Gently fold the whipped cream into the chilled custard until no streaks remain and the mixture is light and airy.
- Spoon or pipe the creamy custard filling over the soaked “cake” base in each serving container, filling about two-thirds of the way to the top. Smooth the surface.
- Place the filled containers back into the refrigerator to chill while you prepare the glaze.
- Create the Glossy Chocolate Glaze:
- Place the finely chopped semi-sweet chocolate in a medium heatproof bowl.
- In a small saucepan, heat the heavy cream, unsalted butter, and light corn syrup (if using) over medium-low heat until the butter is melted and the mixture just begins to simmer around the edges. Do not boil.
- Pour the hot cream mixture over the chopped chocolate. Let it sit undisturbed for 5 minutes to allow the chocolate to melt.
- After 5 minutes, whisk gently from the center outwards until the mixture is smooth, glossy, and fully combined.
- Stir in the vanilla extract.
- Let the glaze cool for 10-15 minutes at room temperature, stirring occasionally, until it reaches a pourable but slightly thickened consistency. It should still be warm but not hot.
- Assemble and Chill:
- Carefully spoon or pour the slightly cooled chocolate glaze over the custard layer in each serving container, ensuring an even coat that reaches the edges.
- Return the assembled No-Bake Boston Cream Cakes to the refrigerator. Chill for a minimum of 2-4 hours to allow the glaze to set and the flavors to fully meld. For best results, chill overnight.
- Serve chilled and enjoy!
Cooking Tips and Variations
Troubleshooting:
- Custard not setting: Ensure you cook the custard mixture for the full minute after it boils, and then again after adding the egg yolks until it visibly thickens. Chilling time is crucial; don’t rush it. If it’s still too loose, you might have used too little cornstarch or not cooked it long enough. A quick fix can be to whisk in a little more cornstarch dissolved in cold milk and briefly heat again, or for a no-heat fix, fold in a small amount of softened cream cheese (about 2-3 tablespoons) to add body.
- Glaze too thick: If your chocolate glaze is too thick to pour smoothly, add a teaspoon of hot heavy cream at a time, stirring well, until it reaches the desired consistency.
- Glaze too thin: If the glaze is too runny, let it sit at room temperature for an additional 10-15 minutes, stirring occasionally, to allow it to cool and thicken slightly. If it’s still too thin, you can try chilling it for a few minutes in the fridge, but be careful not to let it seize up.
- Soggy base: When soaking the ladyfingers or cake, ensure you dip them quickly. They should be moistened, not saturated. A quick dip and immediate removal is key.
Make Ahead & Storage:
- This No-Bake Boston Cream Cake is an excellent make-ahead dessert! It needs significant chilling time, so preparing it the day before you plan to serve it is ideal.
- Store individual servings covered tightly with plastic wrap in the refrigerator for up to 3-4 days. The flavors tend to deepen beautifully over time.
- We do not recommend freezing this dessert, as the custard and ladyfinger texture can become compromised upon thawing.
Flavor Variations:
- Base Variations: Instead of ladyfingers, you could use crumbled vanilla wafers for a slightly different texture, or even thin slices of brioche for a richer, more bread-pudding-like base. For a hint of citrus, add a teaspoon of orange zest to your coffee soak.
- Custard Additions: Elevate your custard by infusing the milk with a vanilla bean pod while heating, then removing it before adding other ingredients. For a nutty twist, add 1/4 teaspoon of almond extract along with the vanilla. A pinch of nutmeg can also add warmth.
- Glaze Twists: For a coffee-infused glaze, add 1/2 teaspoon of espresso powder to the hot cream mixture. A white chocolate glaze can be made by substituting white chocolate for semi-sweet and adjusting the cream slightly for consistency. You can also add a touch of peppermint extract to the chocolate glaze for a festive touch.
- Liqueur Boost: For an adult version, a tablespoon of coffee liqueur (like Kahlua) or rum can be added to the coffee soak for the base, or a splash of Grand Marnier to the custard for an orange hint.
Presentation:
- The individual clear containers are perfect for showcasing the beautiful layers.
- Garnish each serving with a fresh raspberry, a few chocolate shavings, or a delicate mint leaf just before serving for an elegant touch.
- A light dusting of cocoa powder or powdered sugar over the glaze, applied through a fine mesh sieve, can also add visual appeal.
Storage and Reheating
Storage:
Once assembled, these No-Bake Boston Cream Cakes should be stored in the refrigerator. Ensure each individual container is tightly covered with plastic wrap to prevent the dessert from absorbing refrigerator odors and to keep the custard and glaze fresh. When stored correctly, they will remain delicious for up to 3 to 4 days. In fact, many find their flavor improves after the first day, as the layers have more time to meld and the cake base fully softens.
Reheating:
This is a chilled dessert and is meant to be enjoyed cold, straight from the refrigerator. Reheating is not recommended, as it would alter the delicate texture of the custard, soften the chocolate glaze too much, and potentially make the cake base soggy. Simply remove from the fridge, unwrap, and serve!
Frequently Asked Questions
Can I make this dessert in a larger dish instead of individual portions?
Yes, absolutely! While individual servings are convenient and visually appealing, you can certainly assemble this No-Bake Boston Cream Cake in an 8×8 inch square dish, a 9-inch round springform pan, or even a trifle dish. Layer the soaked ladyfingers/cake, then the custard, and finally the chocolate glaze. The chilling time will remain the same, if not slightly longer for a larger volume, to ensure everything sets properly.
What if I don’t like coffee? Can I use something else to soak the ladyfingers?
Of course! The coffee soak is traditional for Boston Cream Pie, but you can easily substitute it with milk (dairy or non-dairy), a light simple syrup (equal parts sugar and water, dissolved and cooled), or even a fruit juice like orange juice for a different flavor profile. The key is to moisten the cake base without making it soggy.
My chocolate glaze isn’t shiny. What went wrong?
A few factors contribute to a shiny glaze. Ensuring your chocolate is finely chopped helps it melt smoothly. The addition of light corn syrup (as in the recipe) is a secret weapon for glossiness. Also, make sure you pour the glaze when it’s still slightly warm but not hot, and stir it gently until it’s completely smooth before pouring. Over-stirring or pouring it when it’s too hot or too cold can affect its sheen. Using good quality chocolate also makes a difference.
Can I use instant pudding mix for the custard to save time?
While instant pudding mix can be a shortcut, for the best and most authentic Boston Cream flavor and texture, we highly recommend making the custard from scratch as outlined in the recipe. Homemade custard offers a richer, creamier, and more nuanced vanilla flavor that instant mixes often lack. However, if you are truly pressed for time, you can prepare a vanilla instant pudding according to package directions, making sure it’s thick, and then fold in the whipped cream as instructed to lighten it.