Introduction
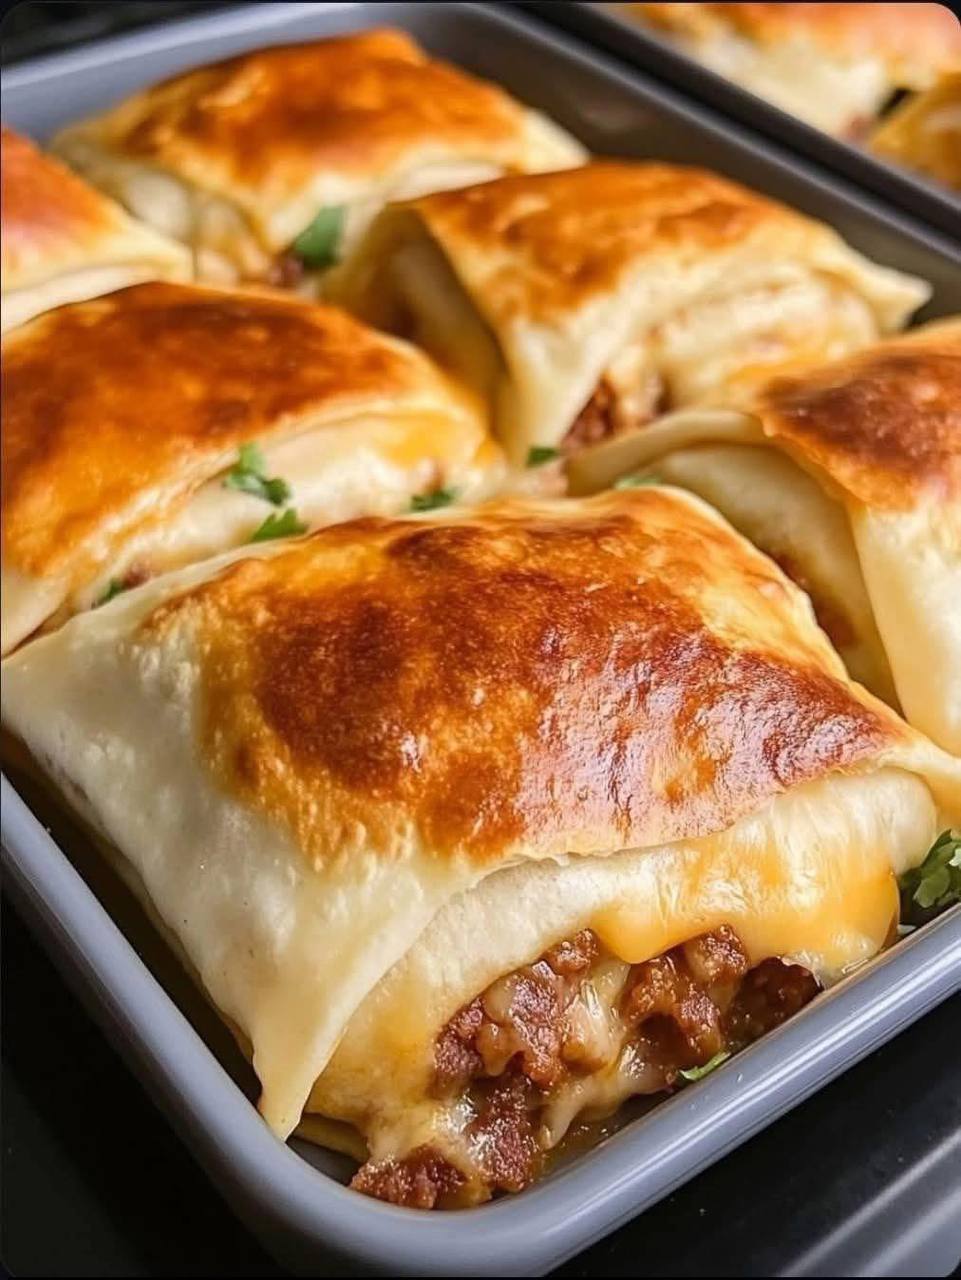
Get ready to revolutionize your weeknight dinner routine and impress at your next gathering with these incredible Loaded Cheesy Pocket Tacos! Forget flimsy shells and messy toppings; we’re talking about a handheld, baked sensation that combines all the irresistible flavors of your favorite tacos into a neat, golden-brown package. Think of them as a delicious mash-up between a cheesy taco and a savory pastry puff – a true comfort food masterpiece that’s both fun to make and even more fun to eat.
What makes these pocket tacos so special? It’s the perfect harmony of textures and tastes. Each bite delivers a burst of seasoned ground beef, gooey melted cheese, and your favorite taco fixings, all encased in a tender, flaky dough. They’re “loaded” with flavor and “cheesy” to perfection, making them an instant crowd-pleaser for kids and adults alike. Plus, because they’re baked, not fried, you get that satisfying crunch without the extra grease, and they hold together beautifully, making them ideal for parties, lunchboxes, or a quick, satisfying dinner on the go.
Whether you’re looking for an exciting new way to enjoy taco night, a fantastic appetizer for game day, or a delicious meal prep option, these Loaded Cheesy Pocket Tacos are about to become your new go-to. They’re surprisingly simple to assemble, highly customizable, and guaranteed to bring smiles to the table. Let’s dive into creating these irresistible handheld taco pies!
Nutritional Information
Per serving (approximate values):
- Calories: 420
- Protein: 28g
- Carbohydrates: 35g
- Fat: 20g
- Fiber: 3g
- Sodium: 850mg
Ingredients
- 1 tablespoon olive oil
- 1 pound lean ground beef (80/20 or 90/10)
- 1 medium yellow onion, finely diced
- 2 cloves garlic, minced
- 1 packet (1 ounce) taco seasoning mix
- 1/2 cup water
- 1/2 cup canned diced tomatoes, drained (optional, for extra moisture)
- 1 cup shredded Colby Jack cheese (or cheddar, Monterey Jack, or a Mexican blend)
- 1/2 cup shredded mozzarella cheese
- 2 (8-ounce) cans refrigerated crescent roll dough sheets or pizza dough sheets
- 1 large egg, beaten (for egg wash)
- Optional toppings: chopped fresh cilantro, sour cream, salsa, guacamole, sliced jalapeños
Instructions
- Preheat your oven to 375°F (190°C). Line two large baking sheets with parchment paper for easy cleanup.
- Heat the olive oil in a large skillet or frying pan over medium-high heat. Add the ground beef and cook, breaking it up with a spoon, until it’s fully browned and no pink remains. Drain any excess grease from the skillet.
- Add the finely diced yellow onion to the skillet with the browned ground beef. Sauté for 3-5 minutes, or until the onion softens and becomes translucent.
- Stir in the minced garlic and cook for another minute until fragrant, being careful not to burn the garlic.
- Sprinkle the taco seasoning mix over the beef and onion mixture. Stir well to coat everything evenly.
- Pour in the 1/2 cup of water and add the drained diced tomatoes (if using). Bring the mixture to a simmer, then reduce the heat to low and let it cook for 5-7 minutes, or until most of the liquid has evaporated and the mixture has thickened. This allows the flavors to meld. Remove from heat and let it cool slightly.
- In a medium bowl, combine the shredded Colby Jack cheese and shredded mozzarella cheese.
- Carefully unroll one sheet of crescent roll dough or pizza dough on a lightly floured surface or directly on your parchment-lined baking sheet. If using crescent roll dough, press the perforations together firmly to create a seamless sheet.
- Using a sharp knife or a pizza cutter, cut the dough sheet into 4-6 equal rectangles or squares, depending on how large you want your pockets to be. Aim for pieces roughly 4×5 inches.
- Spoon about 2-3 tablespoons of the cooled ground beef mixture onto one half of each dough rectangle, leaving a small border around the edges. Avoid overfilling, as this can make sealing difficult and cause leaks.
- Sprinkle a generous amount of the mixed shredded cheese over the beef filling.
- Fold the other half of the dough over the filling, creating a pocket. Gently press down around the edges to seal. You can use your fingers or, for a decorative and secure seal, use the tines of a fork to crimp the edges all around. Ensure there are no gaps for the filling to escape.
- Carefully transfer the sealed taco pockets to the prepared baking sheets, leaving some space between each one. Repeat the process with the remaining dough and filling.
- In a small bowl, whisk the egg to create an egg wash. Lightly brush the tops of each taco pocket with the egg wash. This will help them turn a beautiful golden brown and give them a slightly glossy finish.
- Bake for 12-18 minutes, or until the pockets are puffed up, golden brown, and cooked through. Baking time may vary depending on your oven and the thickness of your dough.
- Once baked, remove the taco pockets from the oven and let them cool on the baking sheet for a few minutes before serving. This allows the cheese to set slightly and prevents burns.
- Serve warm with your favorite taco toppings like sour cream, salsa, guacamole, or fresh cilantro.
Cooking Tips and Variations
For the crispiest pockets, ensure your oven is fully preheated and don’t overcrowd the baking sheets. Giving each pocket enough space allows for even heat circulation and a perfectly golden crust. If you notice some pockets browning faster than others, you can rotate the baking sheets halfway through the baking time.
To prevent leaks, make sure the beef mixture is not too wet. If it seems watery after simmering, cook it a little longer until most of the liquid has evaporated. Also, be diligent when sealing the edges. A good crimp with a fork not only looks nice but also creates a strong seal. You can also lightly moisten the edges of the dough with a little water before folding to help them stick together.
Don’t have crescent roll dough? You can easily substitute store-bought puff pastry sheets or even homemade pie crust for a different texture. If using puff pastry, cut into squares and follow the same folding and sealing method. For a healthier twist, you can opt for whole wheat pizza dough.
The filling is incredibly versatile! Instead of ground beef, try ground turkey, chicken, or even a plant-based ground meat alternative for a vegetarian option. You can also add black beans, corn, diced bell peppers, or finely chopped spinach to the beef mixture for extra veggies and flavor. Spice it up by adding a pinch of cayenne pepper or a dash of your favorite hot sauce to the filling.
Experiment with different cheese combinations. A spicy Monterey Jack can add a kick, while a sharp cheddar provides a more robust flavor. For an even more “loaded” experience, consider adding a thin layer of refried beans to the dough before adding the beef and cheese. Just remember not to overfill!
For a cheesy crust, sprinkle a little extra shredded cheese directly onto the egg-washed tops of the pockets before baking. It will melt and crisp up beautifully, adding another layer of deliciousness.
Storage and Reheating
These Loaded Cheesy Pocket Tacos are fantastic for meal prep! Once baked and cooled completely, store any leftovers in an airtight container in the refrigerator for up to 3-4 days. Make sure they are completely cool before storing to prevent condensation, which can make the crust soggy.
For best results when reheating, we recommend using an oven or a toaster oven. Preheat your oven to 350°F (175°C) and place the pockets directly on a baking sheet. Reheat for 10-15 minutes, or until they are heated through and the crust has re-crisped. This method will help maintain their texture and prevent them from becoming soggy.
You can also reheat them in a microwave, but be aware that the crust may lose some of its crispiness. Microwave on high for 30-60 seconds per pocket, or until warmed through. If using a microwave, you might want to finish them in a toaster oven or air fryer for a few minutes to bring back some crispness.
These pockets also freeze well! To freeze, bake them as directed, then let them cool completely. Place the cooled pockets in a single layer on a baking sheet and freeze for about 1-2 hours, or until solid. Once frozen, transfer them to a freezer-safe bag or container, separating layers with parchment paper to prevent sticking. They can be stored in the freezer for up to 2-3 months.
To reheat from frozen, you can bake them directly in a preheated oven at 375°F (190°C) for 20-30 minutes, or until heated through and golden brown. You may want to cover them loosely with foil if they start to brown too quickly before the inside is fully warm. For a quicker reheat, thaw them in the refrigerator overnight before baking.
Frequently Asked Questions
Can I make these ahead of time?
Yes, absolutely! You can prepare the ground beef filling up to 2-3 days in advance and store it in an airtight container in the refrigerator. When you’re ready to bake, simply assemble the pockets with the pre-made filling and proceed with the baking instructions. Alternatively, you can assemble the entire pockets (unbaked) and refrigerate them for up to 24 hours before baking. Just brush with egg wash right before they go into the oven.
What kind of dough works best for these taco pockets?
Refrigerated crescent roll dough sheets or pizza dough sheets are excellent choices for their convenience and ease of use. Crescent roll dough yields a flakier, richer crust, while pizza dough offers a slightly chewier, bread-like texture. You can also use store-bought puff pastry for an even more delicate and buttery crust. Just ensure you press the seams together firmly if using crescent rolls to create a solid sheet.
Can I adjust the spice level of the filling?
Definitely! The recipe uses a standard taco seasoning packet, which typically provides a mild to medium spice level. To make it spicier, you can add a pinch of cayenne pepper, a dash of hot sauce, or include finely diced jalapeños (with or without seeds, depending on your preference) to the beef mixture. For a milder version, you can use a “mild” taco seasoning or reduce the amount of seasoning and add a little extra cumin and chili powder for flavor without as much heat.
What are some good dipping sauces for these taco pockets?
These Loaded Cheesy Pocket Tacos are fantastic on their own, but dipping sauces take them to the next level! Classic options include sour cream, guacamole, and your favorite salsa (mild, medium, or hot). Other delicious choices could be a creamy cilantro-lime sauce, a spicy queso dip, or even a simple ranch dressing. Don’t be afraid to experiment with what you love!