Introduction
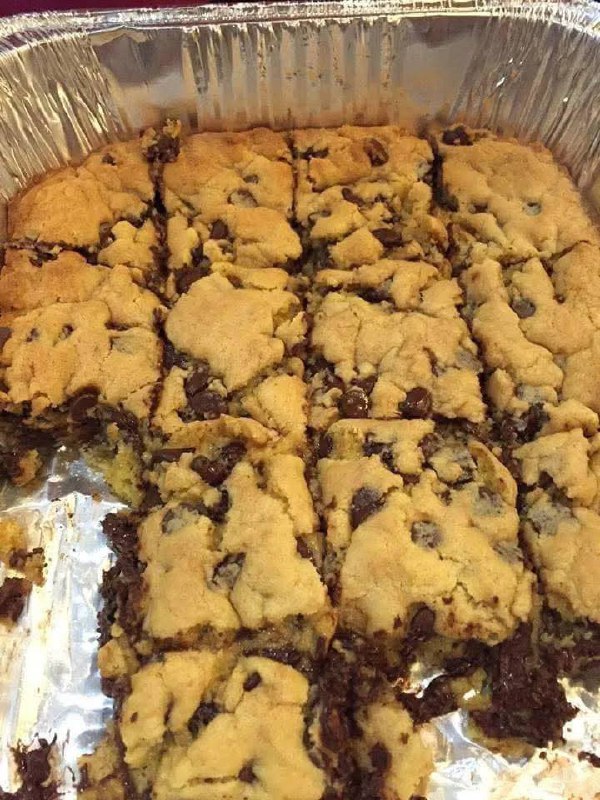
Get ready to meet your new favorite dessert: Lazy Chocolate Chip Cookie Bars! Imagine all the warm, gooey, chocolatey goodness of your beloved chocolate chip cookies, but without any of the fuss of scooping individual portions. These bars are the ultimate solution for anyone craving a homemade treat with minimal effort and maximum deliciousness. They’re a true game-changer for busy weeknights, last-minute potlucks, or simply when a serious cookie craving strikes.
What makes these bars “lazy”? It’s all in the simplicity! Instead of rolling and baking batch after batch, you press one glorious sheet of cookie dough into a single pan, bake it, and then slice it into perfect squares. The result is a uniformly chewy, soft-centered, and utterly irresistible bar loaded with melty chocolate chips. No fancy techniques, no intricate decorating, just pure, unadulterated cookie bliss that comes together in a flash.
These Lazy Chocolate Chip Cookie Bars are incredibly popular because they hit all the right notes: they’re quick to prepare, incredibly satisfying, and appeal to absolutely everyone. Their rich, buttery flavor combined with generous pockets of molten chocolate makes them an instant crowd-pleaser. Whether you’re serving them warm with a scoop of vanilla ice cream, packing them for a school lunch, or bringing them to a party, these bars deliver on taste, texture, and convenience every single time. Prepare to fall in love with the easiest, most delicious cookie experience you’ve ever had!
Nutritional Information
Per serving (approximate values for 24 bars):
- Calories: 250
- Protein: 3g
- Carbohydrates: 35g
- Fat: 12g
- Fiber: 1g
- Sodium: 180mg
Ingredients
- 1 cup (2 sticks) unsalted butter, melted
- 1 cup packed light brown sugar
- 1/2 cup granulated sugar
- 2 large eggs
- 2 teaspoons vanilla extract
- 2 1/4 cups all-purpose flour
- 1 teaspoon baking soda
- 1/2 teaspoon salt
- 1 1/2 cups (about 9 ounces) semi-sweet chocolate chips, plus more for sprinkling on top if desired
Instructions
- Preheat your oven to 350°F (175°C). Lightly grease a 9×13 inch baking pan, or line it with parchment paper, leaving an overhang on the sides for easy lifting. If using a disposable aluminum pan, no greasing or parchment is typically needed.
- In a large mixing bowl, combine the melted butter, light brown sugar, and granulated sugar. Whisk together until smooth and well combined.
- Add the eggs one at a time, mixing well after each addition. Stir in the vanilla extract until fully incorporated.
- In a separate medium bowl, whisk together the all-purpose flour, baking soda, and salt.
- Gradually add the dry ingredients to the wet ingredients, mixing on low speed or by hand until just combined. Be careful not to overmix; stop as soon as no dry streaks of flour remain.
- Gently fold in the 1 1/2 cups of semi-sweet chocolate chips until they are evenly distributed throughout the dough.
- Press the cookie dough evenly into the prepared 9×13 inch baking pan. You can use the back of a spoon or your hands (lightly floured if sticky) to spread it out. If desired, sprinkle a few extra chocolate chips on top for a visually appealing finish.
- Bake for 25-30 minutes, or until the edges are golden brown and the center is set but still looks slightly soft. A toothpick inserted into the center should come out with moist crumbs, not wet batter. Avoid overbaking to ensure the bars remain chewy and gooey.
- Remove the pan from the oven and place it on a wire rack to cool completely. This is a crucial step for clean cuts and optimal texture.
- Once completely cooled (this can take 1-2 hours), use the parchment paper overhang to lift the entire slab of cookie bars out of the pan. Place it on a cutting board and slice into 16-24 squares, depending on your desired serving size.
Cooking Tips and Variations
For the chewiest, most delicious Lazy Chocolate Chip Cookie Bars, resist the urge to overmix the dough. Overmixing develops the gluten in the flour too much, leading to tougher bars. Mix just until the dry ingredients are incorporated. Similarly, do not overbake! These bars are meant to be soft and gooey in the center. The edges should be golden, and the center should look set but still slightly tender. If you bake them until they are firm all the way through, they will be dry. Cooling completely before cutting is perhaps the most important tip; warm bars will crumble and fall apart when you try to slice them. Patience here will be rewarded with perfectly neat squares. For an extra touch of flavor, sprinkle a little flaky sea salt over the bars immediately after they come out of the oven. This enhances the chocolate flavor beautifully and adds a nice contrast.
The beauty of these cookie bars lies in their versatility. While semi-sweet chocolate chips are a classic, feel free to experiment with other varieties. Try milk chocolate chips for a sweeter bar, dark chocolate chips for a richer, more intense flavor, or even white chocolate chips for a creamy twist. A combination of different chocolate chips can also create a wonderful depth of flavor. Nuts are a fantastic addition for those who enjoy a little crunch; stir in 1/2 to 1 cup of chopped walnuts, pecans, or even macadamia nuts along with the chocolate chips. For a more decadent treat, you could swirl in some caramel sauce or a dollop of peanut butter into the dough before baking. A sprinkle of M&M’s or other candies can make these bars extra festive and fun, especially for kids’ parties. Don’t be afraid to get creative and make them your own!
Storage and Reheating
To keep your Lazy Chocolate Chip Cookie Bars fresh and delicious, store them in an airtight container at room temperature. They will remain soft and chewy for up to 3-4 days. If you live in a particularly warm or humid climate, or if you want to extend their shelf life, you can store them in the refrigerator for up to a week. Just be aware that refrigeration can sometimes make them a little firmer, so bringing them back to room temperature before serving is recommended.
For longer storage, these bars freeze beautifully. Once completely cooled, wrap individual bars tightly in plastic wrap, then place them in a freezer-safe bag or container. They can be frozen for up to 3 months. To reheat, you can simply let them thaw at room temperature for an hour or two. For that fresh-out-of-the-oven experience, warm individual bars in the microwave for 10-20 seconds, or in a preheated oven at 300°F (150°C) for about 5-10 minutes, until the chocolate is slightly melty and gooey again. This is especially delightful when serving with ice cream!
Frequently Asked Questions
Can I use cold butter instead of melted butter?
While traditional cookies often use softened butter, this recipe specifically calls for melted butter to create a chewier bar with a slightly different texture profile. Using cold butter would result in a denser, more cake-like bar, so for the intended “lazy” and gooey result, stick with melted butter.
My bars came out dry, what went wrong?
The most common reason for dry cookie bars is overbaking. Ovens can vary, so always keep an eye on them. Aim for edges that are golden brown and a center that looks set but still slightly soft. A toothpick should come out with moist crumbs, not completely clean. Also, ensure you’re measuring your flour correctly (spoon and level, don’t scoop directly from the bag) as too much flour can also lead to dryness.
Can I make these ahead of time?
Absolutely! These cookie bars are an excellent make-ahead dessert. You can bake them a day or two in advance and store them at room temperature in an airtight container. They taste just as wonderful the next day, and some people even find the flavors deepen overnight. They’re perfect for preparing for parties or gatherings without last-minute stress.
What if I don’t have a 9×13 inch pan?
If you don’t have a 9×13 inch pan, you can use a slightly smaller pan, such as an 8×8 or 9×9 inch pan, but be aware that the bars will be thicker and will require a longer baking time (likely 5-10 minutes more). Keep an eye on them and adjust accordingly. Conversely, using a larger pan will result in thinner bars that bake faster. The key is to watch for the visual cues of doneness rather than strictly adhering to the time.