Introduction
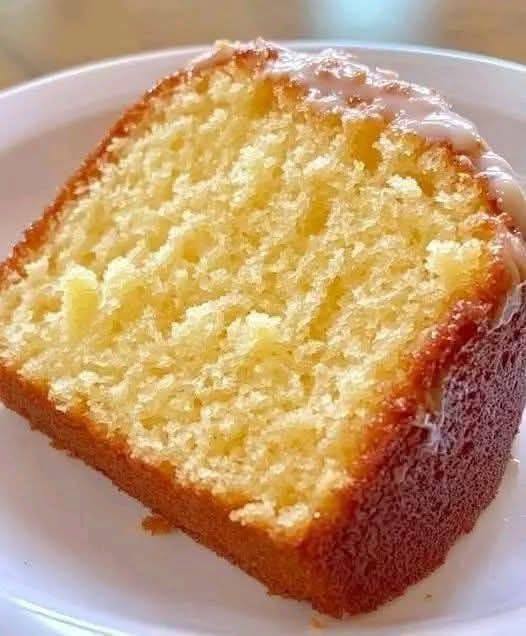
Prepare to be utterly captivated by the Kentucky Butter Cake, a dessert that embodies the very essence of Southern comfort and indulgence. Imagine a cake so incredibly moist, so profoundly buttery, that each bite melts in your mouth, leaving behind a lingering sweetness that begs for more. This isn’t just any cake; it’s a culinary masterpiece, celebrated for its dense yet tender crumb and its signature golden hue. What makes this cake truly legendary is not just the generous amount of butter in the batter, but also the magical butter syrup that’s poured over it while still warm, creating an unparalleled moistness and an irresistible glossy finish. It’s a cake that promises to be the star of any gathering, a true testament to the simple power of quality ingredients and a heartfelt recipe.
The Kentucky Butter Cake holds a special place in the hearts of those who appreciate classic American desserts. Its popularity stems from its straightforward preparation combined with its extraordinary flavor and texture. Unlike many elaborate cakes, it doesn’t rely on complex fillings or frostings to shine. Instead, its charm lies in its inherent richness and the way the butter syrup penetrates every crevice, ensuring a consistently moist and flavorful experience from the first slice to the last. This recipe brings that beloved tradition right into your kitchen, proving that you don’t need a professional baker to achieve bakery-quality results. With a few common ingredients and a little love, you’ll be able to create a cake that tastes like it came straight from a charming Southern kitchen.
What sets this Kentucky Butter Cake apart is its dedication to buttery goodness. From the moment you start creaming the butter and sugar, you’ll know you’re in for a treat. The high-quality butter contributes not only to the cake’s incredible flavor but also to its tender structure. The secret weapon, of course, is the warm butter syrup – a simple yet transformative addition that elevates the cake from merely good to absolutely divine. This syrup, made with more butter, sugar, and water, soaks into the warm cake, sealing in moisture and infusing it with an even deeper, richer buttery taste. The result is a cake that is dense without being heavy, sweet without being cloying, and so incredibly moist it practically glistens. Get ready to bake a cake that will undoubtedly become a new family favorite!
Nutritional Information
Per serving (approximate values):
- Calories: 450
- Protein: 5g
- Carbohydrates: 60g
- Fat: 22g
- Fiber: 1g
- Sodium: 280mg
Ingredients
- 2 ½ cups all-purpose flour
- 1 teaspoon baking powder
- ½ teaspoon baking soda
- ½ teaspoon salt
- 1 cup (2 sticks) unsalted butter, softened
- 2 cups granulated sugar
- 3 large eggs, at room temperature
- 1 teaspoon vanilla extract
- 1 cup buttermilk, at room temperature
- For the Butter Syrup:
- ½ cup (1 stick) unsalted butter
- 1 cup granulated sugar
- ¼ cup water
- 1 teaspoon vanilla extract
Instructions
- Preheat your oven to 325°F (160°C). Grease and flour a 10-12 cup Bundt pan thoroughly, ensuring all crevices are coated. Alternatively, you can use a 9×13 inch baking pan, adjusting baking time as needed.
- In a medium bowl, whisk together the all-purpose flour, baking powder, baking soda, and salt. Set aside.
- In a large mixing bowl, using an electric mixer, cream together the softened 1 cup unsalted butter and 2 cups granulated sugar until light and fluffy, about 3-5 minutes. This step is crucial for incorporating air into the batter, leading to a tender cake.
- Add the eggs one at a time, beating well after each addition. Make sure each egg is fully incorporated before adding the next. Scrape down the sides of the bowl as needed to ensure everything is evenly mixed.
- Stir in the 1 teaspoon vanilla extract into the butter-sugar-egg mixture.
- Gradually add the dry ingredients to the wet ingredients, alternating with the 1 cup buttermilk, beginning and ending with the dry ingredients. Mix on low speed until just combined. Be careful not to overmix, as overmixing can lead to a tough cake. The batter should be smooth but don’t worry about a few small lumps.
- Pour the cake batter evenly into the prepared Bundt pan. Tap the pan gently on the counter a few times to release any air bubbles.
- Bake for 55-65 minutes, or until a wooden skewer or toothpick inserted into the center of the cake comes out clean or with just a few moist crumbs attached. The top should be golden brown and spring back lightly when touched.
- While the cake is baking, prepare the butter syrup. In a small saucepan, combine the ½ cup unsalted butter, 1 cup granulated sugar, and ¼ cup water.
- Bring the syrup mixture to a boil over medium heat, stirring constantly until the sugar is completely dissolved. Once boiling, reduce the heat and let it simmer for 2-3 minutes without stirring, allowing it to thicken slightly.
- Remove the syrup from the heat and stir in the 1 teaspoon vanilla extract. Keep the syrup warm.
- Once the cake is done baking, immediately remove it from the oven. While the cake is still in the pan and hot, use the wooden skewer or toothpick to poke holes all over the top surface of the cake. Poke deeply, making sure to reach the bottom of the pan to allow the syrup to penetrate thoroughly.
- Slowly and evenly pour the warm butter syrup over the entire hot cake, allowing it to soak into all the poked holes. Take your time with this step, ensuring maximum absorption.
- Let the cake cool in the Bundt pan for at least 30-45 minutes. This allows the syrup to fully absorb and the cake to firm up before inverting.
- After cooling in the pan, carefully invert the cake onto a serving plate or wire rack. Allow it to cool completely before slicing and serving. This ensures the cake is fully set and easy to cut.
Cooking Tips and Variations
For the ultimate Kentucky Butter Cake, ensure all your cold ingredients, especially the butter, eggs, and buttermilk, are at room temperature. This allows them to emulsify properly, creating a smoother batter and a more tender, even-textured cake. When creaming the butter and sugar, take your time – 3 to 5 minutes at medium speed is ideal to incorporate enough air for a light and fluffy crumb. Do not overmix the batter once the flour is added; mix just until combined to prevent gluten from developing too much, which can lead to a tough cake. The butter soak is the heart of this cake, so don’t rush it. Poke plenty of holes deeply into the warm cake, and pour the warm syrup slowly and evenly to allow maximum absorption. For easy release from the Bundt pan, make sure to grease and flour it meticulously, getting into every crevice. You can even use a baking spray with flour for added insurance. Lining the bottom of the pan with parchment paper if using a springform or regular round cake pan can also help.
To prevent your cake from sticking, after thoroughly greasing and flouring your Bundt pan, consider adding a thin layer of fine breadcrumbs or finely ground nuts instead of just flour. This creates an extra barrier and often facilitates an easier release. When testing for doneness, a wooden skewer should come out with a few moist crumbs attached, not wet batter. If it’s completely clean, the cake might be slightly overbaked. Remember, the cake will continue to cook slightly from its residual heat after being removed from the oven. For easy slicing and to maintain its beautiful structure, always allow the cake to cool completely before cutting into it. If you try to slice it warm, it may crumble and stick to the knife.
Beyond the classic, there are delightful variations to explore. For a brighter, zesty flavor, add 1-2 tablespoons of fresh lemon or orange zest to the batter along with the vanilla extract. The citrus complements the buttery richness beautifully. You can also experiment with different extracts; try almond extract for a subtle nutty note, or switch to a high-quality vanilla bean paste for a more intense vanilla flavor. For added texture and a delicious crunch, fold in ½ to 1 cup of chopped pecans or walnuts into the batter just before pouring it into the pan. If you’re feeling extra indulgent, consider a simple powdered sugar glaze made with powdered sugar and a touch of milk or lemon juice, drizzled over the cooled cake. For a creamier finish, a light cream cheese glaze would also be divine, providing a slight tang to balance the sweetness.
Storage and Reheating
Proper storage is key to keeping your Kentucky Butter Cake moist and delicious for days. Once the cake has completely cooled, store it at room temperature in an airtight container. A cake dome or a large container with a tight-fitting lid works perfectly. This prevents the cake from drying out and keeps it fresh for up to 3-4 days. If your kitchen is particularly warm or humid, or if you plan to keep the cake longer, you can store it in the refrigerator for up to a week. However, be aware that refrigeration can sometimes alter the texture slightly, making it a bit denser. To counteract this, simply bring refrigerated cake back to room temperature before serving for the best flavor and texture.
For longer storage, Kentucky Butter Cake freezes exceptionally well. Once the cake is completely cool, wrap individual slices or the entire cake tightly in plastic wrap, then an additional layer of aluminum foil. This double-layer protection helps prevent freezer burn. Label with the date and freeze for up to 2-3 months. To thaw, simply unwrap the frozen cake or slices and let them sit at room temperature for several hours or overnight until fully defrosted. Avoid thawing in the microwave, as this can make the cake rubbery.
Reheating this cake isn’t typically necessary as it’s best enjoyed at room temperature. However, if you prefer a slightly warm slice, especially if it’s been refrigerated, you can gently warm individual slices. Place a slice on a microwave-safe plate and microwave for 10-15 seconds, just until slightly warm to the touch. Be careful not to overheat, as this can dry out the cake. Alternatively, you can warm slices in a preheated oven at 250°F (120°C) for about 5-10 minutes, wrapped loosely in foil, until just warm. The warmth can enhance the buttery aroma and make the cake feel even more comforting, but it’s truly delightful at room temperature too.
Frequently Asked Questions
What makes Kentucky Butter Cake so moist?
The incredible moistness of Kentucky Butter Cake comes from two main factors. First, the generous amount of butter and buttermilk in the cake batter itself contributes significantly to a rich, tender crumb. Second, and most importantly, the warm butter syrup that is poured over the hot cake immediately after baking. This syrup soaks deep into the cake, infusing every bite with moisture and a profound buttery flavor, creating a truly unforgettable texture that is dense yet incredibly soft.
Can I make Kentucky Butter Cake without a Bundt pan?
Yes, absolutely! While a Bundt pan gives the cake its classic decorative shape, you can easily bake Kentucky Butter Cake in other pans. A 9×13 inch baking pan is a great alternative, though you may need to reduce the baking time slightly (start checking around 40-45 minutes). You could also use two 8-inch round cake pans or even a loaf pan for smaller portions. Just remember to adjust baking times and ensure your chosen pan is thoroughly greased and floured, regardless of its shape.
Why did my Kentucky Butter Cake stick to the pan?
There are a few common reasons why a cake might stick to the pan. The most frequent culprit is insufficient greasing and flouring of the pan, especially with intricate Bundt pan designs. Ensure you use plenty of butter or shortening to grease all crevices, then dust thoroughly with flour, tapping out any excess. Not letting the cake cool sufficiently in the pan before attempting to invert it can also cause sticking. Allow at least 30-45 minutes for the cake to cool and firm up in the pan after pouring the syrup, as this allows it to detach more easily.
How far in advance can I make this cake?
Kentucky Butter Cake is an excellent make-ahead dessert because its flavor and texture actually improve over time as the butter syrup continues to meld with the cake. You can bake this cake 2-3 days in advance of when you plan to serve it. Store it at room temperature in an airtight container. If you need to make it further in advance, you can bake and freeze the cooled cake (wrapped well) for up to 2-3 months, then thaw it at room temperature before serving.