How to Make Delicious and Cheesy Mini Dumplings: A Comprehensive Guide
If you’re looking for a tasty appetizer or snack that’s sure to impress your family and friends, you’ve come to the right place. These cheesy mini dumplings are not only easy to make but can also be customized to suit your favorite flavors. In this extensive guide, we will explore everything you need to know about making these delightful treats, from step-by-step instructions to variations and tips for success. Let’s dive right in!
Table of Contents
- Introduction
- Why Mini Dumplings?
- Ingredients Needed
- Step-by-Step Instructions
- Cooking Tips
- Popular Variations
- Serving Suggestions
- Storage and Reheating
- Frequently Asked Questions
- Conclusion
1. Introduction
Mini dumplings are small, bite-sized pockets filled with savory goodness that can be baked, steamed, or fried. They are simple to make, versatile, and perfect for parties, gatherings, or even a cozy family dinner. The cheesy goodness in these dumplings makes them a crowd-pleaser, and their presentation is sure to impress. Whether you’re a seasoned chef or a kitchen novice, this guide will help you create delicious mini dumplings that are sure to be a hit!
2. Why Mini Dumplings?
Mini dumplings are a fantastic choice for several reasons:
- Versatility: You can fill them with a variety of ingredients such as cheese, vegetables, meat, or seafood, making them adaptable to different diets and taste preferences.
- Easy to Serve: Their bite-sized nature makes them ideal for appetizers, snacks, or as part of a larger meal.
- Crowd-Pleaser: They are always a favorite at gatherings, parties, and family meals, ensuring there won’t be any leftovers!
3. Ingredients Needed
To make your cheesy mini dumplings, you’ll need the following ingredients:
For the Dumpling Wrappers:
- 2 cups all-purpose flour
- 1/2 teaspoon salt
- 1 large egg
- 1/3 cup water (more if needed)
For the Cheese Filling:
- 1 cup of ricotta cheese
- 1 cup of shredded mozzarella cheese
- 1/2 cup of grated Parmesan cheese
- 1 large egg
- 1 teaspoon garlic powder (optional)
- 1 teaspoon dried herbs (oregano, basil, or parsley)
- Salt and pepper to taste
Optional Toppings:
- Shredded cheese for garnish
- Fresh herbs for garnish
4. Step-by-Step Instructions
Step 1: Prepare the Dumpling Dough
- Mix the Ingredients: In a mixing bowl, combine the flour and salt. Create a well in the center and add the egg and water. Mixture until it starts to come together.
- Knead the Dough: Transfer the dough to a floured surface and knead for about 5 minutes until smooth. If the dough is too sticky, gradually add a little more flour.
- Rest the Dough: Wrap the dough in plastic wrap and let it rest for at least 30 minutes. This allows the gluten to relax, making it easier to roll out.
Step 2: Make the Cheese Filling
- Combine the Fillings: In a mixing bowl, combine ricotta, mozzarella, Parmesan, egg, garlic powder, and herbs. Mix until fully combined. Season with salt and pepper to taste.
Step 3: Assemble the Dumplings
- Roll Out the Dough: On a floured surface, roll out the dough to about 1/8 inch thickness. Use a round cookie cutter or a glass to cut out circles.
- Fill the Dumplings: Place a teaspoon of cheese filling in the center of each dough circle. Be careful not to overstuff.
- Seal the Dumplings: Moisten the edges of the dough with a little water, fold it over the filling, and pinch to seal. You can also crimp the edges with a fork for a decorative touch.
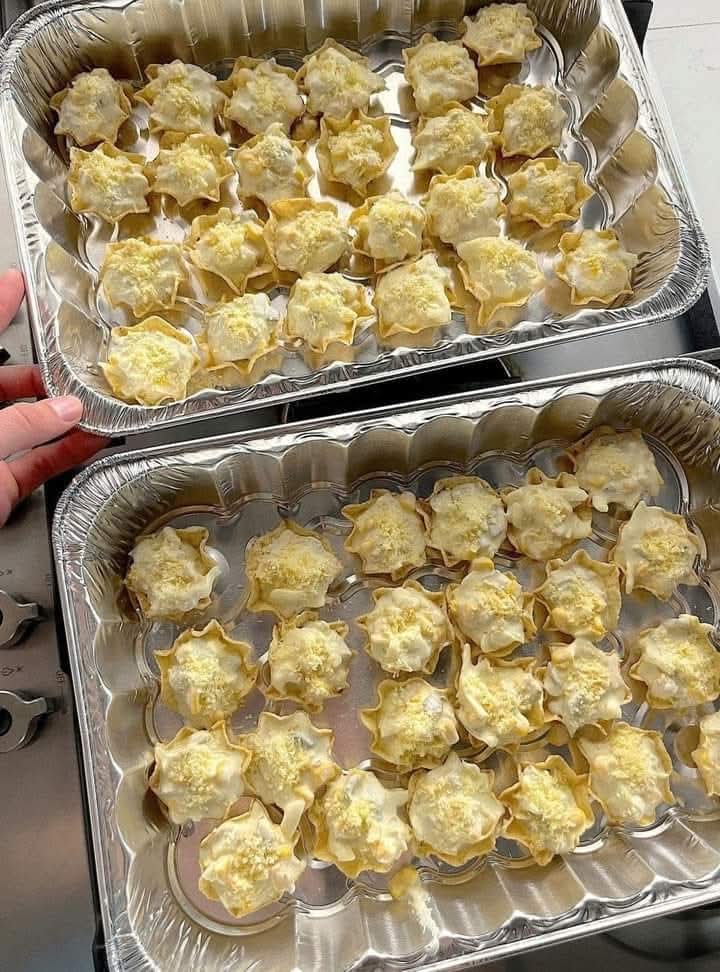
Step 4: Cook the Dumplings
- Prepare for Baking: Preheat your oven to 375°F (190°C). Line a baking sheet with parchment paper.
- Place the Dumplings: Arrange the dumplings on the baking sheet. Brush the tops with melted butter for extra flavor and to achieve a golden color.
- Add Toppings: If desired, sprinkle some shredded cheese on top of the dumplings before baking.
- Bake: Bake the dumplings for about 20-25 minutes or until they are golden brown and the cheese is bubbling.
5. Cooking Tips
- Use Cold Ingredients: For the best dumpling texture, keep the ingredients, especially the butter and cheese, cold until you are ready to cook them.
- Don’t Overfill: Overfilling the dumplings can cause them to burst during cooking. Stick to a teaspoon of filling.
- Experiment with Shapes: Try different shapes and closures for your dumplings. You can create half-moons, triangles, or traditional pleated shapes.
6. Popular Variations
Explore these delightful variations to keep your mini dumpling game exciting!
1. Spinach and Feta Dumplings
- Substitute some of the ricotta cheese with cooked spinach and crumbled feta cheese for a Mediterranean twist.
2. Buffalo Chicken Dumplings
- Mix shredded cooked chicken with cream cheese and buffalo sauce for a spicy, flavorful filling.
3. Veggie Medley Dumplings
- Use a variety of chopped vegetables such as bell peppers, mushrooms, and carrots mixed with cheese for a healthy option.
4. Sweet Dessert Dumplings
- For dessert, fill dumpling wrappers with sweetened cream cheese and chocolate chips, then bake and serve with a dusting of powdered sugar.
7. Serving Suggestions
Serve your mini dumplings alongside a variety of dipping sauces such as:
- Marinara Sauce: A classic tomato sauce pairs perfectly with cheesy dumplings.
- Ranch Dressing: A cool, creamy ranch complements the cheesy flavor.
- Pesto: A vibrant basil pesto adds an aromatic herbaceous note.
- Buffalo Sauce: For the spicy lovers, buffalo sauce is an exciting option.
8. Storage and Reheating
- Storage: Store leftover mini dumplings in an airtight container in the refrigerator for up to 3 days.
- Freezing: You can freeze unbaked dumplings on a baking sheet. Once frozen, transfer them to a zip-top bag and keep them in the freezer for up to 2 months. Bake from frozen, adding a few extra minutes to the baking time.
- Reheating: To reheat baked dumplings, place them in a preheated oven at 350°F (175°C) for about 10 minutes or until warmed through.
9. Frequently Asked Questions
Q1: Can I use store-bought wrappers?
Absolutely! Fresh or frozen dumpling wrappers are great time-savers and still yield delicious results.
Q2: How can I make the filling ahead of time?
You can prepare the cheese filling a day ahead and store it in the refrigerator. Just make sure to assemble the dumplings before baking for the best texture.
Q3: Are these dumplings gluten-free?
You can make them gluten-free by using gluten-free flour for the wrappers.
10. Conclusion
In conclusion, making cheesy mini dumplings is an enjoyable and rewarding cooking experience. With endless variations and easy-to-follow instructions, these dumplings can adapt to any occasion. Whether enjoyed as a snack, appetizer, or part of a meal, they’re sure to be a hit among friends and family.
Get creative with fillings and enjoy the process of making these delightful bites from scratch. Now that you have all the tools you need, it’s time to gather your ingredients and start experimenting. Happy cooking!