Introduction
Tired of seeing strands of hair in your brush and wishing for a fuller, healthier mane? You’re not alone! Many of us dream of luscious locks, and thankfully, nature provides some incredible solutions. One such marvel is aloe vera, a succulent plant renowned for its vast array of health and beauty benefits. Today, we’re diving deep into how to harness the power of this amazing plant to create your very own homemade aloe vera oil, a natural elixir believed to promote faster hair growth and significantly reduce hair loss.
For centuries, aloe vera has been a staple in traditional medicine and beauty routines across various cultures. Its gel, packed with vitamins, enzymes, minerals, and amino acids, offers a powerhouse of nourishment for your scalp and hair follicles. When infused into a carrier oil, these beneficial compounds become even more potent and easier to apply, creating a soothing and strengthening treatment that can transform your hair’s health from the roots up. This article will guide you through every step of making this incredible natural remedy right in your own kitchen.
Imagine a world where your hair feels stronger, looks thicker, and grows more vigorously – all thanks to a simple, natural concoction. This DIY aloe vera oil isn’t just about mixing ingredients; it’s about embracing a holistic approach to hair care, free from harsh chemicals and artificial additives. Get ready to unlock the secrets to a healthier scalp and vibrant hair with our easy-to-follow recipe, and prepare to witness the amazing difference this natural remedy can make!
Nutritional Information
Per serving (approximate values):
- Calories: 120
- Protein: 0g
- Carbohydrates: 1g
- Fat: 14g
- Fiber: 0g
- Sodium: 0mg
Ingredients
- 2-3 large, fresh aloe vera leaves (mature leaves are best for higher gel content)
- 1 cup (240ml) carrier oil of choice (Organic Virgin Coconut Oil, Extra Virgin Olive Oil, or Sweet Almond Oil recommended)
- 1/4 cup (60ml) filtered water
- Clean, air-tight glass bottle or jar for storage
- Fine-mesh strainer or cheesecloth
- Blender or food processor (optional, for smoother gel)
- Double boiler setup or a heat-safe bowl and saucepan
Instructions
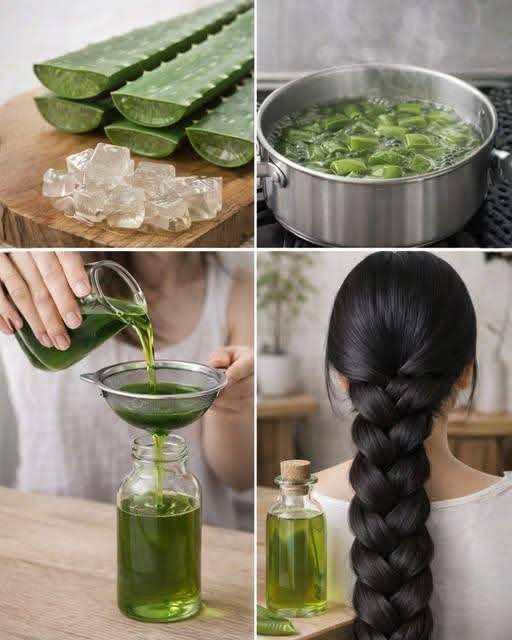
- Prepare the Aloe Vera Leaves: Start by thoroughly washing your aloe vera leaves under cool running water. Pat them dry. Using a sharp knife, carefully cut off the spiky edges along both sides of each leaf.
- Extract the Aloe Vera Gel: Hold a leaf upright with the cut end facing down for about 10-15 minutes. This allows the yellow latex (aloin), a bitter substance that can cause skin irritation, to drain out. Once drained, lay the leaf flat and carefully slice it lengthwise down the middle.
- Scoop the Gel: Using a spoon, gently scoop out the clear, gelatinous pulp from the inside of the leaf. Try to avoid getting any of the green skin. Collect all the gel in a clean bowl.
- Process the Gel (Optional, but Recommended): If you prefer a smoother consistency and easier blending, you can briefly blend the scooped aloe vera gel in a blender or food processor until it forms a somewhat uniform, slightly frothy liquid. If you don’t have a blender, you can simply chop the gel into small pieces.
- Boil the Aloe Vera Gel and Water: In a small saucepan, combine the processed or chopped aloe vera gel with 1/4 cup of filtered water. Bring the mixture to a gentle boil over medium heat, then reduce the heat to low and simmer for about 5-7 minutes. This step helps to further purify the gel and prepare it for oil infusion.
- Prepare for Infusion: Remove the saucepan from the heat and allow the aloe vera and water mixture to cool down slightly.
- Combine Aloe Vera and Carrier Oil: In a clean, dry double boiler (or a heat-safe bowl placed over a saucepan of simmering water), combine the cooled aloe vera mixture with your chosen carrier oil (coconut, olive, or almond oil). Ensure the water in the bottom saucepan does not touch the bottom of the top bowl.
- Gentle Infusion Process: Heat the mixture over low heat, stirring occasionally, for about 30-45 minutes. The goal is a very gentle warmth, not boiling. You’ll notice the aloe vera gel start to turn a light golden brown and the water content will evaporate, leaving behind the oil infused with aloe vera’s beneficial compounds. This slow heating process allows the oil to absorb the nutrients effectively without destroying them.
- Monitor and Test: As the water evaporates, the sizzling sound will gradually subside. The aloe vera pieces will become crispy and the oil will look clearer. Be careful not to burn the aloe vera. Once the aloe vera pieces appear slightly browned and crispy, and the oil has a distinct aloe aroma, it’s ready.
- Cool the Mixture: Remove the double boiler from the heat and let the infused oil cool completely to room temperature. This is important before straining.
- Strain the Oil: Place a fine-mesh strainer (or a colander lined with several layers of cheesecloth) over a clean bowl or measuring cup. Carefully pour the cooled aloe vera oil mixture through the strainer.
- Extract Remaining Oil: Gently press down on the strained aloe vera pulp with the back of a spoon to extract any remaining oil. Discard the spent aloe vera pulp.
- Store the Aloe Vera Oil: Pour the freshly made aloe vera oil into a clean, dry, air-tight glass bottle or jar. A dark-colored glass bottle is ideal as it helps protect the oil from light degradation, extending its shelf life.
Cooking Tips and Variations
For the freshest and most potent oil, always use mature aloe vera leaves. These leaves contain a higher concentration of beneficial gel compared to younger ones. When extracting the gel, be meticulous about removing all traces of the yellow latex (aloin), as it can be irritating to the scalp and skin. Allowing the leaf to “bleed” for 10-15 minutes after cutting is a crucial step.
Choosing the right carrier oil can significantly enhance the benefits of your aloe vera oil. Coconut oil is a popular choice due to its ability to penetrate the hair shaft, providing deep conditioning and reducing protein loss. Extra Virgin Olive Oil is rich in antioxidants and vitamins, making it excellent for scalp health and strengthening hair. Sweet Almond Oil is lighter, packed with Vitamin E, and great for adding shine and softness without weighing hair down. You can even blend two carrier oils for a more comprehensive nutrient profile. For instance, a mix of coconut and almond oil offers both deep nourishment and lightweight conditioning.
The infusion process requires patience and low heat. Overheating can destroy the delicate enzymes and vitamins in the aloe vera. A double boiler setup is highly recommended to maintain a gentle, consistent temperature. If you don’t have one, you can improvise by placing a heat-safe glass bowl over a pot of simmering water. The key is to avoid direct high heat. The goal is to slowly evaporate the water content from the aloe vera gel while allowing the oil to absorb its beneficial compounds. This process typically takes 30-45 minutes, but keep an eye on it; the aloe vera pieces should turn golden brown and crispy, indicating the water has evaporated. The sizzling sound will also diminish.
To boost the potency of your aloe vera oil, consider adding other hair-loving ingredients during the infusion process. A few drops of essential oils like Rosemary oil (known for stimulating hair growth), Peppermint oil (increases circulation to the scalp), or Lavender oil (soothes the scalp and promotes relaxation) can be added after the oil has cooled slightly, just before storage. Always perform a patch test with essential oils, as they are highly concentrated. You could also infuse a few dried hibiscus petals for added shine and strength, or some dried fenugreek seeds, which are rich in protein and nicotinic acid, both known to be beneficial for hair.
For those with very dry or damaged hair, you might consider a second infusion. After straining the first batch of oil, you can use that infused oil to infuse a fresh batch of aloe vera gel. This creates a super-concentrated aloe vera oil, though it will take more time and effort. Remember, consistency is key when using natural remedies. Regular application, 2-3 times a week, will yield the best results.
Storage and Reheating
Proper storage is paramount to maintaining the potency and extending the shelf life of your homemade aloe vera oil. Once the oil has been strained and cooled completely, transfer it into a clean, dry, air-tight glass bottle or jar. Dark-colored glass is highly recommended as it helps protect the oil from light exposure, which can degrade its beneficial compounds and accelerate rancidity. If you only have clear glass bottles, store them in a dark cabinet or wrap them in aluminum foil to block out light.
Store your aloe vera oil in a cool, dry place away from direct sunlight and heat sources. A kitchen cupboard or pantry is usually ideal. Avoid storing it in the bathroom, as fluctuations in temperature and humidity can reduce its shelf life. When stored correctly, homemade aloe vera oil can last anywhere from 3 to 6 months. You’ll know if the oil has gone bad if it develops an off-putting odor, changes color significantly, or shows signs of mold growth (though this is less common with properly infused oil where all water has been removed).
Since this is a hair oil and not a food product, “reheating” in the traditional sense isn’t necessary. However, if your carrier oil (like coconut oil) solidifies in cooler temperatures, you might want to gently warm the oil before application for easier use and better penetration. To do this, simply place the sealed bottle or jar of oil in a bowl of warm water for a few minutes until it liquefies. Avoid using a microwave, as uneven heating can create hot spots and potentially degrade the oil’s beneficial properties. Never place the oil directly on a stovetop flame or in boiling water. Gently warming it to a comfortable temperature for application is all that’s needed.
Always ensure your hands are clean and dry before dipping into the oil to avoid introducing moisture or contaminants, which can shorten its shelf life. If you plan to use the oil frequently, you might consider pouring a small amount into a separate applicator bottle for daily use, keeping the main batch sealed and stored properly. This minimizes exposure of the larger quantity to air and potential contamination.
Frequently Asked Questions
How often should I use aloe vera oil for hair growth?
For optimal results, it is generally recommended to use aloe vera oil 2-3 times per week. Consistency is key with natural remedies. Apply it as a pre-shampoo treatment, leaving it on for at least 30 minutes, or even overnight, before washing your hair. Regular application helps to nourish the scalp, strengthen hair follicles, and create a conducive environment for healthy hair growth.
Can I leave aloe vera oil in my hair overnight?
Yes, absolutely! Leaving aloe vera oil in your hair overnight can be highly beneficial, especially if you have very dry hair or a dry, itchy scalp. The extended contact time allows the oil and aloe vera nutrients to penetrate deeply, providing maximum conditioning and soothing effects. Just make sure to cover your hair with a shower cap or an old towel to protect your pillowcase. Wash it out thoroughly with a mild shampoo the next morning.
Will this homemade aloe vera oil make my hair greasy?
Any oil applied to the hair can make it appear greasy if too much is used or if it’s not washed out properly. To avoid greasiness, use a moderate amount of aloe vera oil – enough to lightly coat your scalp and hair strands, but not drench them. Focus on massaging it into the scalp first, then lightly distributing it through the lengths. When washing, use a good quality, sulfate-free shampoo and ensure you rinse your hair thoroughly to remove all oil residue. You might need two rounds of shampooing if you’ve applied a generous amount or left it on overnight.
Are there any side effects or precautions I should take?
While aloe vera oil is generally safe for most people, it’s always wise to perform a patch test before full application, especially if you have sensitive skin or known allergies. Apply a small amount of the oil to a discreet area of your skin (like behind your ear or on your inner forearm) and wait 24 hours to check for any redness, itching, or irritation. Additionally, ensure you properly drain the yellow latex (aloin) from the fresh aloe leaves during preparation, as this substance can be irritating. This remedy is for external use only. If you have a serious medical condition causing hair loss, consult a healthcare professional.