Introduction
There’s a special kind of magic in baking, and nowhere is it more evident than in the creation of a perfect homemade sponge cake. This classic dessert, with its remarkably light, airy, and tender crumb, is a testament to simple ingredients and careful technique. Imagine a cake so delicate it practically melts in your mouth, yet sturdy enough to form the foundation for countless delightful creations. That’s the beauty of a truly well-made sponge cake – it’s not just a dessert; it’s an experience, a canvas for your culinary imagination, and a comforting staple that evokes warmth and nostalgia.
What makes a sponge cake so special? It’s all in the air. Unlike heavier cakes that rely heavily on chemical leaveners, a traditional sponge cake gets its incredible lift and characteristic springiness from carefully whipped eggs. This aeration, combined with a gentle folding technique, creates a fine, open texture that is both incredibly moist and surprisingly robust. Whether enjoyed simply dusted with powdered sugar, layered with fresh berries and cream, or serving as the base for a show-stopping trifle, a homemade sponge cake elevates any occasion from an afternoon tea to a grand celebration. Its versatility is unmatched, making it a beloved recipe in kitchens around the world.
If you’ve ever been intimidated by the idea of baking a sponge cake, fear no more. This recipe is designed to demystify the process, guiding you through each step to ensure a beautiful, golden-brown, and utterly delicious result. We’ll focus on the key principles that guarantee that signature light and airy texture, turning what might seem like a complex bake into a simple, reliable, and deeply satisfying achievement. Get ready to impress yourself and your loved ones with a homemade masterpiece that tastes as good as it looks.
Nutritional Information
Per serving (approximate values):
- Calories: 280
- Protein: 5g
- Carbohydrates: 45g
- Fat: 9g
- Fiber: 1g
- Sodium: 120mg
Ingredients
- 6 large eggs, at room temperature
- 1 cup (200g) granulated sugar, plus 2 tablespoons for dusting the pan
- 1 cup (120g) all-purpose flour, sifted
- 1 teaspoon baking powder
- 1/2 teaspoon salt
- 1/4 cup (60ml) whole milk, warmed
- 1/4 cup (56g) unsalted butter, melted and cooled slightly
- 1 teaspoon vanilla extract
- Butter or non-stick spray for greasing the pan
Instructions
- Preheat your oven to 350°F (175°C). Grease an 8 or 9-inch springform pan generously with butter or non-stick spray. Dust the greased pan with 2 tablespoons of granulated sugar, rotating to coat the bottom and sides evenly. This sugar coating helps prevent sticking and creates a lovely caramelized crust.
- In a large, heatproof bowl, combine the room temperature eggs and 1 cup of granulated sugar. Place the bowl over a saucepan of simmering water (ensure the bottom of the bowl does not touch the water). Whisk constantly with a hand whisk or electric mixer on low speed until the mixture is warm to the touch (around 100-110°F or 38-43°C) and the sugar has completely dissolved. This step is crucial for achieving maximum volume.
- Remove the bowl from the heat. Using an electric mixer (stand mixer with whisk attachment or handheld mixer), beat the egg and sugar mixture on high speed for 8-10 minutes, or until it is very thick, pale yellow, and has tripled in volume. When you lift the whisk, the batter should fall back into the bowl in a thick ribbon that holds its shape on the surface for a few seconds before dissolving. This is known as the “ribbon stage.”
- While the eggs are whipping, in a separate small bowl, whisk together the sifted all-purpose flour, baking powder, and salt. Sifting the flour beforehand helps prevent lumps and ensures a lighter crumb.
- In another small bowl, combine the warmed milk, melted and slightly cooled butter, and vanilla extract.
- Once the egg mixture has reached the ribbon stage, gently fold in the dry ingredients in three additions. Use a large rubber spatula and a cutting motion, bringing the spatula down through the center of the batter, across the bottom of the bowl, and up the side, turning the bowl as you go. Be very gentle and avoid overmixing, as this will deflate the precious air you’ve incorporated.
- After the dry ingredients are just incorporated, take about 1 cup of the batter and gently fold it into the milk and butter mixture. This lightens the heavier milk mixture, making it easier to incorporate into the main batter without deflating it.
- Carefully pour the milk and butter mixture back into the main batter. Gently fold it in using the same cutting motion, just until combined. Again, do not overmix. The goal is to maintain as much air as possible.
- Pour the batter immediately into the prepared springform pan. Gently tap the pan on the counter a few times to release any large air bubbles.
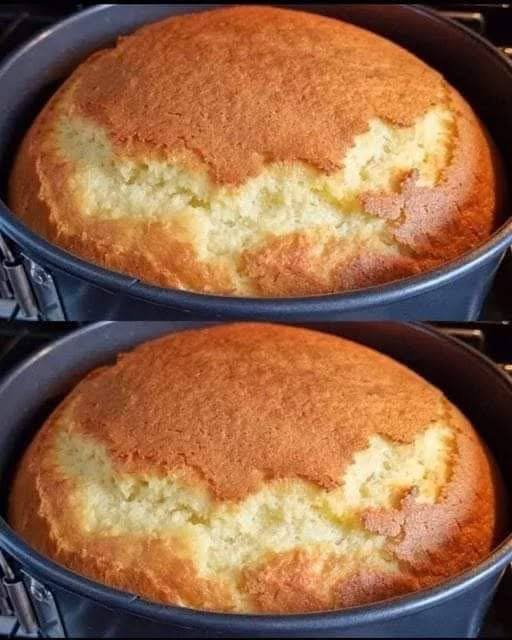
- Bake for 25-35 minutes, or until the cake is golden brown on top, springs back when lightly touched in the center, and a wooden skewer inserted into the center comes out clean.
- Once baked, remove the cake from the oven and let it cool in the pan on a wire rack for 10-15 minutes.
- After 10-15 minutes, carefully run a thin knife around the edge of the pan to loosen the cake, then release the springform latch and remove the sides of the pan. Let the cake cool completely on the wire rack before slicing or decorating.
Cooking Tips and Variations
Achieving the perfect sponge cake is all about technique and attention to detail. Here are some indispensable tips to ensure your cake is light, airy, and delicious every time. First and foremost, the quality and temperature of your ingredients truly matter. Always use large, fresh eggs at room temperature. Cold eggs will not whip up to the same volume, and that volume is the backbone of your sponge cake’s texture. Similarly, ensure your butter is melted but cooled, and your milk is warm, not hot. Extreme temperature differences can shock the batter and cause issues.
The whipping of the eggs and sugar to the “ribbon stage” is perhaps the most critical step. Don’t rush this. It takes time, often 8-10 minutes of high-speed beating, to incorporate enough air for that characteristic light texture. The mixture should be thick, pale, and when you lift the whisk, a ribbon of batter should slowly fall back onto the surface and hold its shape for a few seconds before disappearing. If your eggs aren’t whipped enough, your cake will be dense.
When it comes to incorporating the dry ingredients and the liquid mixture, gentleness is key. Overmixing is the enemy of a light sponge. Use a large rubber spatula and a folding technique: cut down through the center of the batter, sweep across the bottom, and fold up the side, turning the bowl as you go. This preserves the air in the whipped eggs. For the butter and milk mixture, lightening it with a small amount of batter first helps it integrate more smoothly without deflating the main batch. Pour the batter into the prepared pan immediately after mixing to prevent any air from escaping.
Preparing your springform pan correctly is vital for easy release and a beautiful cake. Greasing it thoroughly and then dusting with sugar not only prevents sticking but also creates a lovely, slightly caramelized exterior. Avoid greasing and flouring the sides too heavily if you want the cake to climb the pan for maximum height. Once the cake is baked, resist the urge to remove it from the pan too soon. Cooling it in the pan for 10-15 minutes allows it to firm up slightly and prevents it from collapsing or sticking as you release the sides.
To check for doneness, look for a golden-brown top, a springy feel when lightly touched, and a wooden skewer inserted into the center coming out clean. If your cake is browning too quickly, you can loosely tent it with aluminum foil during the last part of baking. Every oven is different, so it’s always a good idea to know your oven and adjust baking times as needed.
For variations, this basic sponge cake is incredibly versatile. For a citrus twist, add 1 tablespoon of lemon or orange zest to the flour mixture. For a chocolate sponge, replace 2 tablespoons of flour with 2 tablespoons of unsweetened cocoa powder. You can also infuse the milk with spices like cinnamon or cardamom for a warmer flavor profile. Serve your sponge cake simply dusted with powdered sugar, or elevate it with a dollop of whipped cream and fresh berries. It also makes an excellent base for trifles, layered cakes with fruit custards, or even a classic Victoria sponge with jam and buttercream.
Storage and Reheating
Proper storage is essential to maintain the delicate texture and freshness of your homemade sponge cake. Once completely cooled, an unfrosted sponge cake can be stored at room temperature for up to 2-3 days. The best way to do this is to wrap it tightly in plastic wrap or place it in an airtight cake dome or container. This prevents it from drying out and absorbing other odors from your kitchen. Avoid refrigerating plain sponge cake unless it’s very warm and humid, as the refrigerator can dry it out and make it stale more quickly. However, if your sponge cake is filled or frosted with perishable ingredients like fresh cream, custard, or fruit, it must be refrigerated.
When refrigerating a frosted or filled sponge cake, ensure it’s well-covered to protect it from drying and absorbing odors. It will typically last for 3-4 days in the refrigerator. Before serving a refrigerated cake, it’s often best to let it sit at room temperature for 15-30 minutes, especially if it has a buttercream or ganache frosting, as this allows the flavors and textures to soften and become more enjoyable.
For longer storage, sponge cake freezes beautifully. Once completely cooled, wrap the unfrosted cake tightly in at least two layers of plastic wrap, followed by a layer of aluminum foil. This double-layer protection helps prevent freezer burn. You can freeze a whole cake or individual slices. Label with the date. Frozen sponge cake will maintain its quality for up to 2-3 months. To thaw, simply unwrap the cake (or slices) and let it sit at room temperature for several hours (for a whole cake) or about an hour (for slices) until fully defrosted. Do not try to speed up the thawing process in the microwave, as it can alter the texture.
Reheating a sponge cake is generally not recommended as it’s best enjoyed at room temperature. The delicate structure can become tough or dry when reheated. If you must, perhaps for a very slightly warmed slice, use a microwave for very short bursts (5-10 seconds) on low power, but be very cautious, as it’s easy to overdo it and ruin the texture. For a plain slice, a quick toast in a toaster oven might work, but again, watch it carefully. The beauty of sponge cake is its soft, airy texture when fresh, which is best preserved by serving it as is.
Frequently Asked Questions
Why did my sponge cake sink in the middle?
There are several common reasons why a sponge cake might sink. The most frequent culprits are underbaking, which means the cake’s structure hasn’t fully set before being removed from the oven; opening the oven door too early during baking, causing a sudden temperature drop; or overmixing the batter, which deflates the air incorporated into the eggs. Make sure to bake until a skewer comes out clean and the cake springs back when lightly touched, and resist peeking into the oven until at least two-thirds of the baking time has passed.
Can I make this sponge cake without a springform pan?
While a springform pan is ideal for its ease of release, especially for delicate cakes, you can make a sponge cake in a regular round cake pan. You’ll need to prepare it very well by greasing and flouring it thoroughly, or lining the bottom with parchment paper and greasing the sides. To remove the cake, once cooled for about 10-15 minutes, run a thin knife around the edge, then invert the cake onto a wire rack, then invert it again onto another rack to cool right-side up. Be extra gentle to avoid breakage.
My sponge cake is dry. What went wrong?
A dry sponge cake is usually a sign of overbaking. Even a few minutes too long in the oven can strip the cake of its moisture. Ensure you’re checking for doneness at the lower end of the baking time range and remove the cake as soon as it meets the criteria (golden brown, springs back, clean skewer). Another factor can be not enough fat or liquid in the recipe, but following this recipe should mitigate that. Make sure to measure your ingredients accurately, especially the flour.
How can I prevent my sponge cake from sticking to the pan?
To prevent sticking, ensure your pan is thoroughly prepared. For this recipe, we recommend generously greasing the springform pan with butter or non-stick spray, then dusting it with granulated sugar. The sugar not only helps with release but also creates a lovely caramelized crust. If using a regular cake pan, grease and flour it, or line the bottom with parchment paper and grease the sides well. Make sure to let the cake cool in the pan for the recommended 10-15 minutes before attempting to remove it, as this allows the structure to firm up.