Introduction
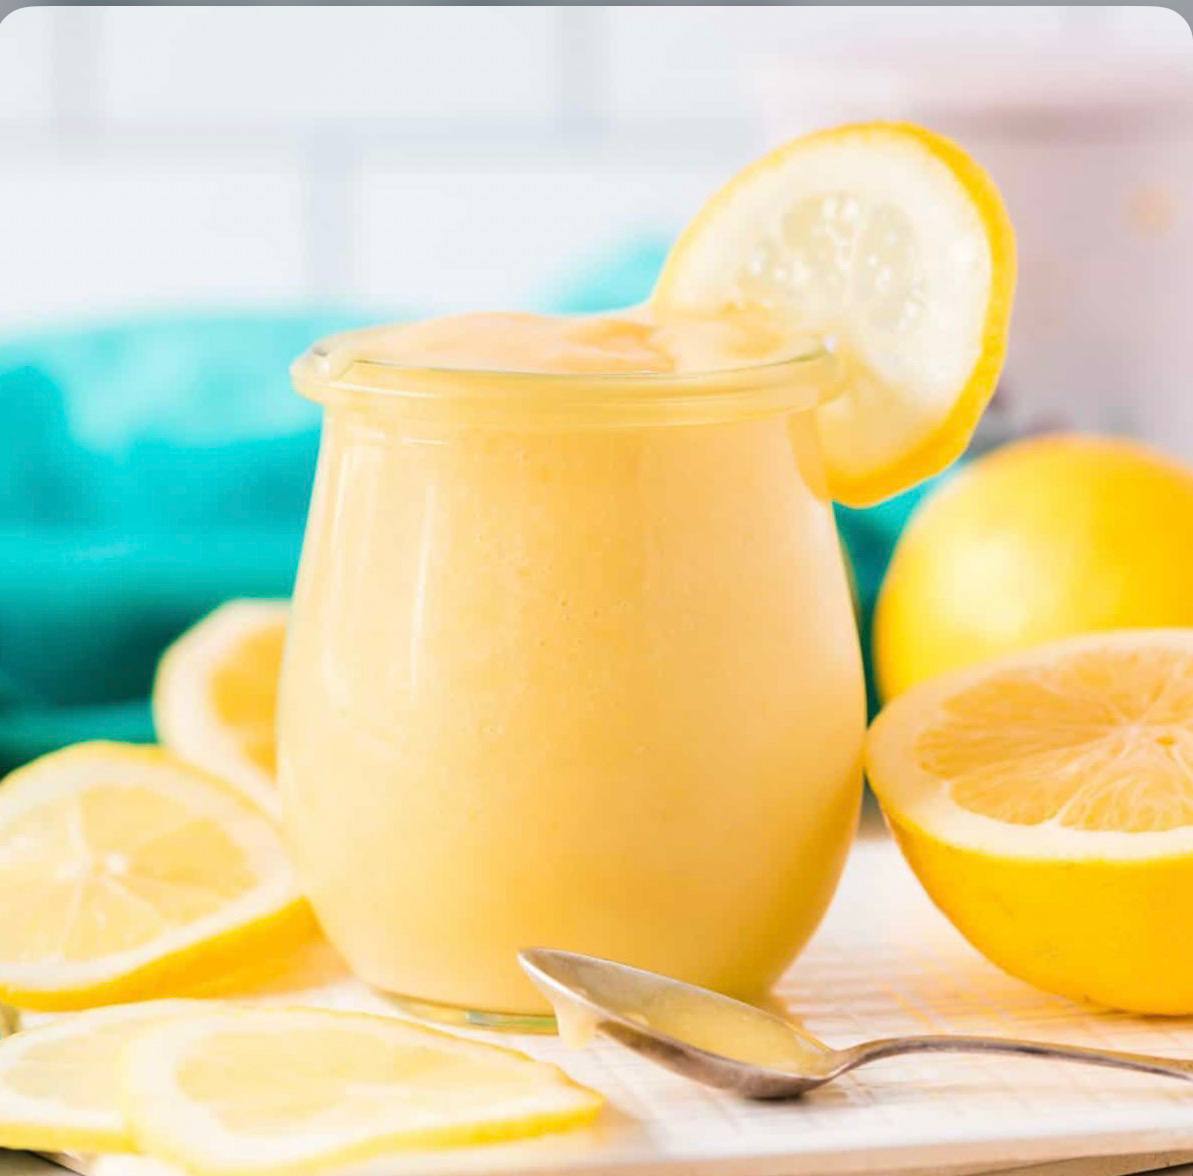
There are few things as delightfully vibrant and refreshingly zesty as homemade lemon curd. This golden, creamy spread is a true culinary gem, offering a perfect balance of sweet and tart that awakens the senses. Forget the store-bought versions; once you experience the rich, intense flavor and silky-smooth texture of a batch made in your own kitchen, you’ll understand why it’s a labor of love worth every minute. Lemon curd isn’t just a spread; it’s a versatile ingredient that elevates everything from breakfast toast to elegant desserts, bringing a burst of sunshine to any dish.
What makes homemade lemon curd so special? It’s the unparalleled freshness. By using bright, unwaxed lemons, fresh eggs, real butter, and sugar, you control every aspect of its creation. This ensures a depth of flavor and a luxurious consistency that simply can’t be replicated with artificial ingredients or preservatives. The process itself is incredibly satisfying, transforming simple components into a shimmering, golden custard that promises pure indulgence with every spoonful. It’s a classic for a reason, beloved for its ability to brighten even the dreariest day with its cheerful color and invigorating taste.
This recipe will guide you through crafting the perfect homemade lemon curd – one that is intensely lemony, wonderfully creamy, and flawlessly smooth. We’ll cover everything from selecting the best ingredients to mastering the gentle cooking technique, ensuring you achieve that captivating texture that coats the back of a spoon with glistening perfection. Whether you’re a seasoned baker or a kitchen novice, you’ll find this recipe straightforward and rewarding, yielding a batch of liquid gold that will become a staple in your culinary repertoire. Get ready to zest, whisk, and enjoy the magical transformation!
Nutritional Information
Per serving (approximate values, based on 12 servings from 1.5 cups total):
- Calories: 180
- Protein: 3g
- Carbohydrates: 25g
- Fat: 9g
- Fiber: 0g
- Sodium: 60mg
Ingredients
- 4 large egg yolks, plus 2 whole large eggs
- 1 cup granulated sugar
- 1/2 cup freshly squeezed lemon juice (from 3-4 medium lemons)
- 2 tablespoons finely grated lemon zest (from 2-3 medium lemons)
- 1/2 cup (1 stick) unsalted butter, cut into 8 pieces
- Pinch of salt
Instructions
- Prepare your equipment: Set up a double boiler by placing a heatproof bowl (preferably stainless steel or glass) over a saucepan filled with about 1-2 inches of simmering water. Ensure the bottom of the bowl does not touch the water. Alternatively, you can cook directly over low heat, but a double boiler offers more gentle and controlled cooking. Have a fine-mesh sieve ready over another clean bowl or jar, and prepare your storage jars by sterilizing them if you plan to keep the curd for an extended period.
- Combine the egg mixture: In the heatproof bowl of your double boiler, whisk together the egg yolks and whole eggs until well combined and slightly frothy. This helps to break down the egg proteins and ensures a smooth curd.
- Add sugar and lemon: Gradually whisk in the granulated sugar until it is fully incorporated and the mixture is pale yellow. Then, stir in the fresh lemon juice and the finely grated lemon zest. The zest is crucial for intense lemon flavor, so don’t skip it! Add a small pinch of salt to balance the sweetness.
- Cook the curd: Place the bowl over the simmering water (or directly over low heat). Begin whisking continuously. The key to a smooth, lump-free curd is constant motion. As the mixture heats, the sugar will dissolve, and the eggs will begin to cook and thicken. Continue to whisk for 10-15 minutes, or until the curd coats the back of a spoon and you can draw a clear line through it with your finger. It should be thick enough to hold its shape somewhat but still pourable. Be patient and do not let the mixture come to a boil, as this can cause the eggs to scramble. If cooking directly over heat, ensure the flame is very low and stir constantly.
- Incorporate the butter: Once the curd has thickened to the desired consistency, remove the bowl from the heat (or turn off the stove if cooking directly). Add the cold unsalted butter pieces, one at a time, whisking vigorously after each addition until fully melted and incorporated. The butter adds richness, gloss, and a silky texture to the curd.
- Strain for ultimate smoothness: For an exceptionally smooth and luxurious curd, immediately pour the hot lemon curd through a fine-mesh sieve into a clean bowl or directly into your sterilized jars. This step removes any tiny bits of cooked egg, lemon zest, or butter solids, resulting in a perfectly uniform texture. Push any remaining curd through the sieve with a spatula.
- Cool and store: Allow the lemon curd to cool slightly at room temperature. Then, to prevent a skin from forming on top, press a piece of plastic wrap directly onto the surface of the curd. Refrigerate for at least 2-3 hours, or preferably overnight, until thoroughly chilled and set. The curd will thicken considerably as it cools.
- Serve and enjoy: Once chilled, your homemade lemon curd is ready to be enjoyed!
Cooking Tips and Variations
For the best lemon curd, always start with fresh, unwaxed lemons. The zest contains vital oils that contribute significantly to the overall flavor, so using organic or well-washed lemons is paramount. Don’t be tempted to use bottled lemon juice, as its flavor profile is often dull compared to freshly squeezed. When zesting, aim to get only the bright yellow part of the peel, avoiding the bitter white pith underneath.
The cooking process is the most crucial part. Whether you use a double boiler or cook directly over low heat, constant whisking is non-negotiable. This prevents the eggs from scrambling and ensures an even, smooth thickening. The curd is done when it’s thick enough to coat the back of a spoon and leaves a clear trail when you run your finger across it. It should resemble a thin custard. If you cook it too long, it might become too thick or grainy. If it’s too thin, continue cooking gently, whisking constantly, until it reaches the desired consistency. A thermometer can be helpful; the curd is typically done when it reaches 170-175°F (77-79°C), at which point the eggs are cooked and the curd is safely thickened.
For a truly luxurious finish, straining the curd through a fine-mesh sieve is highly recommended. This step removes any tiny bits of cooked egg or zest, giving you that iconic silky-smooth texture seen in professional preparations. Don’t skip it if you’re aiming for perfection!
You can easily vary this recipe to explore other citrus flavors. For a vibrant lime curd, substitute all the lemon juice and zest with fresh lime juice and zest. Orange curd offers a sweeter, less tart alternative, using fresh orange juice and zest. For a more exotic twist, try a grapefruit curd. You can also infuse your curd with other flavors: a teaspoon of vanilla extract added with the butter, a hint of cardamom, or a splash of orange blossom water can add wonderful complexity. For a richer, deeper yellow color and even more luscious texture, you can increase the number of egg yolks by one and reduce the whole eggs by one, for a total of 5 yolks and 1 whole egg.
If you prefer a less tart curd, you can slightly increase the sugar by 1-2 tablespoons. Conversely, for an extra zesty kick, you may add an additional tablespoon of lemon juice, but be mindful that this can affect the final thickness. Always taste a small bit once it’s cooled slightly to see if it meets your preference before chilling.
Storage and Reheating
Proper storage is essential for homemade lemon curd to maintain its freshness and safety. Once your lemon curd has been strained and cooled slightly, transfer it to clean, airtight jars or containers. To prevent a “skin” from forming on the surface, press a piece of plastic wrap directly onto the surface of the curd before sealing the container. This eliminates air contact and keeps the top smooth and moist.
Homemade lemon curd should always be stored in the refrigerator due to its egg and butter content. When stored correctly, it will last for up to 2-3 weeks. Be sure to label your jars with the date of preparation so you can easily keep track of its freshness. If you notice any unusual odors, discoloration, or mold, it’s best to discard it.
Lemon curd is typically served chilled or at room temperature, so reheating is generally not necessary or recommended if you’re using it as a spread or filling. Gentle warming can be done if absolutely required for a specific application, but this must be done with extreme care. If you need to warm it slightly, place the desired amount in a heatproof bowl over a double boiler (or in a microwave-safe bowl). Heat very gently, stirring frequently, until it reaches your desired temperature. Avoid boiling or overheating, as this can cause the curd to “break” (separate) or the eggs to scramble, ruining its smooth texture. For most uses, simply letting it sit at room temperature for 15-30 minutes before serving will soften it just enough to be easily spreadable.
Freezing lemon curd is also an option for longer storage. Transfer the cooled curd to freezer-safe containers, leaving about half an inch of headspace to allow for expansion. It can be frozen for up to 3 months. When ready to use, thaw it overnight in the refrigerator. The texture might be slightly thinner after thawing, but a quick whisk can usually restore its original consistency. If it appears a little separated, a brief whisk over a double boiler can help bring it back together.
Frequently Asked Questions
Why did my lemon curd turn out too thin or runny?
A runny lemon curd is usually a sign that it wasn’t cooked long enough or at a sufficient temperature for the eggs to fully thicken. The eggs need to reach a specific temperature (around 170-175°F or 77-79°C) to properly coagulate and thicken the mixture. Ensure you’re whisking constantly and patiently, allowing the curd to cook until it coats the back of a spoon and leaves a clear trail when a finger is drawn across it. If you cooked it directly over heat, the heat might have been too low. If using a double boiler, ensure the water in the saucepan is simmering, not just warm, and that the bowl is making good contact with the steam.
How can I prevent my lemon curd from tasting like scrambled eggs?
The key to avoiding a “scrambled egg” texture is gentle, continuous whisking and controlled heat. If you cook the curd over too high heat, or stop whisking for too long, the egg proteins will cook too quickly and unevenly, leading to lumps or a grainy texture. Using a double boiler is highly recommended as it provides indirect, gentle heat, significantly reducing the risk of scrambling. If you cook directly over a burner, keep the heat very low and whisk without interruption. If you do end up with a few small lumps, straining the curd through a fine-mesh sieve immediately after cooking will help to remove them and achieve a smoother final product.
Can I make this recipe with whole eggs only, or just egg yolks?
This recipe calls for a combination of egg yolks and whole eggs because it offers the best balance of richness, color, and thickening power. Egg yolks provide a beautiful golden color and a wonderfully rich, creamy texture, while the whole eggs help with thickening and contribute to the overall volume without making the curd overly heavy. While you could technically use only egg yolks for an extremely rich and intensely yellow curd (you’d need about 6-8 yolks for this recipe), or only whole eggs for a slightly lighter, less rich version (which might require a bit more cooking time to thicken), the specified combination is designed for optimal results in terms of flavor, texture, and consistency.
My lemon curd has a skin on top after cooling. What went wrong?
A skin forming on top of your lemon curd is a common issue that occurs when the surface of the curd is exposed to air as it cools. This causes the top layer to dry out and form a film. To prevent this, once the curd has been strained and transferred to its storage container, immediately press a piece of plastic wrap directly onto the surface of the warm curd. Ensure the plastic wrap is touching every part of the surface, creating an airtight seal. This prevents air from reaching the curd and keeps the top perfectly smooth and moist as it chills in the refrigerator.