Introduction
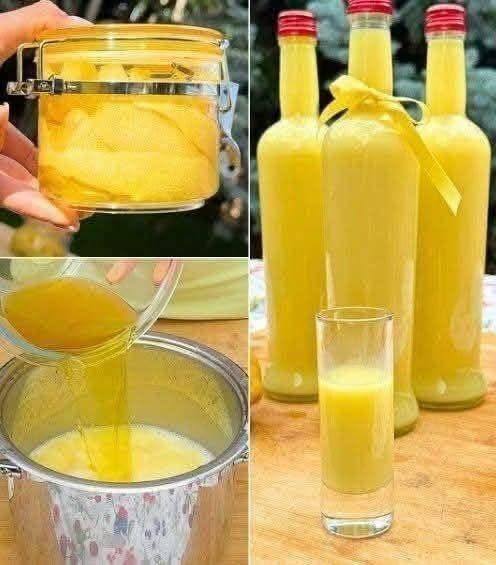
Step into the vibrant world of homemade wellness with our sensational Ginger Elixir, a concentrated “Ginger Water” that’s far more than just a simple beverage. Imagine a golden, zesty brew, brimming with the invigorating warmth and myriad health benefits of fresh ginger, all crafted with your own hands. This isn’t just a drink; it’s a versatile concentrate, a powerful digestif, a refreshing mixer, and a delightful base for countless culinary adventures. Forget artificial flavors and preservatives; our recipe empowers you to create a pure, potent ginger concoction that tastes incredible and makes you feel even better.
What makes this particular “Ginger Water” so special? It’s the perfect balance of fiery ginger heat, refreshing citrus brightness, and just the right touch of sweetness, all cooked down to a powerful concentrate. This method ensures maximum flavor extraction and a longer shelf life, transforming humble ginger root into a liquid gold. Whether you’re looking for a natural immune booster, a soothing remedy for an upset stomach, a delightful addition to your morning routine, or a unique ingredient to elevate your cocktails and mocktails, this homemade ginger elixir is your answer. It’s surprisingly easy to make, incredibly rewarding, and an absolute game-changer for anyone who loves the distinct kick of ginger.
Preparing this ginger elixir at home offers unparalleled control over its quality and taste. You get to choose the freshest ingredients, adjust the spice level to your preference, and ensure it’s free from any unwanted additives. The beautiful, vibrant yellow hue is a testament to its natural goodness, promising a burst of flavor and vitality with every sip. Once you’ve experienced the satisfaction of crafting your own batch, you’ll wonder how you ever lived without this zesty, warming brew. Get ready to transform your kitchen into an apothecary of delicious wellness!
Nutritional Information
Per serving (approximate values for 1/4 cup concentrate, diluted):
- Calories: 70-90 kcal
- Protein: 0.5g
- Carbohydrates: 18-23g
- Fat: 0.1g
- Fiber: 1g
- Sodium: 5mg
Ingredients
- 1 pound (about 450g) fresh ginger root
- 8 cups (2 liters) filtered water, plus more for soaking
- 1 cup (200g) granulated sugar, or to taste
- 1/2 cup (120ml) fresh lemon juice (from 3-4 lemons)
- Optional: A pinch of cayenne pepper for extra heat
- Optional: 1-2 star anise pods or a cinnamon stick for added aroma
- Optional: 1 cup (240ml) high-proof neutral spirit (like vodka or white rum) for a liqueur version
Instructions
- Prepare the Ginger: Begin by thoroughly washing the ginger root under cold running water. Using a spoon or a vegetable peeler, carefully scrape off the skin. You don’t need to be overly meticulous, as some skin can add flavor, but remove any tough or bruised parts. Once peeled, roughly chop the ginger into 1/2 to 1-inch pieces. For maximum flavor extraction, you can grate the ginger using a box grater or pulse it in a food processor until finely minced.
- Soak (Optional, for less bite): If you prefer a less fiery ginger flavor, place the chopped or grated ginger in a bowl and cover with cold water. Let it soak for 30-60 minutes, then drain thoroughly. This step helps to mellow some of the ginger’s intense pungency.
- Combine Ingredients in Pot: Transfer the prepared ginger (chopped or grated) to a large, heavy-bottomed pot or Dutch oven. Add the 8 cups of filtered water. If using optional star anise or cinnamon stick, add them now. Bring the mixture to a rolling boil over high heat.
- Simmer and Infuse: Once boiling, reduce the heat to low, cover the pot, and let it simmer gently for at least 45 minutes to 1 hour. The longer it simmers, the more potent and flavorful your ginger elixir will be. The liquid should reduce slightly and take on a beautiful golden-yellow hue. Stir occasionally to prevent sticking.
- Strain the Ginger: Carefully remove the pot from the heat. Place a fine-mesh sieve or colander lined with cheesecloth over a large heatproof bowl or another clean pot. Slowly pour the ginger mixture through the sieve, allowing the liquid to drain completely. Use the back of a spoon to press down on the ginger solids in the sieve to extract as much liquid as possible. Discard the spent ginger solids (or compost them).
- Sweeten and Acidify: Return the strained ginger liquid to the cleaned pot. Add the granulated sugar and fresh lemon juice. If using optional cayenne pepper, add it now. Stir continuously over medium heat until the sugar is completely dissolved. Taste and adjust sweetness or lemon juice to your preference; you might want more sugar if you like it sweeter, or more lemon if you prefer a tarter concentrate.
- Reduce to Concentrate (Optional): For a more potent and syrupy concentrate, continue to simmer the mixture gently for another 15-30 minutes, uncovered, until it reduces to your desired consistency. Be careful not to reduce it too much, or it will become overly thick. This step also helps to further meld the flavors.
- Cool Down: Remove the pot from the heat and allow the ginger elixir to cool completely to room temperature. This is crucial before bottling to prevent condensation and ensure proper sealing.
- Bottle and Store: Once cooled, carefully pour the ginger elixir into clean, sterilized bottles. Funnels are incredibly helpful here. Seal the bottles tightly. If making a liqueur, this is the stage to add the high-proof neutral spirit to your cooled concentrate, stirring well before bottling.
- Chill: Store the bottled ginger elixir in the refrigerator. It’s best served chilled.
Cooking Tips and Variations
For the freshest and most potent ginger elixir, always select firm, plump ginger roots with smooth, blemish-free skin. Avoid ginger that looks shriveled, bruised, or moldy. To adjust the spice level, you can either increase or decrease the amount of ginger used, or for a milder flavor, try soaking the chopped ginger in cold water for 30-60 minutes before simmering. This helps to leach out some of the more intense pungency. If you find the elixir too spicy after it’s made, you can always dilute it further or add a bit more sweetener to balance the heat. Conversely, for an extra kick, a pinch of cayenne pepper added during the simmering stage or with the sugar can really amplify the warmth.
Experimentation is key to making this recipe your own. Consider adding other complementary spices during the simmering phase: a few whole cloves, a couple of cardamom pods, or even a vanilla bean can introduce wonderful aromatic complexities. For a fruity twist, try adding slices of orange or pineapple during the simmer, removing them before straining. You can also swap out lemon juice for lime juice for a different citrus profile. For a lovely floral note, a tablespoon of dried hibiscus flowers added during the last 15 minutes of simmering will impart a beautiful pink hue and a tart, refreshing flavor. If you prefer a less refined sweetness, honey or maple syrup can be used instead of granulated sugar, though they may slightly alter the final texture and clarity of the elixir.
When it comes to straining, don’t rush the process. Allowing the liquid to drip slowly through a fine-mesh sieve lined with cheesecloth will result in a clearer elixir. For an even smoother consistency, you can strain it a second time. Remember to press down on the ginger solids to extract every last drop of flavorful liquid! Regarding the concentrate’s thickness, if you prefer a thicker, more syrupy consistency (ideal for cocktails or drizzling), simply simmer the strained liquid for an additional 15-30 minutes, or until it coats the back of a spoon. Just be careful not to over-reduce, as it will thicken further as it cools. For bottling, always use clean, sterilized bottles to maximize shelf life, especially if you plan to store it for more than a week. Running bottles and caps through a dishwasher on a hot cycle or submerging them in boiling water for 10 minutes usually suffices.
Finally, consider the alcoholic variation. If you’re aiming for a homemade ginger liqueur, once your concentrate has completely cooled, stir in 1 cup (240ml) of a high-proof neutral spirit like vodka or white rum. This not only adds an alcoholic kick but also acts as a natural preservative, extending the shelf life significantly. The liqueur can be enjoyed neat, on the rocks, or as a spirited mixer in cocktails. For a non-alcoholic but equally sophisticated version, try infusing the cooled concentrate with a few sprigs of fresh mint or rosemary for a delightful herbal aroma. The possibilities are endless!
Storage and Reheating
Proper storage is essential to maintain the freshness and potency of your homemade ginger elixir. Once bottled and sealed, the ginger concentrate should always be stored in the refrigerator. In an airtight container or bottle, it will typically last for about 2-3 weeks. If you’ve opted for the alcoholic liqueur version (with added vodka or rum), the alcohol acts as a preservative, extending its shelf life significantly to several months, still preferably stored in the refrigerator or a cool, dark pantry. Always check for any signs of spoilage, such as unusual odors, mold, or fermentation, before consuming.
This ginger elixir is primarily designed to be enjoyed cold or at room temperature, making reheating generally unnecessary. It’s perfect for diluting with cold sparkling water, adding to iced tea, or using as a base for chilled cocktails. However, if you wish to enjoy a warm, soothing ginger tea, you can gently heat a portion of the concentrate. Simply pour your desired amount of ginger elixir into a mug and top it with hot (but not boiling) water. You can also warm it gently in a small saucepan over low heat, being careful not to boil it, which could diminish some of its delicate flavors and beneficial compounds. Avoid microwaving, as it can sometimes lead to uneven heating and a loss of aroma. If you’ve diluted a larger batch, it’s best to store the concentrate separately and dilute portions as needed to maintain freshness.
Frequently Asked Questions
Can I use dried ginger instead of fresh ginger?
While fresh ginger is highly recommended for its vibrant flavor and aroma, you can use dried ginger in a pinch. However, the flavor profile will be different – often more intense and less nuanced. As a general rule, use about 1 tablespoon of dried ground ginger for every 1/4 cup of fresh ginger. You might need to adjust quantities to taste, and the color of your elixir may also be less vibrant.
How can I make my ginger elixir less sweet or more spicy?
To reduce sweetness, simply use less sugar than the recipe calls for, or omit it entirely if you prefer a sugar-free version. You can always add a natural sweetener like stevia or erythritol to taste after the elixir has cooled. To increase the spice level, you can either use more ginger (up to 1.5 pounds for this recipe) or add a small pinch of cayenne pepper during the simmering process. For a milder elixir, soak the chopped ginger in cold water for 30-60 minutes before simmering it, then drain well.
What are some creative ways to use this ginger elixir?
The possibilities are endless! Beyond diluting it with still or sparkling water, try adding it to hot or iced tea, lemonade, or fruit juices for a spicy kick. It makes a fantastic base for cocktails like Moscow Mules or ginger margaritas, and mocktails too. You can also use a splash in marinades for chicken or fish, in salad dressings, or even in baking recipes like ginger snaps or gingerbread for an extra layer of flavor. It’s also wonderful as a digestive shot after meals.
Can I freeze the ginger elixir for longer storage?
Yes, you can absolutely freeze the ginger elixir! This is an excellent way to extend its shelf life for several months. Pour the cooled concentrate into freezer-safe containers, ice cube trays, or even small freezer bags. Once frozen, you can transfer the cubes or blocks to a larger freezer bag for convenient, portioned use. Thaw overnight in the refrigerator or add a frozen cube directly to hot water for an instant warm ginger drink.