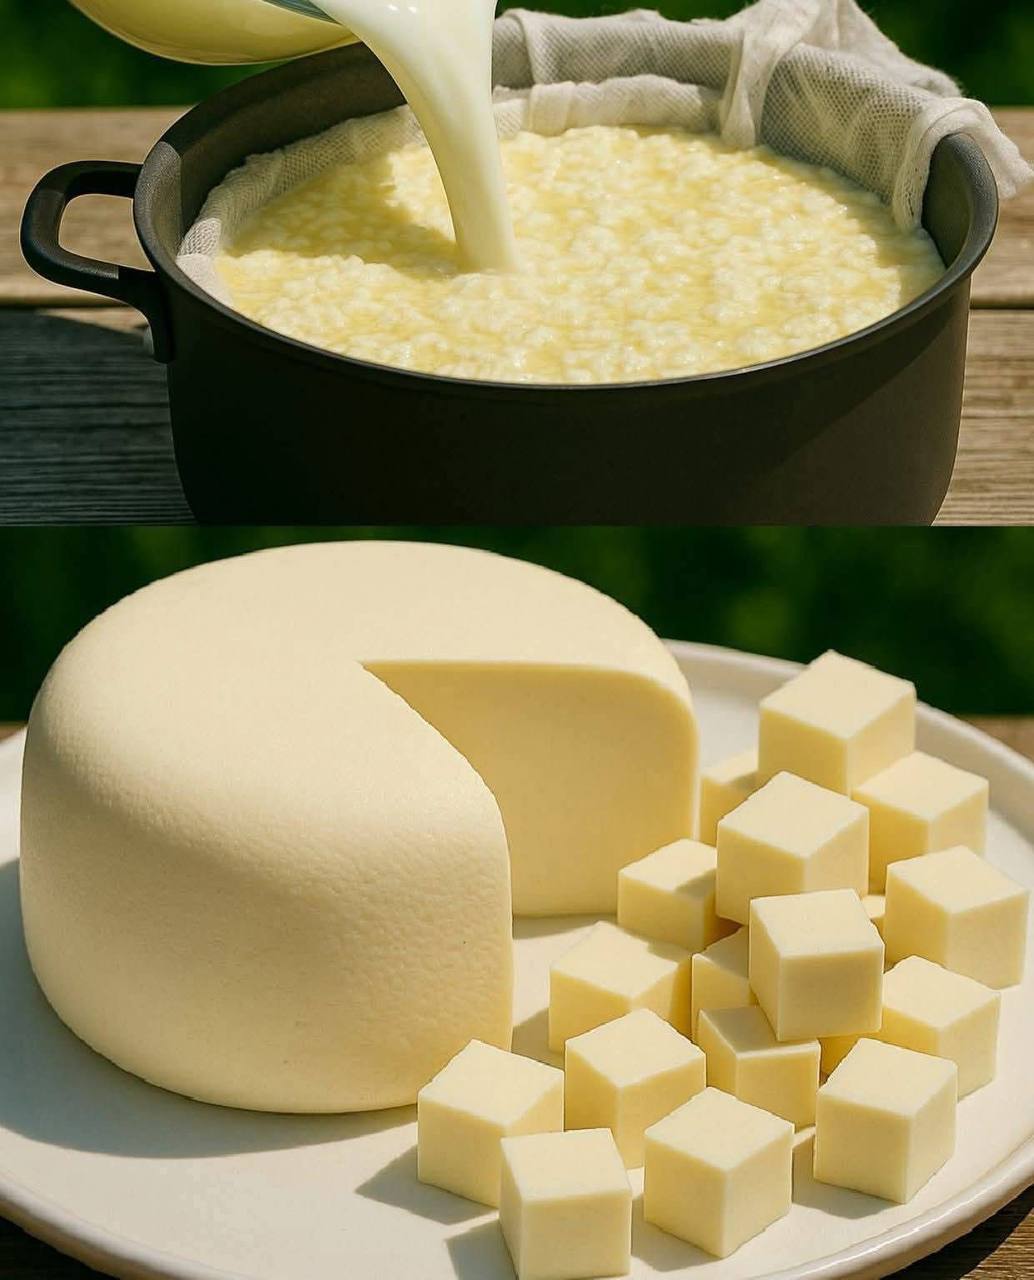
From Milk to Cheese: The Magic of Homemade Fresh Cheese
There’s something uniquely satisfying about transforming simple ingredients into culinary masterpieces right in your own kitchen. And when it comes to cheesemaking, that transformation is nothing short of magical! Imagine taking humble milk, a liquid staple, and with a few easy steps, crafting it into a solid, delicious, and versatile fresh cheese. This isn’t some complex, professional endeavor; it’s a wonderfully accessible process that brings the ancient art of cheesemaking directly to your fingertips. The beauty of homemade fresh cheese lies in its purity, its mild, milky flavor, and the incredible versatility it offers, ready to elevate everything from a simple breakfast to an elegant appetizer.
The journey from milk to cheese is a visual delight, showcasing the fundamental principles of dairy science in action. We’re not talking about aged, complex wheels here, but rather the delightful simplicity of a fresh, unripened cheese – think along the lines of a creamy paneer, a tangy queso fresco, or a rustic farmer’s cheese. This type of cheese is characterized by its smooth, uniform texture and light color, indicating that it hasn’t undergone extensive aging. It’s the perfect starting point for any aspiring cheesemaker, offering immediate gratification and a delicious reward for your efforts. Plus, knowing exactly what goes into your cheese—no additives, no preservatives—makes the experience all the more rewarding.
Making fresh cheese at home is not just a culinary project; it’s an experience that connects you to food in a profound way. It’s a chance to experiment with flavors, control the texture, and impress your friends and family with a creation that’s both delicious and distinctly yours. Whether you enjoy it crumbled over salads, spread on toast, or as a delightful snack, this homemade fresh cheese will become a staple in your kitchen. So, let’s dive into the fascinating world of cheesemaking and discover how easy it is to create your very own fresh cheese from scratch!
Nutritional Information
Per serving (approximate values, based on 100g of fresh cheese made from whole milk):
- Calories: 290
- Protein: 18g
- Carbohydrates: 3g
- Fat: 23g
- Fiber: 0g
- Sodium: 250mg
Ingredients
- 1 gallon (about 3.8 liters) whole milk (not ultra-pasteurized for best results)
- 1/2 cup (120 ml) fresh lemon juice OR white vinegar (divided)
- 1 teaspoon sea salt, or to taste
Instructions
- Prepare Your Workspace and Equipment: Gather all your equipment. Line a colander with a double layer of fine-mesh cheesecloth or butter muslin, ensuring there’s enough overhang to gather later. Place the colander over a large bowl or pot to catch the whey.
- Gently Heat the Milk: Pour the whole milk into a large, heavy-bottomed, non-reactive pot (stainless steel is ideal). Place the pot over medium heat. Stir the milk occasionally to prevent scorching on the bottom. Heat the milk slowly until it reaches a temperature of 180-195°F (82-90°C), or just before it comes to a rolling boil and starts to froth significantly. You’ll see small bubbles forming around the edges. Do not let it boil vigorously.
- Initiate Curdling: Once the milk reaches the desired temperature, remove the pot from the heat. Pour in 1/4 cup (60 ml) of the lemon juice or vinegar. Stir gently for about 30 seconds. You should immediately start to see the milk solids (curds) separating from the watery liquid (whey). The curds will look like soft, white clumps, and the whey will be yellowish and translucent.
- Assess Curdling and Add More Acid if Needed: If the curds haven’t fully separated and the whey still looks milky or cloudy, add the remaining 1/4 cup (60 ml) of lemon juice or vinegar, one tablespoon at a time, stirring gently after each addition, until a clear separation is achieved. Let the mixture sit undisturbed for 10-15 minutes to allow the curds to fully form and settle.
- Drain the Curds: Carefully pour the curds and whey into the cheesecloth-lined colander. The whey will immediately start to drain into the bowl below. Allow the curds to drain for 15-30 minutes, or until most of the liquid has passed through.
- Form and Press the Cheese (Optional but Recommended): Once the initial draining is complete, gather the corners of the cheesecloth to form a ball, twisting gently to squeeze out more whey. For a firmer, more compact cheese, you can press it. Place the cheesecloth-wrapped curds back into the colander. Place a small plate or flat lid on top of the cheese, and then place a heavy object (like a few cans of food or a heavy bowl filled with water) on top of the plate to act as a weight. Press for 1-4 hours, depending on your desired firmness. The longer you press, the firmer and drier your cheese will be.
- Salt the Cheese: After pressing (or draining if you skip pressing), unwrap the cheese from the cheesecloth. Gently knead in the sea salt. You can also sprinkle salt evenly over the surface of the cheese if you prefer. Taste and adjust salt as needed.
- Shape and Store: Shape the cheese into a disk, log, or any desired form. Your fresh homemade cheese is now ready to enjoy! For best results and to allow the flavors to meld, you can refrigerate it for at least 30 minutes before serving.
Cooking Tips and Variations
For the best fresh cheese, always start with good quality whole milk. Avoid ultra-pasteurized milk, as the intense heating process can alter its proteins, making it difficult for curds to form properly. Pasteurized but not ultra-pasteurized milk works wonderfully. Precise temperature control is key; investing in a good kitchen thermometer will give you consistent results. Heating the milk too quickly or letting it boil vigorously can lead to a tougher, rubbery cheese. The ideal temperature range of 180-195°F (82-90°C) ensures optimal curd formation without overcooking the milk solids.
When it comes to the acid, both lemon juice and white vinegar work effectively. Lemon juice tends to impart a very subtle citrusy note, while vinegar is more neutral. For a completely neutral flavor profile, you can also use food-grade citric acid (about 1.5 teaspoons dissolved in 1/4 cup water per gallon of milk). Don’t be afraid to adjust the amount of acid slightly based on your milk; sometimes a little more or less is needed to achieve a clear separation of curds and whey.
The draining time significantly impacts the texture of your final cheese. For a softer, more spreadable cheese, drain for a shorter period (15-30 minutes). For a firmer, sliceable cheese like paneer or queso fresco, drain and press for several hours. You can even leave it pressing overnight in the refrigerator for an extra firm result. Feel free to experiment with pressing weights and times to find your ideal consistency.
To add flavor, consider incorporating fresh herbs like chives, dill, or parsley directly into the curds before pressing. You can also mix in garlic powder, onion powder, or a pinch of chili flakes for a savory kick. For a sweeter cheese, a touch of honey or maple syrup can be folded in with the salt. Remember to save the leftover whey! It’s packed with nutrients and can be used in baking (replacing water in bread recipes), smoothies, soups, or even as a nutrient boost for plants in your garden.
Storage and Reheating
Homemade fresh cheese is best enjoyed within a few days of making it, as it does not contain the preservatives found in commercial cheeses. Store the cheese in an airtight container in the refrigerator. If you’ve made a firmer block, you can wrap it tightly in parchment paper or plastic wrap before placing it in the container. Avoid storing it directly in water, as this can dilute its flavor and texture.
Because this is a fresh, unripened cheese, it doesn’t typically require reheating. It’s meant to be served chilled or at room temperature. However, it can be incorporated into cooked dishes. For example, you can crumble it into hot soups or stews just before serving, add it to scrambled eggs, or use it in a warm pasta dish. If you’re adding it to a hot dish, do so at the very end of cooking to prevent it from melting completely or becoming too rubbery. For best flavor and texture, aim to consume your homemade fresh cheese within 3-5 days.
Frequently Asked Questions
What kind of milk is best for making fresh cheese?
Whole milk is highly recommended for homemade fresh cheese because its higher fat content results in a richer flavor and creamier texture. It’s crucial to avoid ultra-pasteurized (UHT) milk, as the intense heat treatment it undergoes denatures the proteins, making it very difficult for the milk to curdle properly and form distinct curds. Pasteurized (but not ultra-pasteurized) whole milk works perfectly.
Why aren’t my curds forming properly, or why is my cheese too crumbly?
If your curds aren’t forming well, the most common reasons are that the milk didn’t reach a high enough temperature before adding the acid, or you didn’t use enough acid. Ensure the milk is heated to 180-195°F (82-90°C) and add the acid gradually until a clear separation occurs. If your cheese is too crumbly, it might be due to over-draining or over-pressing. For a softer cheese, reduce the draining and pressing time. Also, using low-fat milk can result in a drier, more crumbly cheese.
Can I use flavored acid, like balsamic vinegar, to curdle the milk?
While you can experiment, it’s generally best to stick to neutral-flavored acids like lemon juice or white vinegar for curdling. Stronger flavored acids like balsamic vinegar will impart a very distinct and often overwhelming flavor to your delicate fresh cheese, which might not be desirable. You can always add flavors and herbs after the cheese has formed and drained.
What can I do with the leftover whey?
Don’t discard the whey! It’s a nutrient-rich byproduct and can be used in many ways. You can use it as a liquid replacement in baking recipes (like bread or pancakes), add it to smoothies for a protein boost, use it as a base for soups or broths, or even water your plants with it (it’s great for acid-loving plants). You can store it in an airtight container in the refrigerator for up to a week.