Introduction
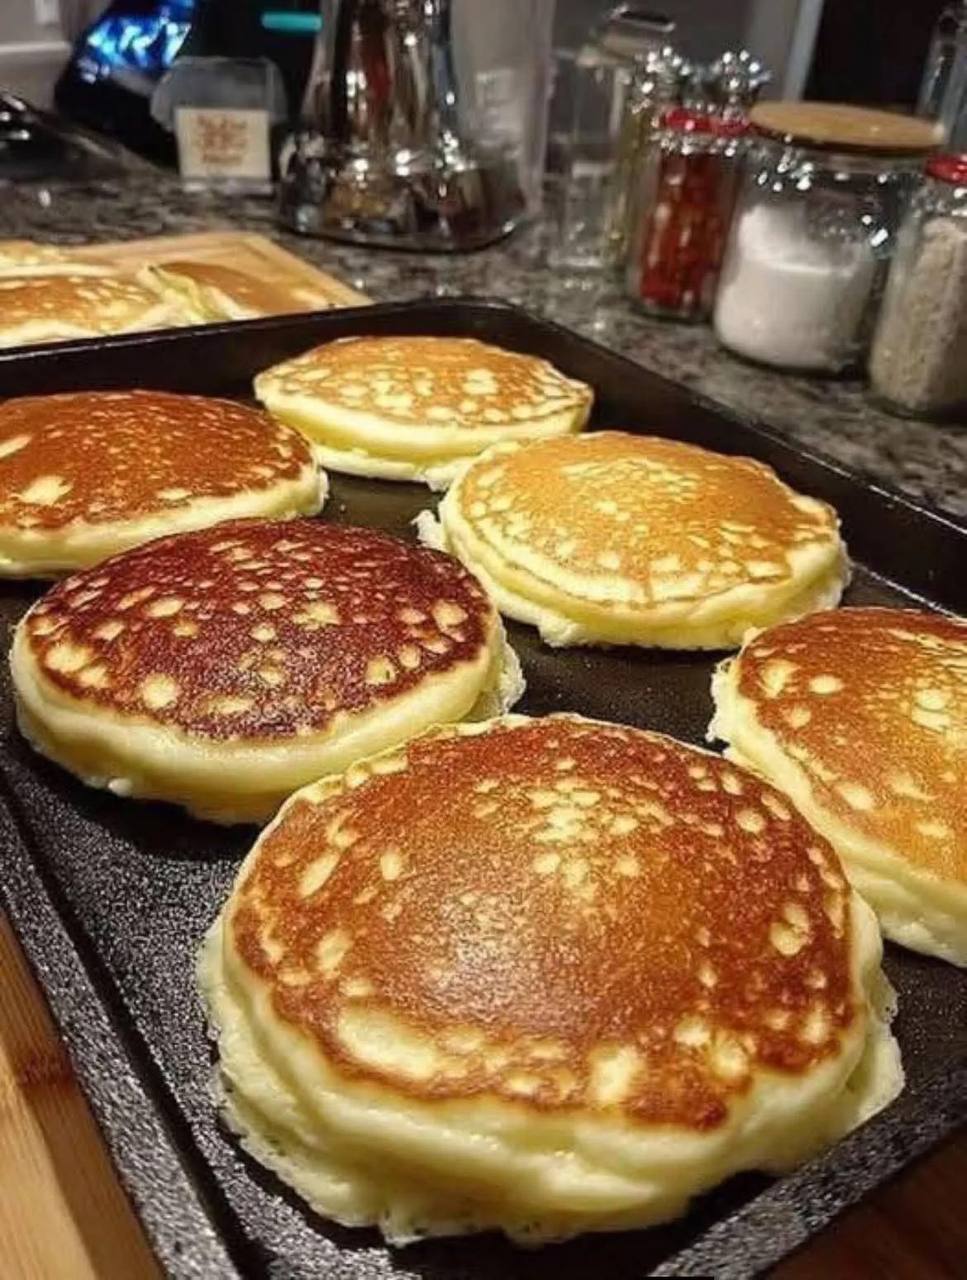
There’s nothing quite like waking up to the aroma of freshly cooked pancakes, especially when they’re perfectly golden, impossibly light, and melt-in-your-mouth fluffy. Fluffy pancakes are more than just a breakfast item; they’re a comforting embrace, a weekend ritual, and a golden promise of deliciousness. Imagine a stack of these cloud-like discs, gently kissed with butter and drenched in warm maple syrup – it’s a culinary experience that instantly elevates any morning into something truly special. This recipe isn’t just about making pancakes; it’s about mastering the art of creating those restaurant-quality, sky-high stacks right in your own kitchen, turning ordinary mornings into extraordinary ones.
What makes a pancake truly “fluffy”? It’s a delicate dance of ingredients and technique. The secret lies in a careful balance of leavening agents, the right kind of liquid, and a gentle hand. We’ll be utilizing the power of baking powder for an incredible lift, and a touch of buttermilk (or a simple homemade substitute) to add tenderness and a subtle tang that complements the sweetness beautifully. The key is to create air pockets within the batter that expand when heated, resulting in that coveted airy texture that makes each bite feel like you’re eating a delicious cloud. Forget dense, flat pancakes; prepare to unlock the secrets to achieving a stack so light, they practically float off the plate.
This recipe is designed to guide you through every step, ensuring that even novice cooks can achieve pancake perfection. We’ll cover everything from selecting the right ingredients to the optimal griddle temperature and the tell-tale signs that your pancakes are ready to flip. Get ready to impress your family and friends with a breakfast that looks as good as it tastes – a towering stack of golden-brown, irresistibly fluffy pancakes that will have everyone asking for seconds. Let’s dive into the simple magic that transforms basic pantry staples into a breakfast masterpiece!
Nutritional Information
Per serving (approximate values):
- Calories: 320
- Protein: 10g
- Carbohydrates: 45g
- Fat: 12g
- Fiber: 2g
- Sodium: 450mg
Ingredients
- 1 ½ cups all-purpose flour (spooned and leveled)
- 2 tablespoons granulated sugar
- 2 teaspoons baking powder (crucial for lift and fluffiness)
- ½ teaspoon baking soda (reacts with buttermilk for extra rise and tender crumb)
- ½ teaspoon salt (enhances flavor)
- 1 ¼ cups buttermilk (provides tang and activates baking soda; can substitute with regular milk + 1 tbsp lemon juice/vinegar)
- 1 large egg (helps bind, enriches, and adds structure)
- 2 tablespoons unsalted butter, melted and slightly cooled (adds richness and moisture)
- 1 teaspoon vanilla extract (for warm, inviting flavor)
- Vegetable oil or additional butter, for greasing the griddle
Instructions
- In a large mixing bowl, whisk together all the dry ingredients: flour, granulated sugar, baking powder, baking soda, and salt. Whisk thoroughly for about 30 seconds to ensure the leavening agents are evenly distributed, which is crucial for uniform rise.
- In a separate medium bowl, whisk together the wet ingredients: buttermilk, large egg, melted butter, and vanilla extract. Whisk until well combined and smooth.
- Pour the wet ingredient mixture into the dry ingredient mixture. Using a whisk or a rubber spatula, mix gently until just combined. It’s perfectly okay, and even desirable, to have a few lumps in the batter. Overmixing develops the gluten in the flour, which leads to tough, flat pancakes instead of fluffy ones. Stop mixing as soon as no pockets of dry flour remain.
- Let the batter rest for 5-10 minutes at room temperature. This resting period allows the gluten to relax and the baking powder to start working, resulting in a more tender and fluffy pancake. While the batter rests, prepare your cooking surface.
- Heat a large non-stick griddle or frying pan over medium-low to medium heat. It’s important to get the temperature right – too low and pancakes will be pale and greasy; too high and they’ll burn before cooking through. A good test is to sprinkle a few drops of water; they should sizzle and evaporate within a few seconds.
- Lightly grease the hot griddle with a small amount of vegetable oil or butter. You can use a paper towel to spread it thinly and evenly.
- Using a ¼ cup measuring cup or an ice cream scoop, pour the pancake batter onto the hot griddle. Leave enough space between each pancake for them to spread slightly and to make flipping easier.
- Cook the pancakes for 2-3 minutes per side, or until golden brown. You’ll know they’re ready to flip when you see bubbles forming and popping on the surface of the pancake, and the edges look set and slightly dry.
- Carefully slide a spatula under each pancake and flip it over. Cook for another 1-2 minutes on the second side, until it’s also golden brown and cooked through in the center.
- Transfer the cooked pancakes to a plate. To keep them warm while you cook the remaining batter, you can place the plate in a warm oven (around 200°F / 95°C).
- Repeat the greasing and cooking process with the remaining batter until all pancakes are cooked. Serve immediately with your favorite toppings.
Cooking Tips and Variations
Do Not Overmix the Batter: This is perhaps the most crucial tip for fluffy pancakes. Mix only until the dry and wet ingredients are just combined. A few lumps are perfectly fine and indicate you haven’t overmixed. Overmixing develops gluten, leading to dense, chewy pancakes.
Rest the Batter: Allowing the batter to rest for 5-10 minutes gives the gluten time to relax and allows the leavening agents to begin their work, resulting in a lighter, more tender crumb.
Proper Griddle Temperature: Medium-low to medium heat is ideal. If your griddle is too hot, the pancakes will burn on the outside before cooking through on the inside. If it’s too cool, they’ll be pale and dense. Test the temperature by sprinkling a few drops of water – they should sizzle and evaporate within a few seconds.
Don’t Overcrowd the Pan: Cook only 2-3 pancakes at a time, depending on the size of your griddle. This ensures even cooking and makes flipping much easier.
Use a Scoop for Uniform Pancakes: An ice cream scoop or a ¼ cup measuring cup helps create consistently sized and shaped pancakes, which cook more evenly and look great stacked.
Watch for Bubbles: The best indicator that a pancake is ready to flip is when bubbles appear on the surface and begin to pop, and the edges look set and slightly dry.
Keep Cooked Pancakes Warm: As you cook batches, place finished pancakes on a plate in a warm oven (around 200°F / 95°C) to keep them toasty until ready to serve.
Buttermilk Substitute: If you don’t have buttermilk, you can easily make your own. For 1 ¼ cups of buttermilk, add 1 tablespoon of lemon juice or white vinegar to a measuring cup, then fill the rest of the way with regular milk (any fat percentage). Stir and let sit for 5 minutes until it slightly curdles. This works perfectly to activate the baking soda.
Add-Ins: Feel free to stir in ½ cup of your favorite additions after the batter has rested. Popular choices include:
- Chocolate Chips: Mini or regular, for a sweet treat.
- Fresh Berries: Blueberries, raspberries, or chopped strawberries.
- Chopped Nuts: Pecans or walnuts add a delightful crunch.
- Spices: A pinch of cinnamon, nutmeg, or pumpkin pie spice can add warmth.
- Lemon Zest: For a bright, citrusy note that pairs wonderfully with berries.
Serving Suggestions:
- Classic: Butter and warm maple syrup are timeless for a reason.
- Fruit Medley: Fresh berries, sliced bananas, or a warm fruit compote.
- Whipped Cream: A dollop of homemade whipped cream for extra indulgence.
- Nut Butters: A spread of peanut butter or almond butter for added protein and flavor.
- Savory Twist: Believe it or not, a fried egg and a slice of bacon can be surprisingly good on the side!
Storage and Reheating
Storing Leftovers: Cooked pancakes can be stored in an airtight container or a resealable freezer bag in the refrigerator for up to 3-4 days. Ensure they are completely cooled before storing to prevent condensation, which can make them soggy.
Freezing for Later: Pancakes freeze beautifully! Once completely cooled, place them in a single layer on a baking sheet and freeze for about 30 minutes until solid. Then, transfer the frozen pancakes to a freezer-safe bag or airtight container, separating layers with parchment paper to prevent sticking. They can be stored in the freezer for up to 2-3 months.
Reheating from Refrigerator:
- Microwave: Place 1-2 pancakes on a microwave-safe plate and heat for 20-30 seconds per pancake, or until warm. Be careful not to overheat, as they can become rubbery.
- Toaster or Toaster Oven: This is often the best method for regaining a slightly crispy exterior. Toast on a medium setting until heated through and lightly browned.
- Oven: Preheat oven to 350°F (175°C). Place pancakes in a single layer on a baking sheet, cover loosely with foil, and heat for 5-10 minutes, or until warm.
Reheating from Freezer:
- Toaster or Toaster Oven: This is the most recommended method for frozen pancakes. Pop them directly into the toaster or toaster oven on a medium-high setting. You may need to toast them twice to ensure they are heated through.
- Microwave: Place 1-2 frozen pancakes on a microwave-safe plate and heat for 45-60 seconds, or until warm. Adjust time based on your microwave’s power.
- Oven: Preheat oven to 375°F (190°C). Place frozen pancakes in a single layer on a baking sheet, cover loosely with foil, and bake for 10-15 minutes, or until heated through.
Frequently Asked Questions
Why are my pancakes not fluffy?
The most common reasons for flat pancakes are overmixing the batter, which develops gluten and makes them tough, or using old/inactive leavening agents (baking powder/baking soda). Ensure your baking powder and soda are fresh, mix the batter gently until just combined (lumps are good!), and let it rest for 5-10 minutes before cooking.
Can I make the batter ahead of time?
While you can mix the dry and wet ingredients separately and store them overnight in the fridge, it’s generally best to combine them just before cooking. The leavening agents (especially baking soda reacting with buttermilk) start working as soon as they’re wet, and letting the combined batter sit for too long can cause it to lose its lift, resulting in less fluffy pancakes. A 5-10 minute rest is ideal, but extended periods are not recommended for optimal fluffiness.
What’s the best way to get perfectly golden-brown pancakes?
Achieving that beautiful golden-brown color comes down to proper griddle temperature. Heat your griddle or pan over medium-low to medium heat. If it’s too hot, they’ll burn quickly; too cold, and they’ll be pale and greasy. A lightly oiled surface also helps. Watch for bubbles forming on the surface and drying edges; these are your cues that it’s time to flip for a perfectly cooked and browned second side.