Introduction
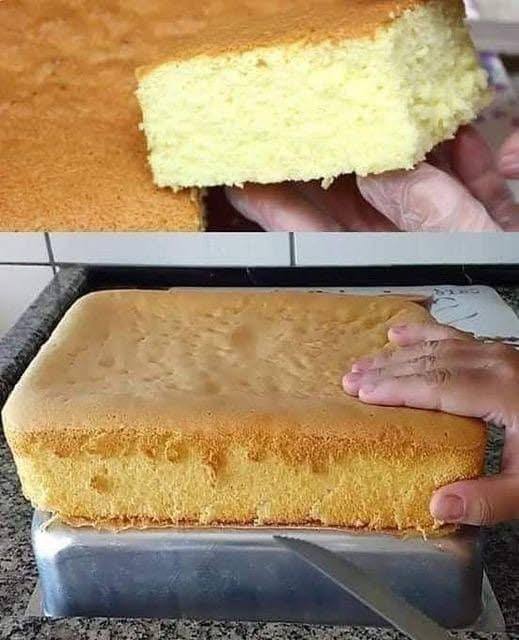
Prepare to have your culinary world transformed by a recipe so simple, yet so utterly magical, it feels almost too good to be true. Forget everything you thought you knew about “bread” as we introduce you to the Fluffy 3-Ingredient Cake that truly melts in your mouth. This isn’t your grandma’s yeast bread; it’s a cloud-like confection, an ethereal delight that defies its humble origins to deliver an experience of pure, unadulterated bliss. Imagine a dessert so light and airy, it feels like biting into a sweet, delicate cloud – that’s precisely what awaits you with this incredible creation.
The allure of this cake lies not just in its unbelievably delicate texture and melt-in-your-mouth quality, but also in its astonishing simplicity. With just three core ingredients, readily available in most kitchens, you can whip up a dessert that tastes and feels like it came straight from a gourmet patisserie. This recipe is a testament to the power of minimal ingredients expertly combined, proving that extraordinary flavor and texture don’t require a lengthy shopping list or complex techniques. It’s the perfect solution for impressing guests with minimal fuss, satisfying a sweet craving without hours in the kitchen, or simply treating yourself to a moment of pure, fluffy indulgence.
Inspired by the revered Japanese soufflé cheesecake, this fluffy cake takes the best elements of that iconic dessert – its incredible lightness, its airy structure, and its ability to practically dissolve on the tongue – and distills them into an even more accessible form. Every bite is a revelation: sweet, rich, yet unbelievably light, leaving behind a delicate memory rather than a heavy feeling. Whether enjoyed as an elegant dessert, a delightful snack with a cup of tea, or even a surprisingly satisfying breakfast paired with fresh berries, this cake promises to be a new favorite, captivating your senses and proving that culinary magic is indeed possible with just three simple ingredients.
Nutritional Information
Per serving (approximate values):
- Calories: 180
- Protein: 7g
- Carbohydrates: 15g
- Fat: 10g
- Fiber: 0g
- Sodium: 80mg
Ingredients
- 4 large eggs, separated (at room temperature)
- 200g cream cheese, softened (full-fat recommended, at room temperature)
- 60g all-purpose flour, sifted (or cake flour for an even lighter texture)
- Optional: 1 tsp vanilla extract
- Optional: Zest of 1/2 lemon or orange
- Optional: Pinch of salt (for egg whites)
Instructions
- Prepare Your Workspace: Preheat your oven to 325°F (160°C). Prepare an 8-inch round springform pan or a 9×5 inch loaf pan. Line the bottom and sides with parchment paper, allowing it to extend above the rim of the pan by about an inch. Grease the parchment paper lightly. Wrap the outside of your baking pan tightly with aluminum foil to prevent water from seeping in during the water bath.
- Set Up Water Bath: Place your prepared baking pan inside a larger roasting pan or oven-safe dish that is deep enough to hold at least 1-2 inches of water. Set aside for now.
- Create the Cream Cheese Base: In a large mixing bowl, combine the softened cream cheese and egg yolks. Using an electric mixer on medium speed, beat until the mixture is completely smooth, creamy, and free of lumps. This may take 2-3 minutes. If using, stir in the vanilla extract and citrus zest at this stage.
- Incorporate Flour: Gradually add the sifted flour to the cream cheese and egg yolk mixture, mixing on low speed until just combined. Be careful not to overmix; stop as soon as no dry streaks of flour remain. The mixture should be thick and smooth. Set this batter aside.
- Whip Egg Whites: In a separate, very clean, dry mixing bowl (ensure no grease or water is present, as this will prevent the whites from whipping properly), add the room temperature egg whites. If using, add a pinch of salt. Using an electric mixer on medium-high speed, beat the egg whites until they form soft peaks. Continue beating until they reach stiff, glossy peaks. When you lift the whisk, the peaks should stand straight up and hold their shape without collapsing, but they should not be dry or crumbly. This is a crucial step for the cake’s fluffiness.
- Gently Fold in Egg Whites: Add about one-third of the whipped egg whites to the cream cheese batter. Using a spatula, gently fold them in until just combined. This lightens the batter and makes it easier to incorporate the remaining whites.
- Continue Folding: Add the remaining whipped egg whites to the batter in two more additions. With each addition, gently fold them in using a cut-and-fold motion. Be very careful not to deflate the egg whites; the goal is to incorporate them without losing the air you’ve whipped into them. This delicate folding technique is key to the cake’s airy texture. Stop folding as soon as the mixture is uniform and no streaks of egg white remain.
- Pour into Pan: Carefully pour the fluffy batter into your prepared baking pan. Gently tap the pan on the counter a few times to release any large air bubbles.
- Bake in Water Bath: Carefully transfer the roasting pan with the cake pan into the preheated oven. Pour hot water into the larger roasting pan, ensuring it comes up about 1-2 inches around the sides of the cake pan.
- Bake Low and Slow: Bake for 60-75 minutes, or until the top is golden brown, and a wooden skewer inserted into the center comes out clean or with moist crumbs attached (not wet batter). The cake will rise significantly during baking and may jiggle slightly in the center when gently moved. The low and slow baking with the water bath is essential for an even, moist, and crack-free cake.
- Cool Gradually: Once baked, turn off the oven but leave the cake inside with the oven door ajar for another 15-20 minutes. This gradual cooling prevents the cake from deflating too quickly and helps maintain its delicate structure.
- Final Cooling and Unmolding: Remove the cake from the oven and the water bath. Let it cool completely on a wire rack in the pan. Once fully cooled, carefully run a thin knife around the edges before releasing the springform pan or inverted loaf pan. Gently peel away the parchment paper.
- Serve: Dust with powdered sugar, serve plain, or accompany with fresh berries and a dollop of whipped cream. Enjoy your impossibly fluffy, melt-in-your-mouth creation!
Cooking Tips and Variations
Achieving the perfect fluffy, melt-in-your-mouth texture for this cake relies on a few critical techniques and careful attention to detail. Here are some indispensable tips and exciting variations to ensure your success and inspire your creativity:
Tips for Best Results:
- Room Temperature Ingredients are Non-Negotiable: This is perhaps the most important tip. Room temperature eggs separate more cleanly, and the whites whip to a greater volume and more stable foam. Room temperature cream cheese blends smoothly without lumps, creating a uniform base. Cold ingredients will result in a lumpy batter and less airy egg whites. Plan ahead and take your ingredients out of the refrigerator at least 30 minutes to an hour before you start.
- Spotless Equipment for Egg Whites: Any trace of fat (oil, egg yolk, butter) or water in your mixing bowl or on your whisk attachment will prevent egg whites from whipping up properly. Use a clean glass or metal bowl, not plastic, as plastic can retain grease. Wipe down your bowl and whisk with a paper towel dampened with lemon juice or vinegar before starting to ensure they are absolutely pristine.
- Don’t Overmix the Batter: Once you’ve added the flour to the cream cheese and egg yolk mixture, mix only until just combined. Overmixing develops gluten in the flour, which can lead to a tougher, less tender cake. Similarly, when folding in the egg whites, be gentle and stop as soon as no streaks remain. Overfolding will deflate the precious air you’ve whipped into the whites, resulting in a dense, disappointing cake.
- The Magic of the Water Bath (Bain-Marie): The water bath is crucial for this delicate cake. It creates a moist, even heat environment in the oven, preventing the cake from drying out, cracking on top, and cooking too quickly. This slow, gentle baking is what gives the cake its incredibly fine, uniform crumb and its signature “melts in your mouth” texture. Ensure your pan is well-wrapped in foil to prevent water from seeping in.
- Whipping Egg Whites to Stiff Peaks: This is the primary leavening agent for this cake. Beat the egg whites until they are glossy and hold stiff peaks. When you lift the whisk, the peaks should stand straight up without flopping over. However, be careful not to overbeat them to the point of being dry and crumbly, as this can make them difficult to fold in and result in a drier cake.
- Gradual Cooling is Key: Resist the urge to pull the cake directly from the hot oven. The sudden temperature change can cause the cake to deflate dramatically and crack. Allowing it to cool gradually in the oven with the door ajar, then on a wire rack, helps it set gently and prevents collapse, maintaining its beautiful rise and delicate structure.
- Parchment Paper is Your Friend: Lining your pan with parchment paper, especially for a springform pan, makes unmolding much easier and helps prevent sticking. Letting the paper extend above the rim can also help the cake rise evenly without touching the pan sides too aggressively.
Recipe Variations:
- Citrus Zest Explosion: Enhance the bright, fresh flavor by adding the zest of a whole lemon, orange, or lime to the cream cheese mixture. The citrus notes pair beautifully with the rich creaminess.
- Vanilla Bean Dream: For a more intense vanilla flavor, scrape the seeds from half a vanilla bean and add them to the cream cheese mixture instead of, or in addition to, vanilla extract.
- Matcha Magic: For a subtle earthy and slightly bitter note, sift 1-2 teaspoons of high-quality matcha powder along with the flour. This creates a beautiful green hue and a distinct Japanese-inspired flavor.
- Chocolate Indulgence: Sift 1-2 tablespoons of unsweetened cocoa powder with the flour for a delicate chocolate version. You could also gently fold in a handful of mini chocolate chips at the very end, just before pouring into the pan, though this might slightly affect the “fluffy” texture.
- Almond Essence: A few drops of almond extract can add a delightful nutty aroma and flavor. Add it with the vanilla extract.
- Spiced Delight: For a warming twist, add a pinch of cinnamon or nutmeg along with the flour, especially lovely during cooler months.
- Individual Servings: Bake the batter in ramekins or a muffin tin (lined with paper cups) for individual portions. Adjust baking time accordingly (likely 25-35 minutes).
Storage and Reheating
This fluffy 3-ingredient cake is best enjoyed fresh, ideally on the day it’s made, when its texture is at its peak ethereal lightness. However, if you have leftovers (a rare occurrence, we predict!), here’s how to store and reheat them properly to maintain as much of its delicate charm as possible:
Storage:
- Airtight Container: Once completely cooled, transfer any leftover cake to an airtight container. This is crucial to prevent it from drying out and absorbing odors from the refrigerator.
- Refrigeration: Store the cake in the refrigerator for up to 3-4 days. While it will retain its flavor, the texture may become slightly denser and less “airy” than when freshly baked.
- Freezing (Not Recommended, but Possible): While not ideal for preserving the delicate, melt-in-your-mouth texture, you can freeze this cake. Wrap individual slices tightly in plastic wrap, then again in aluminum foil, and place them in a freezer-safe bag or container. It can be stored for up to 1 month. The texture will be noticeably different after freezing and thawing, often becoming more dense and crumbly, losing its signature fluffiness.
Reheating:
- Room Temperature: The best way to enjoy leftover cake is to let it come to room temperature. Take slices out of the refrigerator about 20-30 minutes before serving. This allows the cake to soften slightly and regain some of its tender texture.
- Microwave (Use with Caution): If you prefer a slightly warm cake, you can gently microwave individual slices for 10-15 seconds on low power. Be very careful not to overheat, as this can make the cake rubbery or dry. The goal is just to take the chill off, not to cook it further.
- Oven (Not Recommended): Reheating in the oven is generally not recommended for this type of delicate, moist cake, as it tends to dry it out quickly and can make the edges tough. It’s best reserved for cakes that benefit from a crispier crust.
Remember, the magic of this cake is its fresh, airy texture. While it stores reasonably well, savoring it within a day or two of baking will give you the most exquisite experience.
Frequently Asked Questions
Why did my cake deflate after baking?
Deflation is a common issue with soufflé-style cakes and is usually due to one of two main reasons. Firstly, the egg whites might not have been whipped to stiff enough peaks, or they were overbeaten and became dry, making them unstable. Secondly, the cake might have cooled too quickly after being removed from the oven. The sudden temperature change can cause the delicate air pockets to collapse. Always allow the cake to cool gradually in the oven with the door ajar before removing it completely.
Can I use low-fat cream cheese?
While technically possible, it is highly recommended to use full-fat cream cheese for this recipe. Full-fat cream cheese contributes significantly to the rich flavor and the desired “melts in your mouth” texture. Low-fat versions often contain more water and stabilizers, which can alter the consistency of the batter and result in a drier, less creamy cake that doesn’t have the same luxurious mouthfeel. For the best results, stick with the full-fat option.
My cake cracked on top. What went wrong?
Cracking on the surface of the cake often indicates that it baked too quickly or at too high a temperature, causing the exterior to set before the interior had fully risen. This pulls the surface apart. Ensure your oven temperature is accurate (an oven thermometer is a good investment), and always use the water bath method, as it creates a moist, even cooking environment that helps prevent cracking. Also, ensure your pan is well-wrapped in foil to prevent any water from seeping in, which can also affect the crust.
Can I make this cake without a water bath?
While you can bake this cake without a water bath, the results will be significantly different. Without the moist, gentle heat provided by the water bath, the cake is much more likely to dry out, crack on top, and develop a tougher, denser texture. The water bath is fundamental to achieving the signature “melts in your mouth,” incredibly moist, and delicate crumb that makes this cake so special. It’s a crucial step that shouldn’t be skipped for optimal results.