Introduction
Ah, the chocolate chip cookie. It’s more than just a dessert; it’s a memory, a comfort, a universal language of deliciousness. We’ve all been on that elusive quest, haven’t we? The endless search for the *perfect* chocolate chip cookie recipe. You know the one – the cookie that promises everything but often delivers something less. Some are too cakey, some too flat, some too dry, and others just… ordinary. But what if I told you that the search ends today? What if I told you I’ve cracked the code, meticulously tested, and finally perfected the holy grail of chocolate chip cookies?
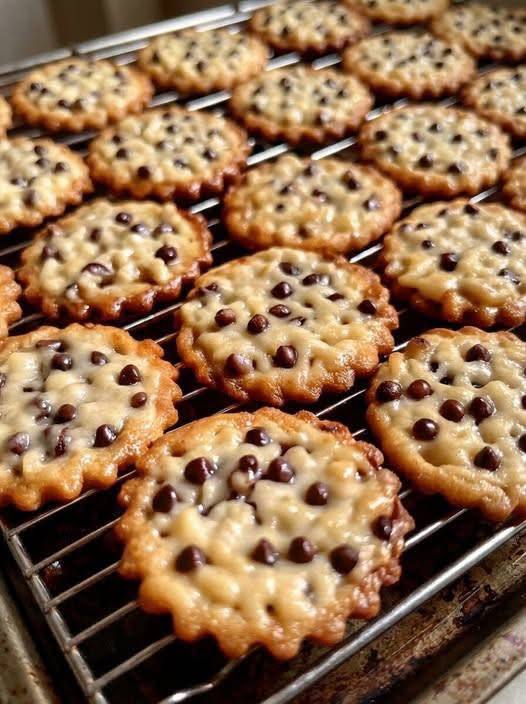
Prepare yourself, because you’re about to discover the ultimate chocolate chip cookie. This isn’t just *a* recipe; it’s *the* recipe. We’re talking about a cookie that boasts an irresistible duality: edges that snap with a delightful crispness, giving way to a luxuriously soft, chewy, and gloriously gooey center. Each bite is a symphony of textures and flavors, from the caramelized notes of the golden-brown edges to the molten pockets of chocolate nestled within its tender heart. This isn’t just a promise; it’s a delicious guarantee.
Forget everything you thought you knew about baking chocolate chip cookies. This recipe is engineered for perfection, designed to deliver that coveted crispy-edge, gooey-center magic every single time. It’s a cookie that will make you a legend among your friends and family, a cookie that will disappear from the plate faster than you can say “more please!” Get ready to bake your new favorite treat, because the ultimate chocolate chip cookie experience is just a few steps away.
Nutritional Information
Per serving (approximate values):
- Calories: 180
- Protein: 2g
- Carbohydrates: 25g
- Fat: 9g
- Fiber: 1g
- Sodium: 110mg
Ingredients
- 1 cup (226g) unsalted butter, softened to room temperature
- ¾ cup (150g) granulated sugar
- 1 cup (200g) light brown sugar, packed
- 2 large eggs, room temperature
- 2 teaspoons pure vanilla extract
- 2 ¼ cups (270g) all-purpose flour
- 1 teaspoon baking soda
- ½ teaspoon salt
- 1 ½ cups (270g) mini semi-sweet chocolate chips
Instructions
- Brown the Butter (Optional but Recommended): In a light-bottomed saucepan, melt the 1 cup of unsalted butter over medium heat. Continue to cook, stirring occasionally, until the butter begins to foam, then develops small brown bits at the bottom and smells nutty. This usually takes 5-8 minutes. Immediately pour the browned butter into a heatproof bowl and let it cool slightly (about 10-15 minutes) until it’s still liquid but no longer hot. This step adds incredible depth of flavor. If skipping this step, ensure butter is simply softened to room temperature.
- Cream Sugars and Butter: In a large mixing bowl, using an electric mixer (stand mixer with paddle attachment or hand mixer), cream together the cooled browned butter (or softened butter), granulated sugar, and packed light brown sugar on medium speed until light, fluffy, and well combined, about 2-3 minutes. This aeration is crucial for cookie texture.
- Add Eggs and Vanilla: Scrape down the sides of the bowl. Add the two large eggs, one at a time, mixing well after each addition until fully incorporated. Stir in the pure vanilla extract. The mixture should look smooth and creamy.
- Combine Dry Ingredients: In a separate medium bowl, whisk together the all-purpose flour, baking soda, and salt. Make sure there are no lumps of baking soda.
- Gradually Add Dry to Wet: With the mixer on low speed, gradually add the dry ingredients to the wet ingredients, mixing only until just combined. Be careful not to overmix the dough once the flour is added, as this can lead to tough cookies. Stop mixing as soon as no streaks of flour remain.
- Fold in Chocolate Chips: Remove the bowl from the mixer. Using a sturdy spatula or wooden spoon, gently fold in the mini semi-sweet chocolate chips until they are evenly distributed throughout the dough.
- Chill the Dough (Crucial Step): Cover the bowl tightly with plastic wrap and refrigerate the cookie dough for at least 30 minutes, or preferably 1-2 hours. Chilling the dough helps prevent the cookies from spreading too much, intensifies flavor, and contributes significantly to the desired crispy-edge, gooey-center texture. You can chill the dough for up to 24-48 hours for even better results.
- Preheat Oven and Prep Baking Sheets: When ready to bake, preheat your oven to 375°F (190°C). Line two large baking sheets with parchment paper. Parchment paper is essential for easy removal and even baking.
- Scoop the Cookies: Using a 1.5-2 tablespoon cookie scoop (or just roll by hand), scoop rounded balls of dough onto the prepared baking sheets, leaving about 2 inches of space between each cookie. Do not flatten the dough balls.
- Bake to Perfection: Bake one sheet at a time in the preheated oven for 9-12 minutes. The exact baking time will depend on your oven. Look for edges that are golden brown and set, while the centers still look slightly soft and puffy. If you want them extra gooey, err on the side of underbaking slightly. Rotate the baking sheet halfway through baking (around 5-6 minutes) for even browning.
- Cool on Baking Sheet: Once baked, remove the baking sheet from the oven. Let the cookies cool on the baking sheet for 5-10 minutes. This is critical! The residual heat on the baking sheet continues to cook the cookies slightly, allowing them to set up without becoming hard, and helps achieve that perfect gooey center.
- Transfer to Wire Rack: After resting on the baking sheet, carefully transfer the cookies to a wire cooling rack to cool completely. Enjoy warm or at room temperature!
Cooking Tips and Variations
To truly master these ultimate chocolate chip cookies, attention to detail and a willingness to experiment with variations will elevate your baking game. Here are some essential tips and delicious ideas to try:
The Science of Crispy Edges & Gooey Centers:
- Browned Butter is Your Best Friend: Don’t skip the browned butter step if you have the time! It adds a deep, nutty, caramel-like flavor that takes these cookies from great to extraordinary. The slight reduction in water content also contributes to crispier edges.
- Chill, Chill, Chill: This is arguably the most important step for achieving that perfect texture. Chilling solidifies the butter, preventing the cookies from spreading too much too quickly in the oven. This allows the edges to set and brown while the center remains soft and underbaked for that gooey texture. It also allows the flavors to meld and deepen.
- Room Temperature Ingredients: Ensure your butter (if not browning) and eggs are at room temperature. Room temperature butter creams beautifully with sugar, incorporating more air for a lighter texture. Room temperature eggs emulsify better with the fat, creating a smoother, more uniform dough.
- Don’t Overmix the Flour: Once you add the dry ingredients, mix only until just combined. Overmixing develops the gluten in the flour, leading to tough, chewy cookies rather than tender, gooey ones.
- High Initial Oven Temperature: Baking at 375°F (190°C) helps the edges set and brown quickly, while the interior remains soft. If your oven has hot spots, rotate the baking sheet halfway through baking.
- Underbake Slightly: For the ultimate gooey center, take the cookies out when the edges are golden brown and set, but the centers still look a little soft, puffy, and even slightly underdone. They will continue to cook on the hot baking sheet.
- Cool on the Baking Sheet: Resist the urge to immediately transfer them to a wire rack. Cooling on the hot baking sheet for 5-10 minutes allows the cookies to finish baking gently and firm up without becoming brittle, preserving that soft, gooey middle.
Variations to Explore:
- Chocolate Varieties: While mini semi-sweet chips are perfect for even distribution and melt, feel free to experiment. Try dark chocolate chunks for intense flavor, milk chocolate chips for a sweeter profile, or a mix of different chocolates. A sprinkle of flaky sea salt on top of each cookie immediately after baking enhances the chocolate flavor beautifully.
- Add-ins Galore:
- Nuts: Toasted pecans, walnuts, or almonds add a delightful crunch and nutty flavor. Fold in about ½ cup with the chocolate chips.
- Spices: A pinch of cinnamon, nutmeg, or even a touch of cayenne pepper (for a subtle kick!) can add warmth and complexity.
- Toffee Bits: For an extra layer of caramel chewiness, fold in ½ cup of toffee bits.
- Oatmeal: For a slightly chewier, heartier cookie, replace ¼ cup of the all-purpose flour with old-fashioned rolled oats.
- Espresso Powder: A teaspoon of instant espresso powder or fine coffee grounds will deepen the chocolate flavor without making the cookies taste like coffee.
- Cookie Bar Form: Press the entire batch of dough into a greased 9×13 inch baking pan. Bake at 350°F (175°C) for 25-35 minutes, or until the edges are golden and the center is set but still soft. Cool completely before cutting into squares.
- Giant Cookies: For bakery-style giant cookies, scoop 3-4 tablespoon portions of dough. You’ll need to increase baking time to 12-15 minutes, watching carefully for golden edges and soft centers.
Storage and Reheating
Properly storing your ultimate chocolate chip cookies ensures they retain their delightful texture and flavor for as long as possible. Reheating them correctly can bring back that fresh-baked warmth and gooeyness.
How to Store Baked Cookies
To keep your cookies at their best, allow them to cool completely on a wire rack before storing. Storing warm cookies will create condensation, making them soggy.
- Room Temperature: Place cooled cookies in an airtight container. They will stay fresh and delicious at room temperature for up to 3-5 days. To help maintain softness, you can place half a slice of bread (like sandwich bread) into the container with the cookies. The cookies will absorb moisture from the bread, keeping them softer.
- Freezing Baked Cookies: For longer storage, baked cookies freeze beautifully. Once completely cooled, place them in a single layer on a baking sheet and freeze for about 30 minutes until solid. Then, transfer the frozen cookies to a freezer-safe airtight container or heavy-duty freezer bag. They will keep well for up to 3 months. Thaw at room temperature or reheat as described below.
How to Store Unbaked Cookie Dough
Preparing the dough ahead of time is a fantastic way to have fresh cookies ready at a moment’s notice.
- Refrigerator: The cookie dough can be stored in an airtight container in the refrigerator for up to 3-4 days. In fact, chilling the dough for at least 24 hours often leads to even more developed flavors.
- Freezing Cookie Dough Balls: Scoop the cookie dough into individual balls (as if you were going to bake them). Place the dough balls on a parchment-lined baking sheet and freeze until solid, about 1-2 hours. Once frozen, transfer the dough balls to a freezer-safe airtight container or heavy-duty freezer bag. They can be stored in the freezer for up to 3 months.
- Baking from Frozen Dough: When ready to bake, you can bake the frozen dough balls directly from the freezer. Add an extra 2-4 minutes to the baking time specified in the recipe. This is a brilliant way to have warm, fresh cookies anytime!
How to Reheat Cookies
For that fresh-from-the-oven experience, reheating is key, especially for bringing back that gooey center.
- Oven/Toaster Oven: This is the best method for reviving the crispy edges and gooey center. Preheat your oven or toaster oven to 300°F (150°C). Place cookies directly on a baking sheet (no need for parchment if just reheating a few). Heat for 5-7 minutes, or until warmed through and the chocolate is melted.
- Microwave: This method is quick but can make the cookies softer all over, and the edges won’t be crispy. Place 1-2 cookies on a microwave-safe plate. Heat on high for 10-20 seconds, depending on your microwave’s power. Be careful not to overheat, as they can become tough. This is best for achieving a very soft, melted chocolate center.
Frequently Asked Questions
Why are my cookies spreading too much and becoming flat?
There are several common culprits for flat cookies. The most frequent reason is insufficient chilling of the dough – cold dough prevents the butter from melting too quickly in the oven. Other factors include using butter that is too soft or melted (unless browned butter is called for and cooled), too little flour, an oven that isn’t hot enough, or over-greasing your baking sheets (parchment paper is best!). Ensure your oven temperature is accurate with an oven thermometer.
Can I use different types of chocolate?
Absolutely! While mini semi-sweet chocolate chips are specified for their melt and distribution, feel free to use your favorite. Dark chocolate chunks will give a more intense, less sweet flavor, while milk chocolate chips will result in a sweeter, creamier chocolate experience. A mix of different types of chocolate, including white chocolate chips, can also be delightful. For a professional touch, chop up a good quality chocolate bar instead of using pre-made chips.
What if I don’t have time to chill the dough?
While chilling the dough is highly recommended for the best texture (crispy edges, gooey centers, and reduced spreading), you can bake the cookies without chilling if you’re in a pinch. However, be prepared for them to spread a bit more and potentially have a slightly less complex flavor. If you must skip the chill, make sure your butter isn’t overly soft, and consider making your cookie dough balls slightly taller rather than perfectly round to give them more structure.
My cookies are hard and dry, not gooey. What went wrong?
The most common reason for hard and dry cookies is overbaking. Keep a close eye on them in the oven; they should look slightly underdone in the center when you pull them out, as they continue to cook on the hot baking sheet. Your oven temperature might also be too high, causing them to bake too quickly and dry out. Another factor could be too much flour or overmixing the dough, which develops gluten and makes the cookies tough. Ensure accurate measurements, especially for flour, and mix only until just combined.