Introduction
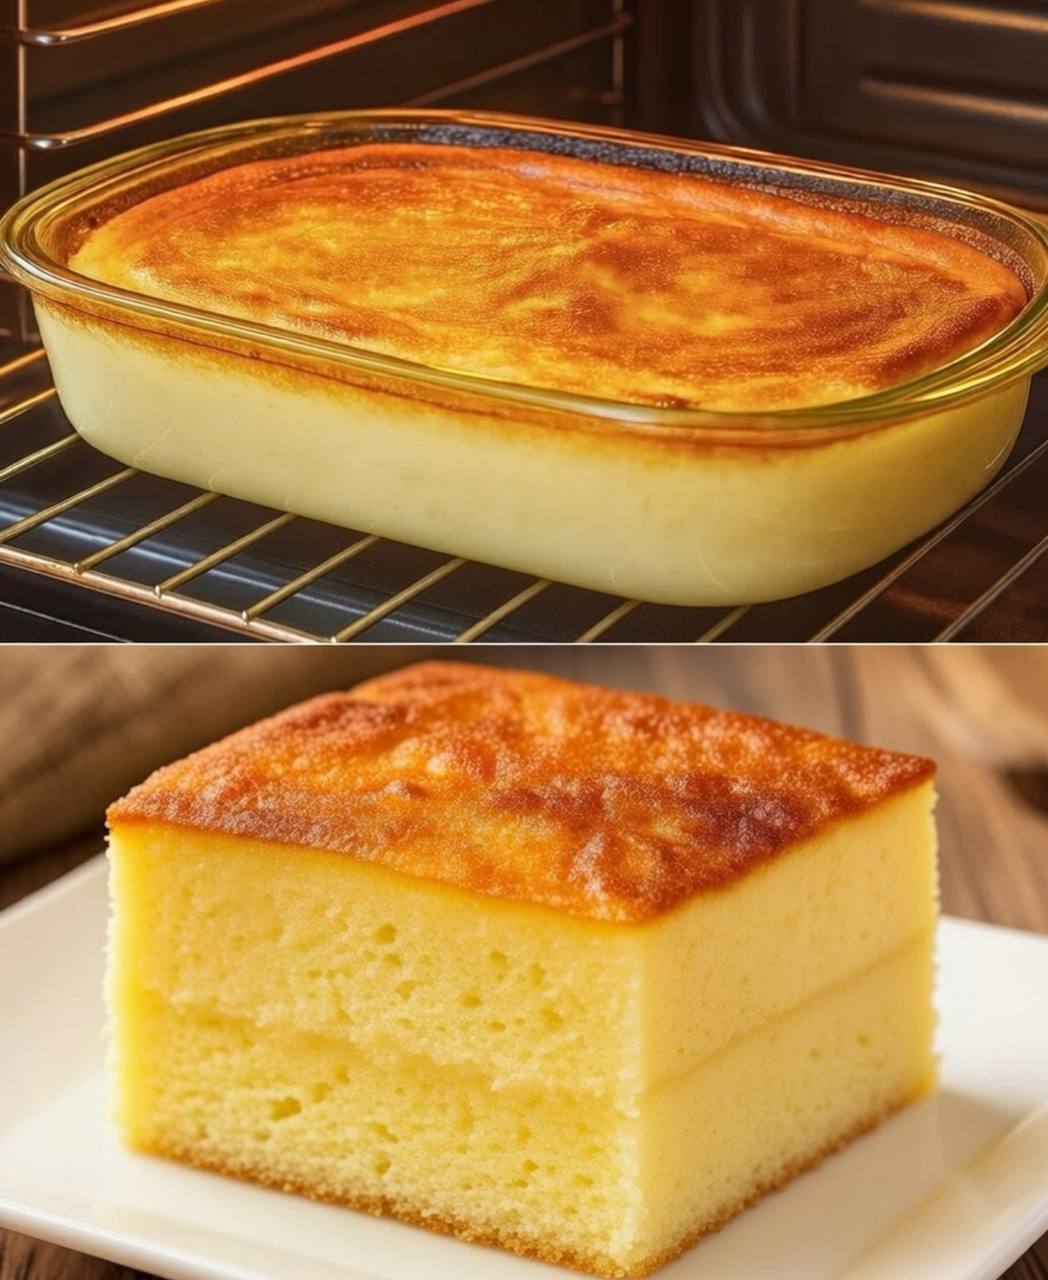
Prepare to be enchanted by the “Creamy Cake,” a dessert that defies expectations and delights the senses. Imagine a single, simple batter poured into a pan, only to emerge from the oven as a beautifully layered masterpiece. This isn’t just a cake; it’s a culinary magic trick, transforming humble ingredients into a three-tiered wonder: a dense, rich custard base, a creamy, melting middle, and a delicate, airy sponge top, all baked simultaneously.
Often referred to as Magic Cake or Impossible Cake (though the latter usually implies a flan and cake combination with caramel), our Creamy Cake is a true showstopper. Its unique texture profile, ranging from firm and custardy to light and fluffy, offers an unparalleled eating experience. It’s an impressive dessert for any occasion, yet surprisingly simple to prepare, making you look like a seasoned pastry chef with minimal effort. Get ready to discover the joy of this self-separating marvel that promises both intrigue and indulgence in every bite.
Nutritional Information
Per serving (approximate values):
- Calories: 350
- Protein: 12g
- Carbohydrates: 35g
- Fat: 18g
- Fiber: 1g
- Sodium: 150mg
Ingredients
- 4 large eggs, separated, at room temperature
- 1 cup (200g) granulated sugar
- 1 teaspoon vanilla extract
- 1/2 cup (113g) unsalted butter, melted and cooled
- 1 cup (120g) all-purpose flour, sifted
- 2 cups (480ml) whole milk, warmed (not hot)
- Pinch of salt
- Powdered sugar for dusting (optional)
Instructions
- Preheat your oven to 325°F (160°C). Grease and lightly flour a 9×9 inch (23×23 cm) square baking dish or a 9-inch round springform pan. If using a springform pan, wrap the bottom thoroughly with aluminum foil to prevent water bath leakage.
- Separate the eggs, placing the yolks in a large mixing bowl and the whites in a separate, clean, medium-sized mixing bowl. Ensure no yolk gets into the whites, as this will prevent them from whipping properly.
- To the egg yolks, add the granulated sugar and vanilla extract. Whisk vigorously for 2-3 minutes until the mixture is pale yellow and creamy.
- Gradually whisk in the melted and cooled butter into the egg yolk mixture until fully combined.
- Add the sifted all-purpose flour to the yolk mixture, whisking until just incorporated and no lumps remain. The mixture will be quite thick at this stage.
- Slowly, in a thin stream, whisk in the warmed whole milk (ensure it’s warm, not hot, as hot milk could curdle the eggs). Continue whisking until the batter is smooth and a uniform consistency. Set aside.
- In the separate bowl with the egg whites, add a pinch of salt. Using an electric mixer (handheld or stand mixer), beat the egg whites on medium-high speed until stiff peaks form. The whites should be glossy and hold their shape when the whisk is lifted.
- Now comes the crucial step: gently fold the stiffly beaten egg whites into the main batter. Do this in three additions. Add about one-third of the egg whites to the batter and fold gently with a rubber spatula to lighten the mixture. Then, add the remaining egg whites in two more additions, folding very gently until just combined. It’s okay if a few small streaks of egg white remain; overmixing will deflate the whites and prevent proper layering. The batter will look very thin and somewhat lumpy, with bits of egg white floating on top. This is exactly what you want!
- Carefully pour the entire batter into your prepared baking dish. The egg whites will float to the top.
- Prepare a water bath: Place the baking dish into a larger roasting pan. Carefully pour hot water into the roasting pan, reaching about halfway up the sides of the baking dish. This water bath (bain-marie) is essential for even cooking and creating the creamy custard layer.
- Carefully transfer the roasting pan with the baking dish to the preheated oven.
- Bake for 50-70 minutes, or until the top is golden brown and the custard is mostly set but still has a slight jiggle in the center when gently shaken. The baking time can vary depending on your oven and the depth of your pan.
- Once baked, carefully remove the roasting pan from the oven. Then, carefully lift the baking dish out of the water bath.
- Let the Creamy Cake cool completely at room temperature on a wire rack. This is a critical step for the layers to fully set.
- Once cooled, cover the dish with plastic wrap and refrigerate for at least 4 hours, or preferably overnight. Chilling is absolutely essential for the layers to firm up and for the cake to be easily sliced and served.
- Before serving, dust generously with powdered sugar, if desired. Slice into squares or wedges and enjoy the magical layers!
Cooking Tips and Variations
To achieve the perfect Creamy Cake every time, paying attention to a few key details makes all the difference. Firstly, ingredient temperature is paramount. Ensure your eggs are at room temperature, as this allows them to emulsify better with the sugar and butter, creating a smoother base. Similarly, use warm (not hot) milk; it helps prevent lumps in the flour mixture and ensures a consistent batter. The gentle folding of the egg whites is perhaps the most critical step. Overmixing will deflate the air you’ve painstakingly whipped in, preventing the formation of that beautiful sponge layer on top. Fold just until no large streaks of white remain, embracing the slightly lumpy appearance of the batter before baking.
The water bath, or bain-marie, is non-negotiable for this recipe. It provides gentle, even heat, allowing the custard layer to set slowly and creamily without curdling or cracking. It also prevents the cake from drying out. Don’t be tempted to open the oven door too frequently during baking, especially in the first 40 minutes, as this can cause the cake to sink. Look for a golden top and a slight jiggle in the center; it will continue to set as it cools. Patience with the chilling time is also vital. This isn’t a dessert that can be rushed. The layers need ample time in the refrigerator to firm up and for their distinct textures to fully develop, making it easy to slice and enjoy.
For variations, the possibilities are endless. For a delightful citrus twist, add 1 tablespoon of lemon or orange zest to the egg yolk mixture. Chocolate lovers can incorporate 1/4 cup of unsweetened cocoa powder along with the flour, or melt 2 ounces of dark chocolate with the butter for a richer flavor. Coffee enthusiasts might add 1-2 teaspoons of instant espresso powder dissolved in a tablespoon of the warm milk. A hint of almond extract or a splash of rum or brandy can also elevate the flavor profile. For an elegant touch, a thin layer of caramel sauce poured into the bottom of the pan before the batter can transform it into a true “Impossible Cake” experience, where the caramel rises to the top during baking. You can also experiment with spices like a pinch of nutmeg or cinnamon in the batter. Feel free to top with fresh berries, a dollop of whipped cream, or a fruit compote for added freshness and contrast.
Storage and Reheating
Storing your Creamy Cake properly is essential to maintain its delicate texture and flavor. Once completely cooled and thoroughly chilled, the cake should be covered tightly with plastic wrap or stored in an airtight container. This prevents it from absorbing odors from the refrigerator and keeps it from drying out. The Creamy Cake stores beautifully in the refrigerator for up to 3-4 days. In fact, many find that the flavors meld and deepen even further after a day or two, making it an excellent make-ahead dessert for parties or special occasions.
Due to its custard-like base and delicate sponge, Creamy Cake is best served cold, straight from the refrigerator. Reheating is generally not recommended for this type of dessert. Warming it up, even gently, can alter the distinct layered texture, causing the custard to lose its firm set and potentially become watery, and the sponge to become rubbery. The beauty of this cake lies in its cool, refreshing, and multi-textured experience. If you prefer a slightly less cold dessert, you can take it out of the refrigerator about 15-20 minutes before serving, but avoid letting it come to full room temperature for an extended period, especially in warm environments. Freezing is also not advised, as the high moisture content of the custard layer can lead to an undesirable grainy texture upon thawing. Stick to refrigeration for optimal enjoyment of your magical creation.
Frequently Asked Questions
What makes the layers separate?
The magic of the Creamy Cake lies in its unique batter composition and baking process. The batter contains ingredients of different densities: heavy milk and egg yolks for the custard, flour for structure, and airy whipped egg whites. As the cake bakes slowly in a water bath, the denser ingredients (milk, egg yolks, butter) sink to the bottom, forming the custard. The flour creates a creamy middle layer, and the light, aerated egg whites naturally rise to the top, baking into a delicate sponge. The slow, even heat of the water bath allows this separation to happen gradually and distinctly.
Can I make this cake ahead of time?
Absolutely, and it’s highly recommended! Creamy Cake is one of those rare desserts that actually improves with time. It requires significant chilling (at least 4 hours, but preferably overnight) for the layers to fully set and for the flavors to meld. Making it a day in advance allows the textures to firm up beautifully, making it easier to slice and enhancing the overall eating experience. Store it covered in the refrigerator until ready to serve.
Why is a water bath necessary?
A water bath (bain-marie) is crucial for the Creamy Cake because it provides a gentle, moist, and even cooking environment. This prevents the delicate custard layer from cooking too quickly, curdling, or cracking. It ensures a smooth, creamy texture for the bottom layer and helps the entire cake bake uniformly without drying out. Without a water bath, you’d likely end up with a denser, less creamy, and potentially cracked custard base.
My egg whites deflated when I folded them in. What went wrong?
Deflated egg whites are a common issue and usually indicate overmixing or folding too vigorously. When folding, use a rubber spatula and a gentle, cutting motion from the bottom of the bowl upwards, then folding it over. Do not stir or whisk. It’s also important that your egg whites are completely free of any yolk or grease, and that your bowl and whisk are impeccably clean and dry, as fat can prevent egg whites from whipping to stiff peaks. Finally, incorporating them in stages (e.g., one-third at a time) can help maintain their volume.