Introduction
Imagine a world where warm, gooey chocolate chip cookies are always just minutes away, without the fuss of last-minute mixing or a mountain of dishes. Welcome to the delightful reality of Chocolate Chip Slice and Bake Cookies! This recipe isn’t just about baking; it’s about unlocking pure, unadulterated cookie joy on demand. These aren’t your average store-bought logs; these are homemade, bursting with rich flavor, and incredibly easy to prepare, making them perfect for those impromptu cravings or when unexpected guests drop by.
What makes these slice and bake cookies truly special is their ingenious blend of convenience and classic, comforting taste. We’re taking the beloved chocolate chip cookie and giving it a brilliant make-ahead twist. The process is wonderfully simple: whip up a batch of dough, shape it into logs, chill it, and then at a moment’s notice, simply slice and bake. The chilling time isn’t just for ease of slicing; it also allows the flavors to meld and deepen, resulting in a cookie that tastes even better than freshly mixed dough. It’s the ultimate solution for busy schedules, offering the warmth and indulgence of homemade cookies with minimal effort when you need them most.
This recipe focuses on delivering that perfect balance of a slightly crisp edge and a soft, chewy center, generously dotted with mini chocolate chips that ensure every bite is packed with melty goodness. It’s a foolproof method that transforms pantry staples into a batch of irresistible treats, ready to be enjoyed with a cold glass of milk, a scoop of ice cream, or simply savored on their own. Get ready to revolutionize your cookie game and discover the sheer bliss of having delicious, homemade chocolate chip cookies whenever the mood strikes.
Nutritional Information
Per serving (approximate values for one cookie):
- Calories: 180
- Protein: 2g
- Carbohydrates: 25g
- Fat: 9g
- Fiber: 1g
- Sodium: 120mg
Ingredients
- 1 cup (2 sticks) unsalted butter, softened
- 3/4 cup granulated sugar
- 3/4 cup packed light brown sugar
- 2 large eggs
- 2 teaspoons pure vanilla extract
- 2 1/4 cups all-purpose flour
- 1 teaspoon baking soda
- 1/2 teaspoon salt
- 1 1/2 cups mini semi-sweet chocolate chips (or regular semi-sweet chocolate chips)
Instructions
- In a large mixing bowl, using an electric mixer on medium speed, cream together the softened unsalted butter, granulated sugar, and packed light brown sugar until the mixture is light, fluffy, and pale in color, about 2-3 minutes. Scrape down the sides of the bowl as needed to ensure everything is well combined.
- Add the two large eggs one at a time, beating well after each addition. Once the eggs are fully incorporated, stir in the pure vanilla extract until just combined. Be careful not to overmix at this stage.
- In a separate medium bowl, whisk together the all-purpose flour, baking soda, and salt. This ensures the leavening agents and salt are evenly distributed throughout the dry ingredients.
- Gradually add the dry ingredients to the wet ingredients, mixing on low speed until just combined. Mix only until no streaks of flour remain; overmixing can lead to tough cookies.
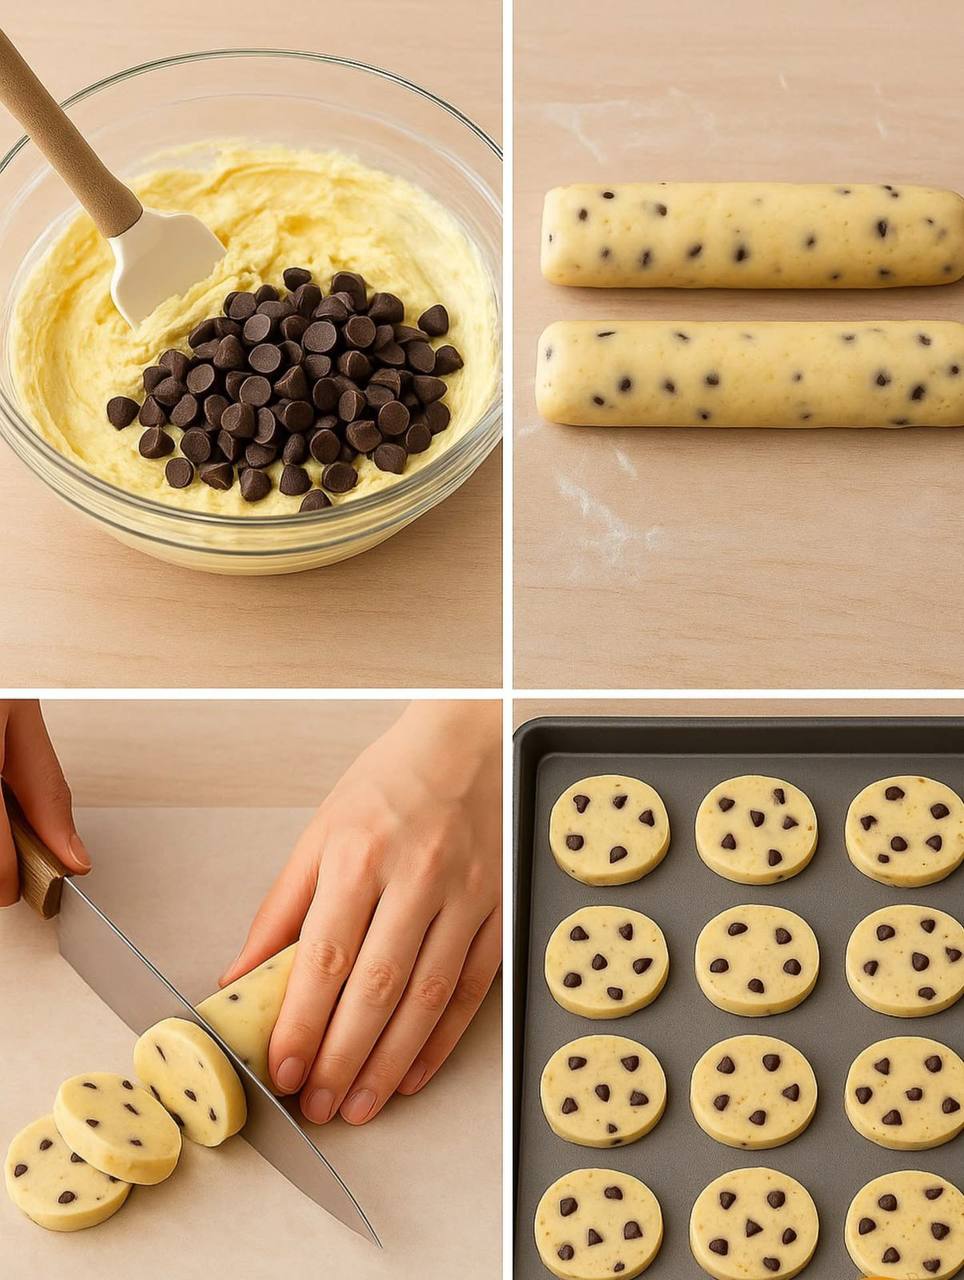
- Gently fold in the mini semi-sweet chocolate chips using a spatula or wooden spoon until they are evenly distributed throughout the dough.
- Divide the cookie dough in half. On a piece of parchment paper or plastic wrap, shape each half into a log, approximately 1 1/2 to 2 inches in diameter and about 8-10 inches long. Try to make the logs as even in thickness as possible for uniform cookies.
- Wrap each dough log tightly in parchment paper, plastic wrap, or aluminum foil, twisting the ends to seal. Refrigerate the dough logs for at least 2 hours, or preferably overnight. Chilling is crucial for firming up the dough, developing flavor, and preventing excessive spreading during baking.
- When ready to bake, preheat your oven to 375°F (190°C). Line a baking sheet with parchment paper or a silicone baking mat.
- Remove one chilled dough log from the refrigerator. Using a sharp knife, slice the dough into 1/2-inch thick rounds. For best results, avoid sawing motions and use a firm, even press to cut through the dough.
- Place the sliced cookie dough rounds on the prepared baking sheet, leaving about 2 inches of space between each cookie to allow for spreading.
- Bake for 9-12 minutes, or until the edges are golden brown and the centers are still slightly soft and puffy. The exact baking time may vary depending on your oven and the thickness of your cookies.
- Remove the baking sheet from the oven and let the cookies cool on the sheet for 5 minutes before transferring them to a wire rack to cool completely. This allows them to set up and prevents them from breaking.
- Repeat with the remaining dough log, or save it in the refrigerator or freezer for future baking sessions.
Cooking Tips and Variations
For the best results, always start with room temperature butter. Softened butter creams better with sugar, creating air pockets that lead to a lighter, more tender cookie texture. If your butter isn’t soft enough, you can cut it into smaller pieces and let it sit at room temperature for 15-30 minutes, or microwave it for a few seconds (be careful not to melt it). Do not overmix the dough once the flour is added; this develops the gluten, which can make the cookies tough. Mix only until the ingredients are just combined. Chilling the dough is non-negotiable for slice and bake cookies. It firms up the butter, preventing the cookies from spreading too much, and allows the flavors to deepen, resulting in a richer, more complex taste. Aim for at least 2 hours, but overnight is ideal. When slicing, use a sharp, thin knife and make a clean, decisive cut to maintain the round shape of the cookies. For perfectly round cookies, you can use a small, round cookie cutter (slightly larger than your sliced dough) to gently reshape any irregular edges right after slicing. Don’t overbake! Cookies will continue to cook slightly on the hot baking sheet after they’re removed from the oven. They are done when the edges are set and golden, and the centers still look a little soft. This ensures a chewy interior.
To vary these delicious cookies, consider swapping out some of the mini semi-sweet chocolate chips for other mix-ins. Try milk chocolate, dark chocolate, or even white chocolate chips for a different flavor profile. A combination of different chocolate types can also be wonderful. For an added textural element, incorporate 1/2 cup of finely chopped nuts like walnuts, pecans, or almonds along with the chocolate chips. For a festive touch, especially around holidays, colorful sprinkles can be folded into the dough. You can also add a pinch of cinnamon or a dash of almond extract (in addition to or in place of a portion of the vanilla) for a subtle flavor twist. For a more gourmet feel, try adding a tablespoon of instant espresso powder to the dry ingredients; it won’t make the cookies taste like coffee but will enhance the chocolate flavor beautifully. Always remember to taste a small piece of the raw dough to check for sweetness and adjust if necessary before chilling.
Storage and Reheating
Baked Chocolate Chip Slice and Bake Cookies can be stored in an airtight container at room temperature for up to 3-4 days. For optimal freshness and chewiness, you can place a slice of bread in the container with the cookies; the bread will absorb moisture and keep the cookies soft. Avoid refrigerating baked cookies as this can dry them out. If you want to extend their shelf life, baked cookies can be frozen in an airtight container or freezer bag for up to 3 months. To reheat frozen baked cookies, simply place them on a baking sheet and warm them in a preheated 300°F (150°C) oven for 5-10 minutes, or until heated through and soft.
The unbaked dough logs are incredibly versatile for storage. They can be kept tightly wrapped in plastic wrap and then in an airtight container or freezer bag in the refrigerator for up to 1 week. This allows you to slice and bake fresh cookies whenever a craving strikes. For longer storage, the dough logs can be frozen for up to 3 months. Wrap them very tightly in several layers of plastic wrap, then an additional layer of aluminum foil, and place them in a freezer-safe bag. When you’re ready to bake from frozen, you can slice the dough logs directly from the freezer, though they might be a bit harder to cut. Increase the baking time by 2-4 minutes, or until the cookies are golden brown and set. Alternatively, you can let the frozen dough logs thaw in the refrigerator overnight before slicing and baking as usual.
Frequently Asked Questions
Why did my cookies spread too much?
Several factors can cause cookies to spread excessively. The most common reason is insufficient chilling time for the dough. The butter needs to firm up in the refrigerator to prevent it from melting too quickly in the oven. Other culprits include using butter that is too soft or melted, overmixing the dough (which develops gluten and makes it less stable), or having an oven temperature that is too low. Ensure your oven is preheated accurately and that your butter is only softened, not melted.
Can I use regular chocolate chips instead of mini ones?
Absolutely! While mini chocolate chips are specified to ensure even distribution in the smaller slices of slice and bake cookies, regular-sized chocolate chips will work perfectly fine. You might find that some slices have more chocolate than others, but the overall flavor and texture will still be delicious. You could even chop up a chocolate bar for a more gourmet feel.
How do I make sure my cookies are perfectly round?
The key to perfectly round slice and bake cookies starts with forming an even dough log. Take your time to shape the dough into a uniform cylinder. After chilling and slicing, if some cookies have slightly irregular edges, you can use a small, round cookie cutter (slightly larger than your cookie) or even a knife to gently press and shape the edges back into a circle on the baking sheet before baking. This neat trick helps achieve that bakery-perfect appearance.