Introduction
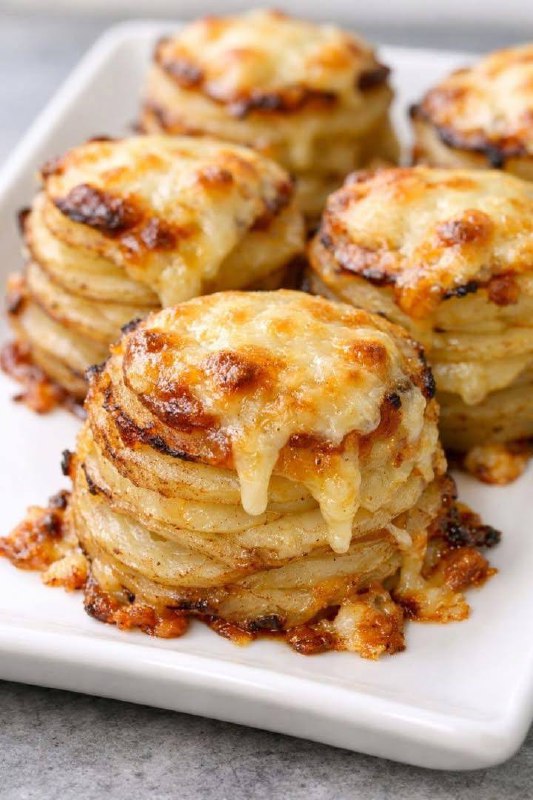
Easter is a time for gathering, celebrating, and, of course, indulging in incredible food. While the main course often steals the show, a truly memorable meal is built upon spectacular side dishes. This year, prepare to elevate your holiday feast with a dish that is as stunning to behold as it is delicious to devour: Cheesy Potato Stacks. Forget your traditional mashed potatoes or even your trusty scalloped gratin; these individual potato stacks offer a “wow” factor that will have your guests raving. They’re visually appealing, perfectly portioned, and boast layers of tender potato and gooey, melted cheese, all baked to golden perfection.
What makes these Cheesy Potato Stacks so special for Easter? They strike that perfect balance of rustic comfort and elegant presentation. Each stack is a miniature masterpiece, showcasing thinly sliced potatoes carefully layered and baked until incredibly tender on the inside with a beautifully crisp, cheesy exterior. Despite their impressive appearance, they are surprisingly straightforward to prepare, making them an ideal choice for a holiday meal when you want to impress without being chained to the kitchen. They offer a delightful textural contrast and a rich, savory flavor that complements everything from a succulent glazed ham to a tender roasted lamb or even a simple roast chicken. Get ready to add a new favorite to your Easter tradition!
These individual gratin-style potato stacks are truly a game-changer. They provide all the comforting, cheesy goodness of a classic potato gratin but in a convenient, elegant, and perfectly portioned format. No more messy serving of a large casserole; each guest gets their own beautiful stack. The simple act of layering thin potato slices with cheese and a creamy base transforms humble ingredients into something extraordinary. They’re hearty, satisfying, and utterly irresistible, making them the ultimate crowd-pleaser for any special occasion, but especially fitting for the festive spread of an Easter celebration.
Nutritional Information
Per serving (approximate values):
- Calories: 320
- Protein: 12g
- Carbohydrates: 30g
- Fat: 18g
- Fiber: 3g
- Sodium: 450mg
Ingredients
- 2 lbs Yukon Gold potatoes, peeled
- 1 cup heavy cream
- 1/2 cup whole milk
- 1 clove garlic, minced
- 1/2 teaspoon salt, plus more to taste
- 1/4 teaspoon black pepper, plus more to taste
- 1/4 teaspoon nutmeg (freshly grated preferred)
- 1 1/2 cups shredded Gruyere cheese (or a blend of Gruyere and sharp cheddar)
- 1/4 cup finely grated Parmesan cheese
- 2 tablespoons unsalted butter, melted
- Cooking spray or additional butter for greasing muffin tins
- Optional garnishes: Fresh chives, chopped parsley
Instructions
- Preheat your oven to 375°F (190°C). Lightly grease a 12-cup standard muffin tin with cooking spray or butter.
- Peel the potatoes. Using a mandoline slicer or a very sharp knife, slice the potatoes into very thin, uniform rounds, about 1/16-inch thick. The thinner and more even the slices, the better your stacks will hold together and cook consistently.
- In a medium bowl, whisk together the heavy cream, whole milk, minced garlic, 1/2 teaspoon salt, 1/4 teaspoon black pepper, and nutmeg.
- In a separate bowl, toss the shredded Gruyere (or cheese blend) with the grated Parmesan cheese.
- Begin assembling the potato stacks. Dip each potato slice into the cream mixture, ensuring it’s lightly coated.
- Place a small amount of the shredded cheese mixture at the bottom of each greased muffin cup. This will help create a cheesy crust.
- Start layering the potato slices vertically in each muffin cup, overlapping them slightly to form a stack. As you layer, sprinkle a small amount of the cheese mixture between every few layers. Continue layering potatoes and cheese until each muffin cup is full and slightly mounded, as the potatoes will shrink down during baking. Aim for about 10-15 potato slices per stack, depending on the size of your slices and muffin cups.
- Once all the muffin cups are filled, brush the tops of the potato stacks with the melted butter. Sprinkle any remaining cheese mixture over the tops of the stacks.
- Cover the muffin tin loosely with aluminum foil.
- Bake for 30 minutes.
- Remove the foil and continue baking for another 25-35 minutes, or until the potatoes are very tender when pierced with a knife, and the tops are golden brown and bubbly. If the tops are browning too quickly, you can loosely tent them with foil again.
- Once baked, remove the muffin tin from the oven and let the potato stacks rest for 5-10 minutes. This resting time is crucial as it allows the cheese to set and the stacks to firm up, making them easier to remove from the tin without falling apart.
- Carefully run a thin knife around the edge of each potato stack to loosen it, then gently lift them out using a small offset spatula or a spoon.
- Serve immediately, garnished with fresh chives or parsley if desired.
Cooking Tips and Variations
For the best Cheesy Potato Stacks, precision and good ingredients are key. Here are some tips to ensure your stacks are perfect every time, along with delicious variations to keep things exciting.
Tips for Best Results
- Mandoline is Your Best Friend: While a sharp knife can work, a mandoline slicer is highly recommended for achieving consistently thin and even potato slices. This is crucial for even cooking and for the stacks to hold their shape beautifully. Aim for about 1/16th of an inch.
- Choose the Right Potatoes: Yukon Gold potatoes are ideal for this recipe. Their waxy texture holds up well to slicing and baking, and they have a natural buttery flavor that complements the cheese and cream. Russet potatoes can also work, but they tend to be starchier and might result in a slightly drier stack.
- Season Every Layer: Don’t just season the cream mixture. Lightly sprinkle a pinch of salt and pepper on some of the potato layers as you build the stacks. This ensures flavor penetrates throughout the entire stack, rather than just on the surface.
- Don’t Be Shy with the Cheese: Use good quality melting cheeses like Gruyere, sharp cheddar, or a blend. The cheese not only adds flavor but also acts as a binder, helping the stacks hold their shape.
- Don’t Overfill: While you want mounded stacks, be careful not to overfill the muffin cups to the point where they overflow during baking. The potatoes will shrink, but excessive filling can lead to a messy bake.
- The Resting Period is Crucial: After baking, resist the urge to immediately remove the stacks. Letting them rest for 5-10 minutes allows the cheese to cool and set, making them much easier to extract from the muffin tin without crumbling.
- Test for Doneness: Insert a thin knife or skewer into the center of a stack. It should go in with very little resistance, indicating the potatoes are fully tender.
Variations
- Garlic Lover’s Delight: For an extra punch of garlic, thinly slice 1-2 cloves of garlic and layer them intermittently with the potatoes and cheese. You can also roast a head of garlic, mash it, and stir it into the cream mixture.
- Herbal Infusion: Add finely chopped fresh herbs to the cream mixture or sprinkle them between layers. Thyme, rosemary, or sage pair wonderfully with potatoes and cheese. For a fresh finish, garnish with chopped chives or parsley after baking.
- Smoky Bacon Stacks: Cook 4-6 slices of bacon until crispy, then crumble them. Sprinkle bacon bits between the potato layers for a smoky, savory addition.
- Spice It Up: A pinch of cayenne pepper or a dash of hot sauce in the cream mixture can add a subtle kick without overpowering the dish.
- Different Cheeses: Experiment with different cheese combinations. Provolone, Fontina, or even a smoked Gouda can offer unique flavor profiles. Just ensure they are good melting cheeses.
- Creamy Spinach Stacks: Wilt about 1/2 cup of fresh spinach, squeeze out excess moisture, chop it, and mix it into the cream mixture or layer it with the potatoes for added color and nutrients.
- Individual Ramekins: If you don’t have a muffin tin or prefer slightly larger portions, you can assemble these stacks in individual oven-safe ramekins. Adjust baking time as needed.
Storage and Reheating
These Cheesy Potato Stacks are delicious fresh out of the oven, but they also store and reheat surprisingly well, making them a great make-ahead option for busy holidays.
Storage
- Refrigeration: Once completely cooled, store any leftover Cheesy Potato Stacks in an airtight container in the refrigerator for up to 3-4 days.
- Freezing: While possible, freezing is not recommended as the texture of the potatoes can become a bit mealy upon thawing and reheating. If you must freeze, place cooled stacks on a baking sheet and freeze until solid, then transfer to a freezer-safe bag or container. Freeze for up to 1 month. Thaw in the refrigerator overnight before reheating.
Reheating
- Oven (Recommended): This method is best for restoring crispiness. Preheat your oven to 350°F (175°C). Place the potato stacks on a baking sheet. Loosely tent with foil to prevent excessive browning, especially if they are frozen or very cold. Bake for 15-20 minutes, or until heated through and the cheese is bubbly. If you want to crisp up the tops, remove the foil for the last 5 minutes.
- Air Fryer: For a quick reheat and crispy exterior, preheat your air fryer to 325°F (160°C). Place the stacks in a single layer in the air fryer basket. Cook for 5-8 minutes, or until heated through and crispy. Keep an eye on them to prevent burning.
- Microwave (Least Recommended): While the quickest option, the microwave will soften the potato stacks and make the cheese less crispy. Heat individual stacks on a microwave-safe plate for 30-60 seconds, or until warmed through. This method is best if you prioritize speed over texture.
Frequently Asked Questions
What kind of potatoes are best for potato stacks?
Yukon Gold potatoes are highly recommended for Cheesy Potato Stacks. Their waxy texture and lower starch content help them hold their shape well when sliced thinly and baked. They also have a naturally buttery flavor that complements the richness of the cheese and cream. Russet potatoes can be used, but they tend to be starchier and may result in a slightly drier, more crumbly stack.
Can I prepare these Cheesy Potato Stacks ahead of time?
Absolutely! These potato stacks are an excellent make-ahead dish, which is perfect for holiday planning. You can assemble the stacks completely in the muffin tin, cover them tightly with plastic wrap, and refrigerate for up to 24 hours before baking. When ready to bake, remove them from the refrigerator about 30 minutes before baking to allow them to come closer to room temperature, then bake as directed, potentially adding a few extra minutes to the baking time.
Why are my potato stacks falling apart or not holding their shape?
There are a few common reasons why potato stacks might not hold their shape. The most critical factor is the thickness and uniformity of your potato slices; if they are too thick or uneven, they won’t layer and bind properly. Using a mandoline ensures consistent thinness. Secondly, ensure you’re using enough cheese between the layers, as cheese acts as a binder. Lastly, the resting period after baking is crucial. Allowing the stacks to cool slightly for 5-10 minutes in the muffin tin before attempting to remove them gives the cheese a chance to set and firm up, helping them hold their structure.
Can I make this recipe dairy-free or vegan?
Adapting this recipe to be dairy-free or vegan is possible, though the flavor and texture will be slightly different. You would need to substitute the heavy cream and milk with a dairy-free alternative like full-fat coconut milk or a rich cashew cream. For the cheese, use a good quality dairy-free shredded cheese that melts well. Brands vary widely, so choose one known for its melting properties. You would also need to replace the butter with a plant-based butter alternative. The overall richness might change, but you can still achieve delicious results.