Introduction
Get ready to meet your new favorite obsession: homemade cheese bread! This isn’t just any cheese bread; it’s a fluffy, flaky, and utterly irresistible layered flatbread bursting with savory cheese. Imagine warm, golden-brown pockets of dough, each bite revealing tender layers intertwined with gooey, melted cheese. It’s the kind of comfort food that instantly brightens your day, perfect for a cozy breakfast, a satisfying snack, or an incredible side dish that will steal the show at any meal.
Inspired by the rich traditions of flatbreads like Malawach and Paratha, this recipe takes that beloved layered technique and infuses it with a generous cheesy heart. The magic lies in the simple yet clever method of rolling, spreading, and coiling the dough, which creates those incredible, delicate layers that puff up beautifully when cooked. Don’t be intimidated by the idea of making bread from scratch; this recipe is surprisingly straightforward and incredibly rewarding, even for novice bakers. The dough is easy to work with, and the pan-frying process is quick, meaning you’ll have delicious, warm cheese bread on your table in no time.
What makes this cheese bread truly special is its incredible versatility and universal appeal. It’s savory, satisfying, and utterly delicious on its own, but also acts as a fantastic canvas for your favorite dips or accompaniments. Whether you’re looking for a quick and easy breakfast, a hearty afternoon snack, or a unique addition to your dinner spread, this layered cheese bread is guaranteed to impress. Prepare to fall in love with the process and, more importantly, with every single cheesy, flaky bite!
Nutritional Information
Per serving (approximate values):
- Calories: 350
- Protein: 12g
- Carbohydrates: 40g
- Fat: 15g
- Fiber: 2g
- Sodium: 450mg
Ingredients
- 2 cups (240g) all-purpose flour, plus more for dusting
- 1 teaspoon salt
- ¾ cup (180ml) warm water (about 100-110°F / 38-43°C)
- 2 tablespoons olive oil, plus more for coating and cooking
- 1 cup (113g) shredded mild cheddar cheese (or a blend like Monterey Jack)
- 2 tablespoons unsalted butter, melted (for brushing layers)
Instructions
- Prepare the Dough: In a large mixing bowl, combine the flour and salt. Gradually add the warm water and 2 tablespoons of olive oil, mixing with a spoon or your hands until a shaggy dough forms.
- Knead the Dough: Turn the dough out onto a lightly floured surface. Knead for 5-7 minutes until the dough is smooth, elastic, and no longer sticky. It should feel soft and pliable.
- Rest the Dough: Lightly grease the mixing bowl with a little olive oil. Place the dough in the bowl, turning it to coat. Cover the bowl with plastic wrap or a clean kitchen towel and let it rest at room temperature for at least 30 minutes, or up to 1 hour. This resting period is crucial for developing gluten and making the dough easy to roll.
- Divide the Dough: Once rested, gently punch down the dough and divide it into 4 equal pieces. Roll each piece into a smooth ball.
- Prepare for Rolling: Lightly flour your work surface. Take one dough ball and flatten it slightly with your hand. Drizzle a tiny bit of olive oil on the surface where you’ll be rolling, and also lightly oil your rolling pin. This helps prevent sticking and aids in stretching the dough thinly.
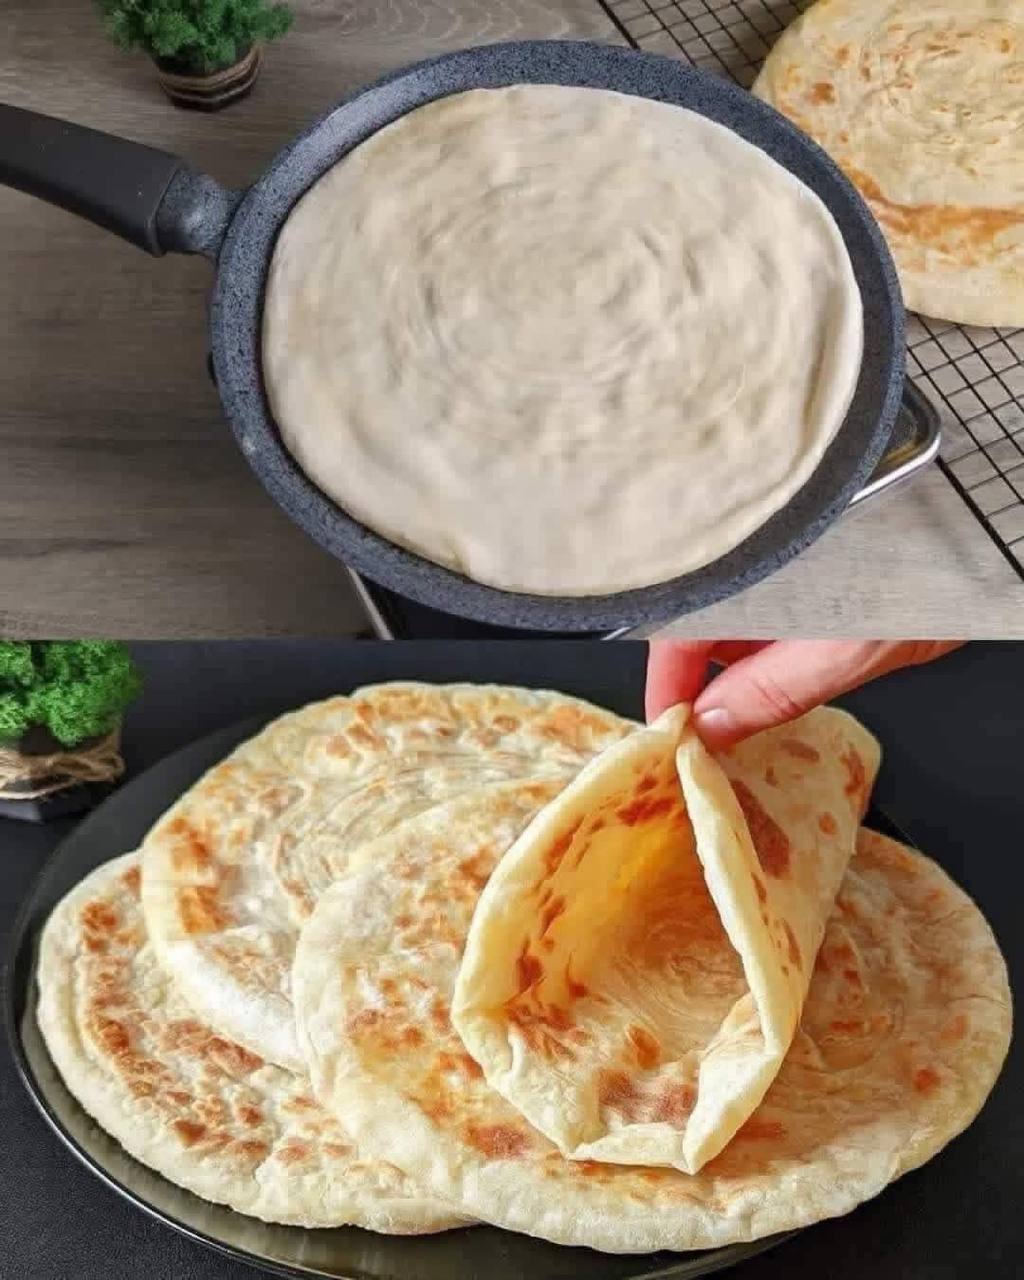
- Roll and Fill: Roll out one dough ball into a very thin circle, about 8-10 inches in diameter. The thinner, the flakier your bread will be. Don’t worry if it’s not a perfect circle. Brush the entire surface of the rolled-out dough with about ½ tablespoon of melted butter. Sprinkle about ¼ cup of shredded cheese evenly over the buttered surface, leaving a small border around the edges.
- Create the Layers (Spiral Technique): Starting from one edge, tightly roll the dough into a long, thin log. Once you have a log, gently stretch it a little longer (about 12-15 inches) without tearing it. Now, starting from one end of the log, tightly coil it into a spiral shape, tucking the end underneath. You should have a tight, round coil.
- Repeat and Rest Again: Repeat steps 5-7 with the remaining three dough balls, so you have four coiled dough pieces. Cover the coiled dough pieces with plastic wrap or a kitchen towel and let them rest for another 15-20 minutes. This second rest further relaxes the dough, making it easier to flatten without resistance.
- Flatten the Coils: On a lightly floured surface, take one coiled dough piece. Gently flatten it with your palm, then use your rolling pin to roll it out into a circle about 6-7 inches in diameter and about ¼ inch thick. Be gentle to maintain the layers. Repeat with the remaining coils.
- Cook the Cheese Bread: Heat a large non-stick skillet or cast-iron pan over medium heat. Add about 1 teaspoon of olive oil to the hot pan, swirling to coat.
- Pan-Fry: Carefully place one flattened cheese bread into the hot pan. Cook for 3-4 minutes per side, or until golden brown, puffed, and cooked through. You’ll see the layers start to separate and puff up. Gently press down on the bread with a spatula occasionally to ensure even contact with the pan and help it cook evenly.
- Serve Warm: Remove the cooked cheese bread from the pan and place it on a plate. Repeat with the remaining cheese breads, adding a little more oil to the pan if needed for each one. Serve immediately while warm and the cheese is still gooey.
Cooking Tips and Variations
For the flakiest cheese bread, don’t skimp on the resting times for the dough. The longer the dough rests, the more relaxed the gluten becomes, allowing you to roll it out incredibly thin without it tearing or snapping back. A thin dough is key to those delicate, distinct layers. When rolling out the dough, use a light hand and try to apply even pressure. If the dough resists, let it rest for another 5-10 minutes before continuing. This patience will be rewarded with superior texture.
When pan-frying, a medium heat is your best friend. Too high, and the outside will burn before the inside cooks and the cheese melts. Too low, and the bread will absorb too much oil and become greasy rather than crispy. Listen to the sizzle; a gentle sizzle is perfect. Pressing gently with a spatula during cooking helps ensure even browning and allows the internal steam to build, encouraging the layers to separate and puff beautifully.
Variations:
- Cheese Power-Up: Experiment with different cheeses! A blend of mozzarella and cheddar offers a classic stretchy, savory profile. For a tangier flavor, try feta mixed with a little cream cheese, or add a sprinkle of Parmesan for a nutty bite.
- Herbaceous Delight: Elevate the flavor by adding finely chopped fresh herbs to your cheese filling. Chives, parsley, oregano, or a mix of Italian herbs would be fantastic.
- Spicy Kick: If you love a bit of heat, sprinkle a pinch of red pepper flakes or a dash of cayenne pepper over the cheese before rolling. You could also add a tiny bit of minced jalapeño for a fresh, spicy crunch.
- Garlic Lover’s Dream: Mix a teaspoon of garlic powder or finely minced fresh garlic into the melted butter before brushing it onto the dough for an aromatic twist.
- Sweet Treat (with adjustments): While this recipe is savory, the layered technique can be adapted for a sweet version. Omit the salt from the dough and cheese. Instead of cheese, spread softened butter mixed with cinnamon sugar, or even a thin layer of jam or fruit preserves before rolling.
- Whole Wheat Wonders: For a slightly healthier and heartier option, substitute up to half of the all-purpose flour with whole wheat flour. You might need to add a touch more water to achieve the right dough consistency, as whole wheat flour absorbs more liquid.
- Everything Bagel Twist: After brushing with butter, sprinkle a generous amount of everything bagel seasoning over the cheese for a flavorful, textural crunch.
Storage and Reheating
Layered cheese bread is always best enjoyed fresh and warm, straight from the pan. The layers are at their flakiest, and the cheese is perfectly gooey. However, if you find yourself with leftovers, they can be stored and reheated.
To store, allow the cooked cheese bread to cool completely to room temperature. Once cooled, place the bread in an airtight container or wrap it tightly in plastic wrap or aluminum foil. It can be stored at room temperature for up to 1 day, or in the refrigerator for up to 3-4 days. For longer storage, you can freeze the cooked cheese bread. Wrap each piece individually in plastic wrap, then place them in a freezer-safe bag or container. They will keep well in the freezer for up to 1 month.
Reheating is easy and crucial for bringing back that delightful texture. Avoid the microwave if possible, as it can make the bread soft and chewy rather than flaky. The best methods for reheating are:
- Oven/Toaster Oven: Preheat your oven or toaster oven to 350°F (175°C). Place the cheese bread directly on a baking sheet or oven rack. Reheat for 5-10 minutes, or until warmed through and the layers have crisped up again. If reheating from frozen, it might take 15-20 minutes.
- Skillet/Pan: This method works wonderfully for restoring crispness. Heat a non-stick skillet over medium-low heat. Place the cheese bread in the dry pan (no oil needed for reheating, unless you want extra crispness). Reheat for 2-3 minutes per side, gently pressing with a spatula, until warmed through and crispy.
Frequently Asked Questions
What kind of cheese is best for this recipe?
For this layered cheese bread, a good melting cheese that isn’t too oily is ideal. Mild cheddar, Monterey Jack, Colby, or a blend of these work wonderfully, providing a classic savory flavor and excellent melt. Mozzarella is also a great choice if you prefer a milder, stretchier cheese. Avoid very crumbly cheeses like feta as the sole cheese, as they won’t provide the same gooey texture, though a small amount mixed with a good melting cheese can add flavor.
Can I prepare the dough ahead of time?
Yes, absolutely! This is a great way to make meal prep easier. You can prepare the dough up to step 3 (after the first rest) and refrigerate it for up to 24 hours. Lightly oil the dough ball, place it in an airtight container or cover the bowl tightly with plastic wrap, and store it in the fridge. When you’re ready to cook, let the dough come to room temperature for about 30 minutes before proceeding with dividing, rolling, and filling. You can also prepare the coiled dough pieces (step 8) and refrigerate them for a few hours, then let them come to room temperature before flattening and cooking.
My cheese bread isn’t puffing up/getting flaky. What went wrong?
There are a few common reasons this might happen. First, ensure your dough is rolled out very thinly in step 6; thinness is key to creating distinct layers. Second, don’t skip the melted butter between the layers, as this fat helps create separation. Third, the resting times are crucial; if the dough isn’t relaxed, it will be hard to roll thin and the layers won’t form as well. Finally, ensure your pan is at the right temperature (medium heat) and that you are gently pressing the bread during cooking. If the heat is too low, it won’t cook quickly enough to create steam that puffs the layers. If too high, it will burn without fully cooking through or puffing.
Can I bake this cheese bread instead of pan-frying?
While this recipe is designed for pan-frying to achieve that signature golden, crispy, and flaky exterior, you can technically bake it, though the texture will be different. To bake, preheat your oven to 400°F (200°C). Brush the flattened cheese breads with a little olive oil or melted butter, and bake on a baking sheet for 12-18 minutes, flipping halfway, until golden brown and cooked through. The layers might not be as pronounced or as crispy as with pan-frying, but it will still be delicious.