The Most Delicious No-Oven Breakfast Bread You’ve Never Tasted
If you’re looking for the perfect breakfast bread—soft, fluffy, buttery, and unbelievably delicious—you’ve just found it. This no-oven breakfast bread is unlike anything you’ve tried before. Made without baking, it’s quick, easy, and produces a golden, tender loaf that melts in your mouth. The combination of warm milk, yeast, sugar, and butter creates a sweet, fragrant bread that’s perfect for morning toast, sandwiches, or enjoying on its own.
Why This No-Oven Breakfast Bread Is Special
Most breakfast breads require an oven, but this recipe shows that incredible bread can be made without one. By cooking on a stovetop or skillet, the bread develops a light crust while remaining soft and fluffy inside. The yeast and sugar combination gives it a sweet aroma, while butter adds richness and flavor. This bread is perfect for anyone who wants a fresh, warm loaf quickly without the fuss of preheating an oven or using complicated techniques.
Ingredients You’ll Need
- 1 cup warm water (200 ml)
- 1 tablespoon yeast (10 grams)
- 4 teaspoons sugar
- 1/3 cup vegetable oil (60 ml)
- 1 cup warm milk (200 ml)
- 1/2 teaspoon salt
- 5 cups of flour (600 grams), plus 30–50 grams for kneading
- 100 grams butter
Optional for flavor variations:
- 1 teaspoon vanilla extract or cardamom for a fragrant twist
- 2 tablespoons honey for extra sweetness
- Sesame or poppy seeds for sprinkling on top
Each ingredient plays an important role: yeast and sugar activate the dough and make it rise, milk and butter add moisture and softness, and flour provides structure. Vegetable oil ensures tenderness and prevents sticking, while salt balances the flavor.
How to Make No-Oven Breakfast Bread
Step 1: Activate the Yeast
In a small bowl, combine warm water (about 110°F / 43°C), yeast, and sugar. Stir gently and let it sit for 5–10 minutes until it becomes frothy and bubbly. This indicates that the yeast is active and ready to help your dough rise.
Step 2: Prepare the Dough
In a large mixing bowl, combine warm milk, vegetable oil, and salt. Add the frothy yeast mixture and gradually incorporate 5 cups of flour. Mix until a soft, sticky dough forms. You can add a little more flour if necessary, but the dough should remain slightly sticky for the best texture.
Step 3: Knead the Dough
Transfer the dough to a lightly floured surface and knead for 8–10 minutes until smooth and elastic. Kneading develops the gluten, which gives the bread its structure and chewy, tender crumb. Use extra flour sparingly, just enough to prevent sticking.
Step 4: First Rise
Place the kneaded dough in a lightly greased bowl, cover with a clean kitchen towel or plastic wrap, and let it rise in a warm place for 1–1.5 hours, or until doubled in size. The rising process is essential for soft, fluffy bread.
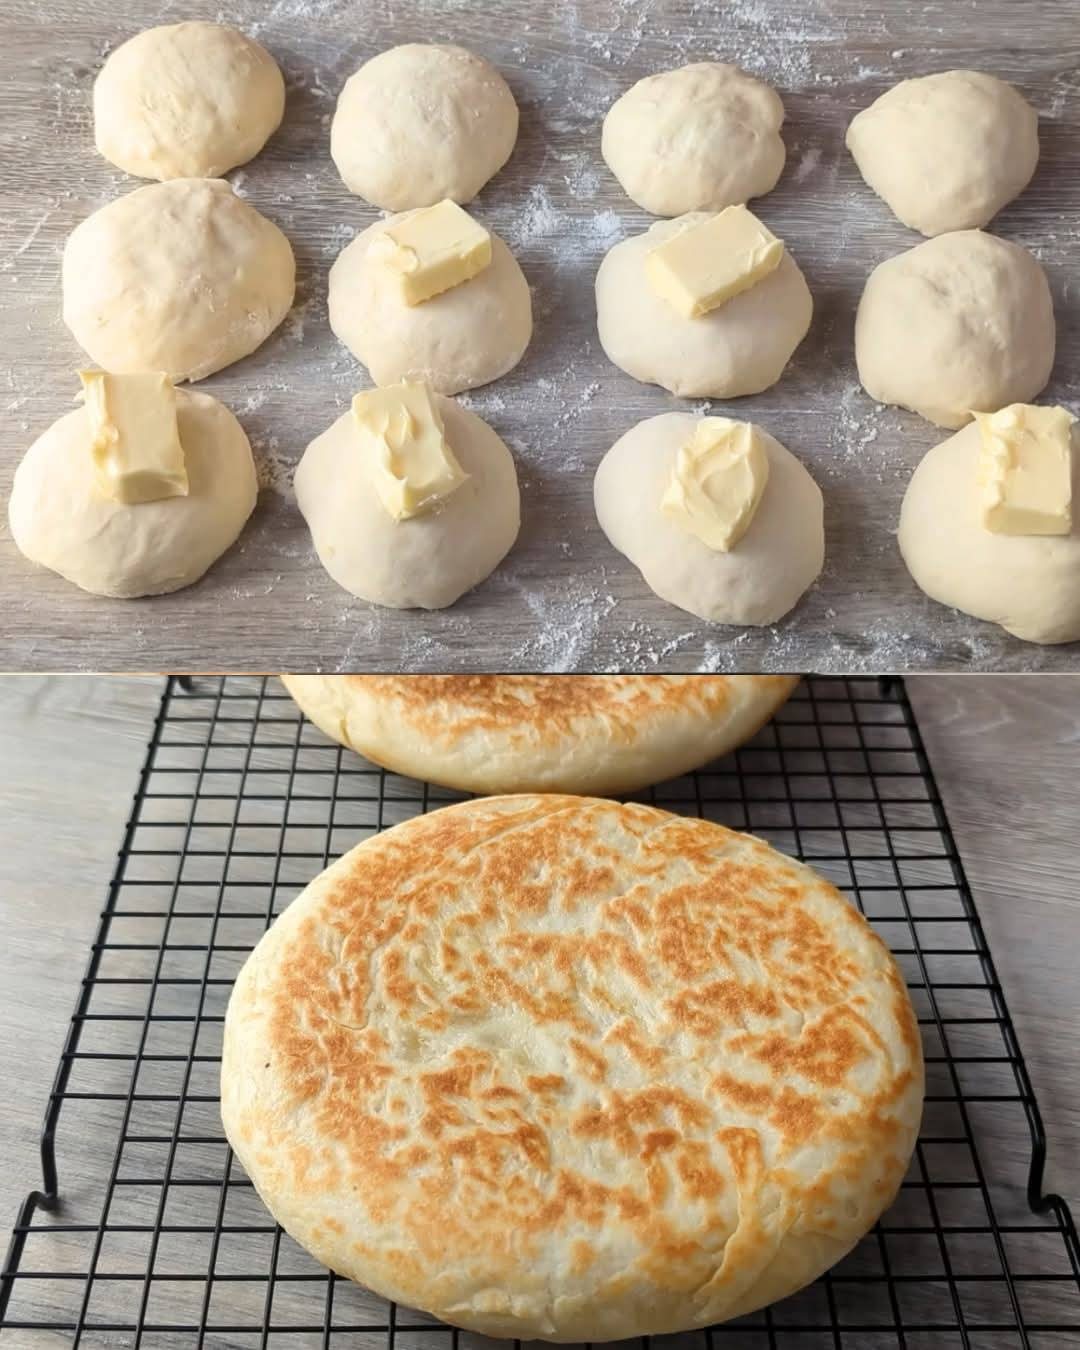
Step 5: Shape the Bread
After the first rise, punch down the dough to release excess air. Divide it into equal portions if making small loaves or keep it whole for a large loaf. Roll and shape the dough into your desired form.
Step 6: Prepare the Skillet or Pan
Heat a large non-stick skillet or frying pan over low to medium-low heat. Melt 100 grams of butter in the skillet, coating the bottom and sides. Butter adds flavor and helps create a golden crust while cooking the bread gently.
Step 7: Cook the Bread
Place the shaped dough in the skillet and cover with a lid. Cook over low heat for 15–20 minutes on one side, then flip carefully and cook for another 10–15 minutes until the bread is golden brown and cooked through. Avoid high heat to prevent burning while keeping the inside soft and fluffy.
Step 8: Cool and Serve
Remove the bread from the skillet and let it cool slightly on a wire rack. Serve warm for the best flavor and texture. This bread is perfect for breakfast, sandwiches, or spreading with butter, jam, or honey.
Tips for Perfect No-Oven Breakfast Bread
- Keep the heat low: Cooking slowly ensures the inside is fully cooked while the outside turns golden.
- Use warm liquids: Warm water and milk help activate the yeast for a better rise.
- Don’t over-flour: Too much flour can make the bread dense. Use extra only as needed to knead.
- Cover while cooking: Using a lid traps steam, helping the bread stay soft and fluffy.
- Experiment with flavors: Add vanilla, cardamom, or honey to enhance the aroma and taste.
Variations
Sweet Breakfast Bread
Add 2 tablespoons of sugar to the dough and sprinkle cinnamon sugar on top before cooking for a sweet morning treat.
Savory Herb Bread
Mix in 1–2 teaspoons of dried herbs like thyme, rosemary, or oregano for a fragrant, savory loaf.
Seeded Topping
Brush the top with melted butter and sprinkle sesame, poppy, or sunflower seeds for added texture and flavor.
Mini Rolls
Divide the dough into small portions and cook as individual rolls for easy breakfast servings or lunchboxes.
How to Store No-Oven Breakfast Bread
Store cooled bread in an airtight container at room temperature for up to 2 days. For longer storage, wrap tightly in plastic wrap and refrigerate for up to 5 days. Reheat gently in a pan or microwave before serving to restore softness.
Serving Ideas
- Serve warm with butter and honey for a classic breakfast
- Slice for sandwiches with eggs, cheese, or ham
- Use as a base for French toast or bread pudding
- Pair with jam, peanut butter, or Nutella for a sweet snack
Common Questions
Can I make this bread gluten-free?
Yes, substitute with a gluten-free all-purpose flour blend, though texture may differ slightly.
Can I make it ahead of time?
Yes, you can prepare the dough the night before and refrigerate it. Bring to room temperature before cooking.
What if the bread is not cooked inside?
Lower the heat and cover the pan to allow steam to cook the inside without burning the outside.
Can I add fillings?
Absolutely! Try chocolate chips, raisins, or cheese folded into the dough before cooking for a special twist.
Why This No-Oven Bread Works
The secret to this bread is gentle cooking combined with a well-risen, buttery dough. Cooking on the stovetop preserves moisture while creating a tender crumb, and butter ensures flavor and golden color. The yeast fermentation gives it a light, airy texture that rivals oven-baked bread, making it a perfect, convenient breakfast option.
Conclusion
This no-oven breakfast bread is soft, fluffy, buttery, and irresistibly delicious. In just a little over an hour, you can enjoy fresh, golden bread without an oven. Its versatility allows you to customize flavors, shapes, and toppings, making it perfect for breakfast, brunch, or snacks. Keep this recipe handy—it’s a simple, homemade solution for anyone craving fresh, soft bread at any time. Each bite delivers warmth, flavor, and a comforting homemade touch that’s sure to delight family and friends alike.