Introduction
Ah, the grilled cheese sandwich. A culinary icon, a nostalgic hug, and the ultimate comfort food. For many, it evokes memories of childhood lunchboxes, rainy day indulgence, or a simple, satisfying meal after a long day. But what if we told you that your grilled cheese experience was about to be profoundly elevated? Forget everything you thought you knew about this classic. We’re not just making a grilled cheese; we’re crafting an experience, a symphony of textures and flavors that will redefine your understanding of “the best.”
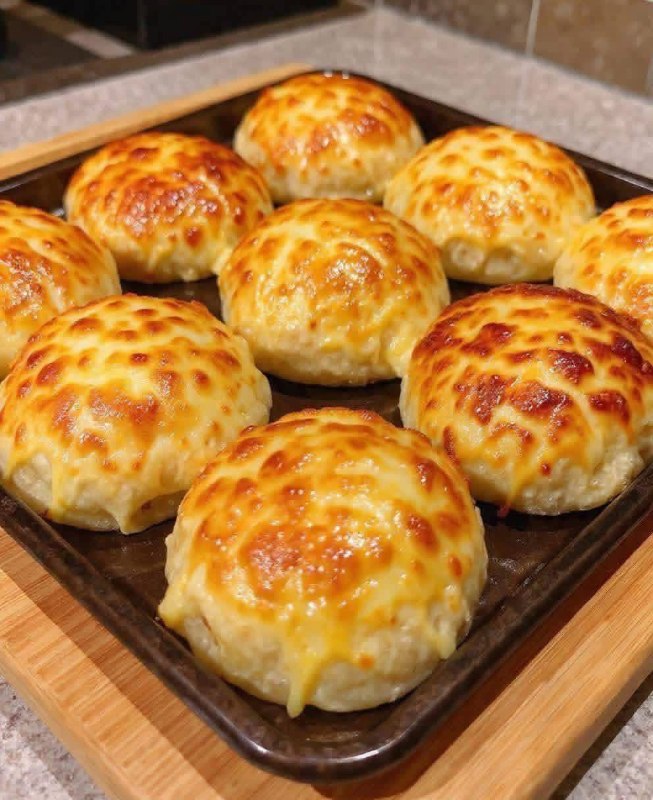
The secret to our unparalleled grilled cheese lies not just within, but all around. We begin with a foundation that is anything but ordinary: fluffy, golden-baked buns, generously crowned with a glorious, melted cheese crust. Imagine the soft, yielding interior of a freshly baked bun, infused with subtle savory notes, meeting a crispy, caramelized cheese topping that crunches delightfully with every bite. This isn’t merely bread; it’s an integral, cheesy component that sets the stage for the melty, gooey perfection that awaits inside.
This recipe isn’t about reinventing the wheel; it’s about perfecting it. By integrating the cheese into the very structure of the bread, we achieve a depth of flavor and an irresistible texture that a standard slice of bread simply cannot deliver. When this magnificent cheesy bun is then stuffed with a carefully selected blend of cheeses and grilled to golden-brown perfection, the result is nothing short of culinary magic. Prepare yourself for a grilled cheese sandwich that transcends its humble origins, becoming a masterpiece of comfort, flavor, and pure, unadulterated cheesy joy.
Nutritional Information
Per serving (approximate values):
- Calories: 580
- Protein: 28g
- Carbohydrates: 45g
- Fat: 35g
- Fiber: 3g
- Sodium: 950mg
Ingredients
- For the Cheesy Buns (makes 8-10 buns):
- 2 ¼ teaspoons (1 packet) active dry yeast
- 1 cup warm milk (105-115°F / 40-46°C)
- 2 tablespoons granulated sugar
- 1 teaspoon salt
- 1 large egg, lightly beaten
- ¼ cup unsalted butter, melted and cooled
- 3 ½ cups all-purpose flour, plus more for dusting
- 1 cup shredded sharp cheddar cheese, for topping
- ½ cup shredded mozzarella cheese, for topping
- 1 tablespoon olive oil or melted butter, for brushing
- For the Grilled Cheese Sandwich (per sandwich):
- 1 cheesy bun, split horizontally
- 1 tablespoon unsalted butter, softened, for grilling
- 2 slices (about 1.5 oz) sharp cheddar cheese
- 1 slice (about 0.75 oz) provolone cheese
- 1 slice (about 0.75 oz) Monterey Jack cheese
Instructions
- Prepare the Yeast Mixture: In a large mixing bowl, combine the warm milk, sugar, and active dry yeast. Stir gently and let sit for 5-10 minutes until foamy, indicating the yeast is active.
- Combine Wet Ingredients: To the yeast mixture, add the salt, beaten egg, and melted butter. Whisk until well combined.
- Add Flour: Gradually add the all-purpose flour, one cup at a time, mixing with a wooden spoon or a stand mixer with a dough hook until a shaggy dough forms.
- Knead the Dough: Turn the dough out onto a lightly floured surface and knead for 8-10 minutes, or use a stand mixer on medium speed for 6-8 minutes, until the dough is smooth, elastic, and no longer sticky.
- First Rise: Lightly grease a clean bowl with a little olive oil. Place the dough in the bowl, turning it once to coat. Cover the bowl with plastic wrap or a clean kitchen towel and let it rise in a warm place for 1-1.5 hours, or until doubled in size.
- Shape the Buns: Gently punch down the risen dough to release the air. Divide the dough into 8-10 equal portions (about 80-90g each). Roll each portion into a smooth, round ball.
- Second Rise: Line a baking sheet with parchment paper. Arrange the shaped buns on the prepared baking sheet, leaving some space between them. Cover loosely with plastic wrap or a clean kitchen towel and let them rise for another 30-45 minutes, or until noticeably puffy.
- Prepare Cheese Topping and Preheat Oven: While the buns are on their second rise, preheat your oven to 375°F (190°C). In a small bowl, combine the shredded sharp cheddar and mozzarella cheeses for the topping.
- Top the Buns: Once the buns have risen, gently brush the tops of each bun with a thin layer of olive oil or melted butter. Generously sprinkle the mixed shredded cheese over the top of each bun, pressing lightly to ensure it adheres.
- Bake the Cheesy Buns: Bake for 18-22 minutes, or until the buns are golden brown and the cheese topping is melted, bubbly, and slightly caramelized. Remove from the oven and let cool slightly on a wire rack. These cheesy buns are now ready to be used or stored.
- Prepare for Grilling (per sandwich): Once the cheesy buns are cool enough to handle, carefully slice one bun horizontally through the middle, creating two halves.
- Butter the Buns: Spread a thin, even layer of softened butter on the un-cheesy side of both the top and bottom halves of the bun.
- Assemble the Sandwich: Place the bottom half of the bun (butter-side down) in a cold or preheated non-stick skillet or cast-iron pan over medium-low heat. Layer the sharp cheddar, provolone, and Monterey Jack cheeses on top of the bottom bun half. Place the top half of the bun (butter-side up) on top of the cheese.
- Grill the Sandwich: Cook for 4-6 minutes per side, or until the cheesy bun is golden brown and crispy, and the cheese inside is completely melted and gooey. You may need to adjust the heat to prevent burning while ensuring the cheese melts thoroughly. Press down gently with a spatula occasionally to ensure even browning and good contact with the pan.
- Serve: Carefully remove the grilled cheese from the pan. Let it rest for a minute or two before slicing diagonally and serving immediately.
Cooking Tips and Variations
To ensure your grilled cheese reaches peak perfection, consider these essential tips. For the ultimate cheesy buns, don’t skimp on the kneading; a well-developed gluten structure results in a soft, airy bun interior. When topping the buns with cheese, be generous! The goal is a thick, crispy cheese crust that adds incredible texture and flavor. For baking the buns, keep an eye on them; ovens vary, and you want that perfect golden-brown, bubbly cheese topping without burning. If the cheese starts to brown too quickly, you can loosely tent the buns with foil for the last few minutes of baking.
When it comes to grilling the sandwich itself, patience is paramount. Use medium-low heat. This allows the heat to penetrate slowly, thoroughly melting the internal cheeses before the exterior of the bun over-browns. Pressing gently with a spatula during grilling helps to create a compact sandwich and maximizes contact with the hot pan, ensuring even toasting. For an extra crispy exterior, you can lightly brush the outside of the cheesy bun halves with a little extra butter or even mayonnaise before grilling – the mayo adds a fantastic golden crust.
The beauty of the grilled cheese lies in its versatility. While our recommended cheese blend for the filling (sharp cheddar, provolone, Monterey Jack) offers a perfect balance of tang, stretch, and creaminess, feel free to experiment. Gruyère adds a nutty, earthy depth, while fontina provides a beautifully smooth melt. A touch of smoked gouda can introduce a wonderful smoky aroma. For those who love a bit of heat, a sprinkle of pepper jack or a thin slice of jalapeño can be a delightful addition. Beyond cheese, the sky’s the limit for variations. Consider adding caramelized onions for a sweet and savory note, crispy bacon or thinly sliced ham for a hearty addition, or even a thin slice of tomato (placed between cheese layers to prevent sogginess). For a gourmet twist, a smear of fig jam or a sprinkle of fresh herbs like chives can elevate the flavor profile even further. Don’t be afraid to get creative and make this “Best Grilled Cheese Sandwich” truly your own.
Storage and Reheating
The cheesy buns can be made ahead of time and stored. Once completely cooled, place them in an airtight container or a large resealable bag. They will keep at room temperature for up to 2 days, or in the refrigerator for up to 5 days. For longer storage, the baked buns can be frozen for up to 3 months. To freeze, wrap each bun individually in plastic wrap, then place them in a freezer-safe bag. Thaw frozen buns at room temperature before using for grilled cheese.
Leftover grilled cheese sandwiches are best enjoyed fresh, but if you have any, allow them to cool completely before storing. Wrap them tightly in aluminum foil or place them in an airtight container and refrigerate for up to 1-2 days. Reheating a grilled cheese sandwich without it becoming soggy or chewy can be a bit tricky, but it’s certainly possible. The best method is to reheat it in a dry skillet over medium-low heat, flipping occasionally, until warmed through and re-crisped. Alternatively, you can reheat it in a toaster oven or a conventional oven preheated to 325°F (160°C) for 5-10 minutes, or until hot and crispy again. Avoid the microwave, as it will make the bread soggy and the cheese rubbery.
Frequently Asked Questions
Can I use pre-made bread dough for the cheesy buns?
Absolutely! If you’re short on time or prefer not to make dough from scratch, you can use a good quality store-bought pizza dough or frozen bread dough. Simply thaw and follow the instructions for shaping and rising, then proceed with the cheese topping and baking steps as outlined in the recipe. This will still result in a significantly elevated grilled cheese experience compared to using plain sliced bread.
What’s the best way to prevent the cheese from oozing out during grilling?
A little ooze is part of the charm of a grilled cheese! However, to minimize excessive leakage, ensure your cheese layers are placed neatly within the bun halves. Don’t overstuff the sandwich. Also, using medium-low heat and pressing gently with a spatula helps to create a good seal as the cheese begins to melt and adhere to the bread, containing it better within the sandwich.
Can I make these cheesy buns sweet instead of savory?
While this recipe is tailored for a savory grilled cheese, the basic bun dough can certainly be adapted for sweet applications. Instead of a savory cheese topping, you could brush with butter and sprinkle with cinnamon sugar, or add a streusel topping before baking. However, for the “Best Grilled Cheese Sandwich,” we highly recommend sticking to the savory cheese topping to complement the internal cheese filling.