
Introduction
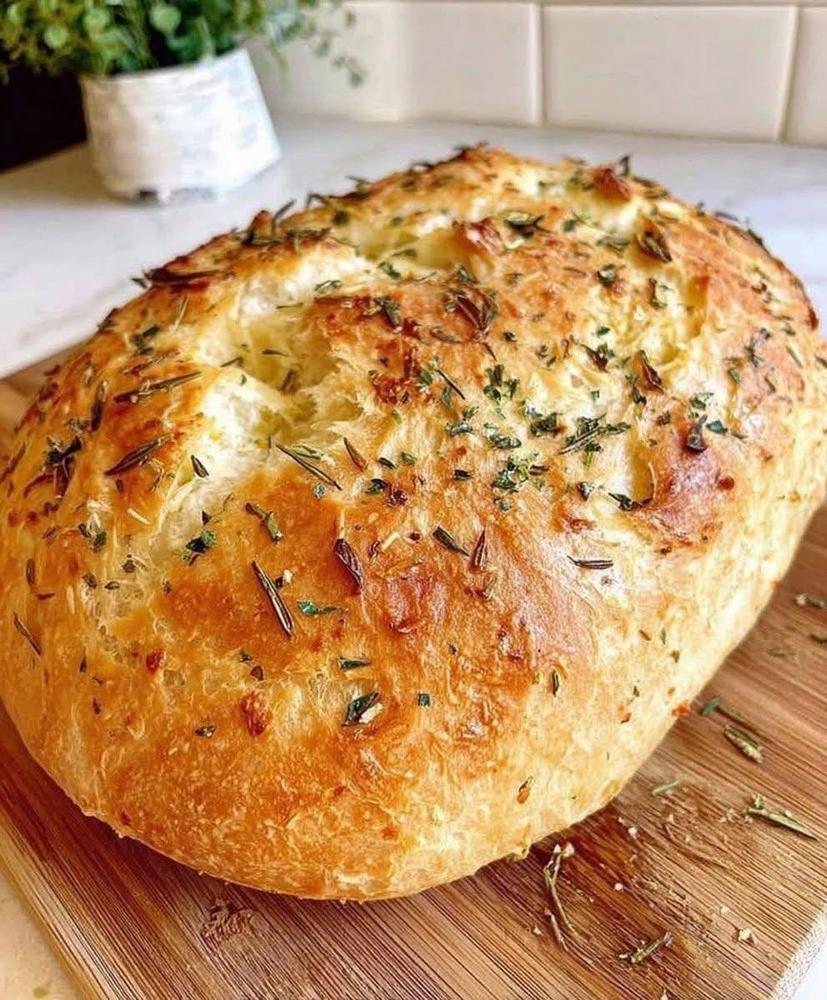
Imagine the irresistible aroma wafting from your kitchen, a symphony of warm, crusty bread and pungent garlic. Now imagine achieving that culinary magic with minimal effort. Welcome to the world of sourdough no-knead garlic bread! This isn’t just any garlic bread; it’s a revelation. Combining the effortless technique of no-knead baking with the deep, complex flavors of sourdough, and then infusing it with aromatic garlic and herbs, creates a bread that is truly in a league of its own. It’s a testament to the power of simple ingredients and a little patience, transforming them into a masterpiece of texture and taste.
What makes this recipe so special? First, the “no-knead” method liberates you from the arduous task of kneading dough, making it incredibly accessible for beginners and a time-saver for seasoned bakers. This hands-off approach allows the dough to develop its gluten structure naturally over a long, slow fermentation. Second, the sourdough starter introduces a depth of flavor that commercial yeast simply can’t replicate. Its tangy notes perfectly complement the savory garlic, creating a sophisticated and utterly delicious profile. Finally, the generous application of garlic and herbs ensures every bite is bursting with classic, comforting appeal. The result is a bread with a gloriously crusty exterior, a beautifully open and chewy interior, and a flavor that will have everyone asking for more.
Whether you’re looking for the perfect accompaniment to a hearty pasta dish, a comforting side for a bowl of soup, an impressive appetizer for entertaining, or simply a warm, satisfying treat to enjoy on its own, this sourdough no-knead garlic bread is your answer. It’s a comforting staple that brings joy to any meal, proving that homemade bread doesn’t have to be complicated to be extraordinary. Prepare to be amazed by how easily you can create such a spectacular loaf right in your own kitchen.
Nutritional Information
Per serving (approximate values, based on 12 servings per loaf):
- Calories: 220 kcal
- Protein: 7g
- Carbohydrates: 40g
- Fat: 4g
- Fiber: 2g
- Sodium: 350mg
Ingredients
- 400 grams (about 3 1/4 cups) unbleached all-purpose flour or bread flour, plus more for dusting
- 100 grams (about 1/2 cup) active sourdough starter (fed and bubbly)
- 350 ml (about 1 1/2 cups) lukewarm water
- 10 grams (about 1 1/2 teaspoons) fine sea salt
- 4-6 cloves fresh garlic, minced, or 2 teaspoons garlic powder
- 2 tablespoons olive oil, divided, plus more for greasing
- 1 tablespoon dried parsley
- 1 teaspoon dried rosemary, crushed
- 1/2 teaspoon dried oregano (optional)
- Pinch of red pepper flakes (optional, for a hint of heat)
Instructions
- Prepare the Dough: In a large mixing bowl, combine the flour, active sourdough starter, lukewarm water, and salt. Mix with a wooden spoon or your hands until all the flour is hydrated and no dry spots remain. The dough will be shaggy and sticky. Do not knead.
- First Rise (Bulk Fermentation): Cover the bowl tightly with plastic wrap or a damp kitchen towel. Let the dough rest at room temperature (ideally 70-75°F / 21-24°C) for 8-12 hours, or until it has doubled in size, is bubbly, and has a domed top. The exact time will depend on the temperature of your kitchen and the strength of your starter. For a slower rise, you can place it in the refrigerator for 12-18 hours after an initial 2-3 hours at room temperature.
- Prepare Garlic & Herbs: While the dough is rising, or towards the end of its first rise, prepare your garlic and herbs. In a small bowl, combine 1 tablespoon of olive oil with the minced fresh garlic (or garlic powder), dried parsley, dried rosemary, dried oregano (if using), and red pepper flakes (if using). Mix well and set aside.
- Shape the Loaf: Lightly flour your work surface. Gently scrape the dough out of the bowl onto the floured surface. Try to handle the dough as little as possible to preserve the air bubbles. Gently pull the edges of the dough towards the center to form a rough ball. Flip the dough over so the seam is underneath.
- Second Rise (Proofing): Lightly flour a proofing basket (banneton) or a bowl lined with a floured kitchen towel. Carefully transfer the shaped dough into the basket, seam-side up. Cover with a damp kitchen towel or plastic wrap. Let it proof at room temperature for 1-2 hours, or until it looks puffy and passes the “poke test” (when gently poked with a floured finger, the dough springs back slowly). Alternatively, for a deeper flavor and easier handling, you can cold-proof the dough in the refrigerator for 4-12 hours.
- Preheat Oven & Dutch Oven: About 30 minutes before you plan to bake, place a Dutch oven (with its lid) in your oven and preheat to 450°F (230°C).
- Bake the Bread (Initial): Carefully remove the hot Dutch oven from the oven. Gently invert the dough from the proofing basket into the hot Dutch oven. If desired, score the top of the dough with a sharp knife or razor blade (a single slash or a cross is common).
- Apply Garlic Topping: Drizzle the remaining 1 tablespoon of olive oil over the top of the dough. Then, carefully spoon or spread the prepared garlic and herb mixture evenly over the surface of the dough.
- Bake Covered: Place the lid back on the Dutch oven and bake for 30 minutes.
- Bake Uncovered: Remove the lid and continue baking for another 15-20 minutes, or until the crust is deeply golden brown and the internal temperature reaches 200-210°F (93-99°C).
- Cool: Carefully remove the bread from the Dutch oven and transfer it to a wire rack. Let it cool completely for at least 1-2 hours before slicing. This cooling step is crucial for the internal structure to set and for the flavor to fully develop.
Cooking Tips and Variations
Sourdough Starter Care: The success of this recipe hinges on an active, bubbly sourdough starter. Make sure your starter has been fed 4-12 hours before you plan to mix the dough and is at its peak of activity, showing many bubbles and a pleasant, tangy aroma. If your starter is sluggish, give it an extra feeding or two before using.
Flour Choice: While all-purpose flour works well, bread flour with its higher protein content will give you a chewier crumb and a more robust structure. Experiment to find your preferred texture.
Dough Consistency: Don’t be alarmed if your dough seems very wet and sticky – this is characteristic of no-knead sourdough. Resist the urge to add too much extra flour during mixing or shaping, as this can lead to a dense loaf. A light dusting of flour on your hands and work surface is usually sufficient for shaping.
Achieving a Perfect Crust: Baking in a preheated Dutch oven creates a steamy environment that mimics a professional bread oven, resulting in that desirable thick, crispy crust. If you don’t have a Dutch oven, you can try placing a pan of hot water on the bottom rack of your oven during baking to create steam, but the results may vary.
Garlic Infusion: For a milder garlic flavor, use garlic powder. For a more pungent and fresh taste, use freshly minced garlic. You can also roast your garlic cloves before mincing them for a sweeter, more mellow garlic flavor that spreads easily.
Even Herb Distribution: To ensure the herbs and garlic adhere well and don’t burn, apply the oil-garlic-herb mixture when you remove the lid from the Dutch oven, or even a few minutes before that, to allow it to cook into the crust without over-browning too early.
Flavor Variations:
- Cheesy Garlic Bread: Add 1/2 cup shredded Parmesan or mozzarella cheese along with the garlic and herbs during the last 15-20 minutes of baking for a gooey, cheesy topping.
- Spicy Kick: Increase the red pepper flakes or add a pinch of cayenne pepper to the garlic mixture.
- Mediterranean Twist: Incorporate chopped sun-dried tomatoes and black olives into the dough or sprinkle on top with the garlic and herbs.
- Rosemary & Sea Salt: For a simpler, elegant bread, omit the parsley and oregano, and just use fresh rosemary sprigs pressed into the dough with a sprinkle of flaky sea salt before baking.
- Onion & Garlic: Add 1/4 cup finely chopped caramelized onions to the dough during the initial mix for an extra layer of savory flavor.
Troubleshooting:
- Dough Too Sticky: If the dough is unmanageably sticky during shaping, lightly wet your hands instead of flouring them.
- Dense Bread: This can be due to an inactive starter, under-proofing, or over-handling the dough. Ensure your starter is bubbly and allow sufficient bulk fermentation and proofing time.
- Burnt Garlic/Herbs: If your garlic and herbs are browning too quickly, consider adding them halfway through the uncovered baking time, or tent the bread loosely with foil if they start to look too dark.
Storage and Reheating
Storage: Sourdough no-knead garlic bread is best enjoyed fresh on the day it’s baked. However, if you have leftovers, store them at room temperature in an airtight container or a bread bag for up to 2-3 days. Avoid refrigerating, as this can dry out the bread and negatively affect its texture.
For longer storage, you can freeze the bread. Once completely cooled, slice the bread and place the slices in a freezer-safe bag or container, separating layers with parchment paper to prevent sticking. It can be frozen for up to 2-3 months. You can also freeze a whole loaf, wrapped tightly in plastic wrap and then foil.
Reheating:
- From Room Temperature: To refresh day-old bread, preheat your oven to 350°F (175°C). Place the slices directly on the oven rack or on a baking sheet and heat for 5-10 minutes, or until warmed through and the crust is crisp again.
- From Frozen (Slices): Place frozen slices directly on a baking sheet. Heat in a preheated oven at 350°F (175°C) for 10-15 minutes, or until thawed, warmed, and crisp.
- From Frozen (Whole Loaf): If reheating a whole frozen loaf, unwrap it and place it directly in a cold oven. Set the oven to 350°F (175°C) and bake for 30-40 minutes, or until the center is warm and the crust is revived.
- Toaster/Toaster Oven: Individual slices can also be quickly reheated in a toaster or toaster oven until warm and slightly crispy.
Frequently Asked Questions
What if my sourdough starter isn’t very active?
An active, bubbly starter is crucial for a good rise and flavor in this no-knead recipe. If your starter seems sluggish, feed it regularly (every 12-24 hours) for a few days until it reliably doubles in size within 4-8 hours after feeding. Using a weak starter will result in a dense, flat loaf with less sourdough flavor. You can also try using a small amount of commercial yeast (1/4 teaspoon) along with your sourdough starter if you’re in a pinch and your starter isn’t at its peak, though this will slightly alter the pure sourdough flavor.
Can I make this recipe without a Dutch oven?
Yes, you can, but the results might vary slightly. A Dutch oven creates a steamy environment that helps develop a beautiful, crusty exterior. If you don’t have one, you can bake the bread on a preheated baking stone or a heavy baking sheet. To create steam, place a metal pan on the bottom rack of your oven while preheating, and carefully pour about 1 cup of boiling water into it when you place the bread in the oven. Be cautious when adding water to a hot pan. Bake covered with an inverted metal bowl for the first 30 minutes, then uncover for the remaining time.
How do I know when the dough has finished its first rise?
The dough is ready after its first rise (bulk fermentation) when it has visibly doubled in size, looks bubbly on the surface, and has a domed top. You might also see some small bubbles bursting on the surface. If you gently jiggle the bowl, the dough should have a slight wobble. The exact time will depend on your kitchen temperature and starter strength, so observing these visual cues is more important than strictly following a time frame.
Can I prepare the dough ahead of time?
Absolutely! The beauty of no-knead sourdough is its flexibility. After the initial bulk fermentation at room temperature, you can place the dough (either in its bulk state or after shaping into a proofing basket) directly into the refrigerator for a cold proof. This can extend the proofing time significantly, from 12-24 hours or even up to 48 hours for some recipes. Cold proofing develops more complex flavors and makes the dough easier to handle. When you’re ready to bake, simply take the dough directly from the fridge, preheat your oven and Dutch oven, and proceed with baking as usual.