
Introduction
There’s something incredibly satisfying about opening a jar of homemade pickled vegetables. The vibrant colors, the crisp texture, and that delightful tangy-sweet-salty burst of flavor can elevate almost any meal. Whether you’re looking to add a zesty crunch to your sandwiches, a bright counterpoint to rich meats, or simply a refreshing snack, homemade pickled vegetables are an absolute game-changer. Forget the often-soggy, overly sweet, or bland store-bought versions; making your own allows you to control every aspect, from the freshness of the produce to the precise balance of flavors in your brine.
Pickling is an ancient art, a time-honored method of food preservation that has seen a resurgence in popularity, and for good reason. It’s surprisingly simple to do at home, even for beginners, and the results are truly rewarding. Beyond their incredible taste, pickled vegetables offer a fantastic way to extend the life of your fresh produce, reducing food waste and ensuring you always have a flavorful accompaniment on hand. Plus, the process itself is a fun, hands-on culinary adventure that connects you to traditional foodways.
This guide will walk you through creating your own beautiful and delicious pickled vegetable jars. We’ll cover everything you need to know, from selecting the freshest ingredients and crafting the perfect brine to packing your jars and ensuring safe storage. Get ready to transform everyday vegetables into a pantry staple that’s bursting with flavor and ready to brighten up your plate whenever you desire. The customization possibilities are endless, so let’s dive into the wonderful world of homemade pickling!
Nutritional Information
Per serving (approximate values for 1/2 cup mixed pickled vegetables):
- Calories: 35
- Protein: 1g
- Carbohydrates: 8g
- Fat: 0g
- Fiber: 2g
- Sodium: 350mg
Ingredients
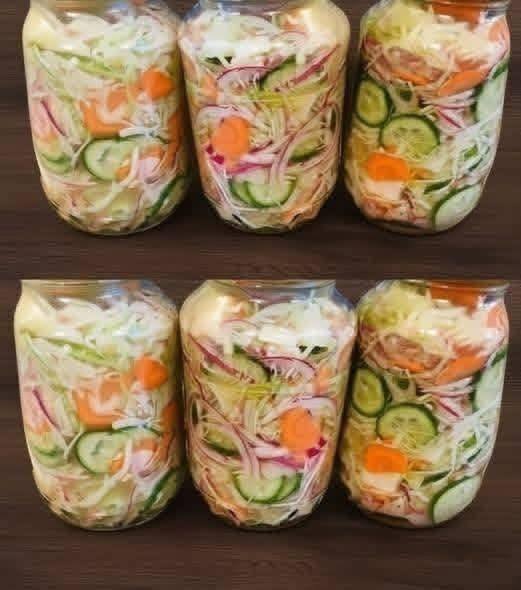
- 4 cups mixed fresh vegetables, such as:
- 1 small head white cabbage, thinly shredded (about 2 cups)
- 2 medium cucumbers, thinly sliced (about 1.5 cups)
- 2 medium carrots, peeled and thinly sliced or julienned (about 1 cup)
- 1 small red onion, thinly sliced (about 1/2 cup)
- 2 cups distilled white vinegar (5% acidity)
- 1 cup water
- 1/4 cup granulated sugar
- 1 tablespoon pickling salt (non-iodized)
- 2 cloves garlic, peeled and thinly sliced
- 1 teaspoon mustard seeds
- 1/2 teaspoon black peppercorns
- Optional: 1/2 teaspoon red pepper flakes for a touch of heat
- Optional: 2-3 sprigs fresh dill or 1 teaspoon dried dill weed
Instructions
- Prepare Your Jars and Lids: Thoroughly wash two 1-pint (500ml) or one 1-quart (1-liter) glass canning jars and their lids with hot, soapy water. Rinse well. For refrigerator pickles, sterilization isn’t strictly necessary, but ensuring they are very clean is crucial. If you plan to hot water bath can for shelf stability, sterilize your jars and lids according to standard canning practices (boiling for 10 minutes or running through a hot dishwasher cycle).
- Prepare the Vegetables: Wash all vegetables thoroughly. Shred the cabbage, slice the cucumbers and carrots into uniform rounds or sticks, and thinly slice the red onion. Aim for consistent sizes so they pickle evenly.
- Pack the Jars: Begin layering the prepared vegetables into your clean jars. Pack them tightly but without crushing them, ensuring there’s about 1/2 inch of headspace from the rim of the jar. Distribute the garlic slices, mustard seeds, peppercorns, and any optional red pepper flakes or dill among the jars as you pack the vegetables.
- Prepare the Brine: In a medium non-reactive saucepan (stainless steel or enamel), combine the distilled white vinegar, water, granulated sugar, and pickling salt. Bring the mixture to a boil over medium-high heat, stirring occasionally to dissolve the sugar and salt completely. Once boiling, remove the saucepan from the heat.
- Pour the Brine: Carefully pour the hot brine over the packed vegetables in the jars, ensuring all vegetables are fully submerged. Use a clean butter knife or chopstick to gently dislodge any air bubbles trapped between the vegetables. Add more brine if necessary to maintain the 1/2-inch headspace.
- Seal the Jars: Wipe the rims of the jars clean with a damp cloth. Place the lids on the jars and screw on the bands until finger-tight (do not overtighten).
- Cool and Refrigerate: Allow the jars to cool completely to room temperature on your countertop. Once cool, transfer the jars to the refrigerator.
- Patience is Key: For the best flavor, let the pickled vegetables sit in the refrigerator for at least 24-48 hours before eating. This allows the flavors to meld and the vegetables to absorb the brine. They will continue to develop flavor over the next few days.
Cooking Tips and Variations
Tips for Best Results:
- Freshness Matters: Always start with the freshest, highest-quality vegetables you can find. This will significantly impact the flavor and crispness of your finished pickles.
- Uniform Cuts: Cut your vegetables into relatively uniform sizes. This ensures they pickle at the same rate and have a consistent texture.
- Don’t Overpack: While you want to pack the vegetables tightly, avoid cramming them in so much that the brine can’t circulate. Leave enough space for the brine to fully cover all the vegetables.
- Hot Brine for Crispness: Pouring hot brine over the vegetables helps to slightly cook them and draw out moisture, contributing to a crisper pickle.
- Use Pickling Salt: Regular table salt often contains anti-caking agents and iodine, which can make your brine cloudy and potentially alter the flavor. Pickling salt is pure salt and is recommended for clear, clean-tasting pickles.
- Non-Reactive Pot: Always use a non-reactive pot (like stainless steel or enamel) when making your brine. Aluminum or cast iron can react with the vinegar, leading to off-flavors and discoloration.
- Headspace is Important: The 1/2-inch headspace is crucial. Too little, and the brine might overflow; too much, and the vegetables at the top might not be fully submerged.
- Vent Air Bubbles: After pouring the brine, gently running a clean knife or chopstick along the inside of the jar helps release trapped air bubbles, ensuring better contact between the brine and vegetables.
Flavor Variations:
- Spicy Pickles: Add extra red pepper flakes, a whole small dried chili, or a few slices of fresh jalapeño or serrano pepper to the jars.
- Garlic Lover’s Pickles: Increase the amount of sliced garlic or add whole peeled garlic cloves to each jar.
- Herbal Notes: Experiment with different fresh herbs. Besides dill, try fresh thyme, oregano, or bay leaves in your jars.
- Sweet & Sour: Adjust the sugar content in the brine for a sweeter pickle, or reduce it for a more tart flavor.
- Asian Inspired: For an Asian twist, add a few slices of fresh ginger, a star anise pod, or a dash of sesame oil to the brine. You could also swap some of the white vinegar for rice vinegar.
- Mustard & Turmeric: For a vibrant yellow color and earthy flavor, add 1/2 teaspoon of ground turmeric to the brine along with extra mustard seeds.
Vegetable Variations:
- Green Beans: Trim the ends of fresh green beans and blanch them quickly before packing for a brighter color and crisp texture.
- Cauliflower Florets: Break a head of cauliflower into small florets.
- Bell Peppers: Slice colorful bell peppers (red, yellow, orange) into strips.
- Radishes: Thinly slice radishes for a peppery, crunchy pickle.
- Asparagus: Trim the woody ends of asparagus spears.
- Beets: Cook and peel small beets, then slice or dice them before pickling for a beautiful, earthy pickle. Note: beets will tint your brine and other vegetables pink!
- Cherry Tomatoes: Pierce cherry tomatoes a few times with a skewer before adding them to the jar.
Storage and Reheating
These homemade pickled vegetable jars are designed as refrigerator pickles, meaning they are not processed for shelf-stable long-term storage at room temperature. They must be stored in the refrigerator.
Storage:
- Unopened Jars: Once the jars have cooled to room temperature, store them in the refrigerator. They are best enjoyed after at least 24-48 hours to allow the flavors to develop.
- Opened Jars: Once a jar has been opened, always keep it in the refrigerator with the lid tightly sealed.
- Shelf Life: Properly stored refrigerator pickles will last for 3-4 weeks, and often longer, in the refrigerator. Always use your senses: if they smell off, look moldy, or have a slimy texture, it’s best to discard them.
- Brine Level: Ensure the vegetables remain submerged in the brine throughout their storage. If vegetables are exposed to air, they are more likely to spoil.
Reheating:
Pickled vegetables are typically enjoyed cold or at room temperature, straight from the jar. They are not meant to be reheated. Reheating would soften their crisp texture and diminish their vibrant, tangy flavor, which are key characteristics of a good pickle. Serve them chilled as a side dish, condiment, or snack.
Frequently Asked Questions
What is the difference between canning and refrigerator pickles?
Canning involves a hot water bath or pressure canning process that creates a vacuum seal, making jars shelf-stable at room temperature for extended periods. Refrigerator pickles, like this recipe, are simply stored in the refrigerator and rely on the acidity of the brine and cold temperatures for preservation. They have a shorter shelf life than properly canned pickles.
Can I use any type of vinegar?
For most pickling recipes, distilled white vinegar (5% acidity) is recommended because it has a clean, neutral flavor and consistent acidity, which is important for food safety and flavor. You can experiment with other vinegars like apple cider vinegar or rice vinegar for different flavor profiles, but ensure they also have at least 5% acidity. Balsamic or red wine vinegar are generally too strong and dark for most vegetable pickles.
Why did my pickles turn soft?
Several factors can lead to soft pickles. Overcooking the vegetables before pickling, using old or low-quality vegetables, not enough salt in the brine, or improper storage (not cold enough) can all contribute to softness. Using a hot brine and allowing adequate chilling time can help maintain crispness. Some people also add grape leaves or pickling crisping agents to their jars for extra crunch, though it’s not strictly necessary for this recipe.
How long does it take for the pickles to be ready to eat?
While you can technically eat them within a few hours, for the best flavor and texture, it’s recommended to let your homemade pickled vegetables sit in the refrigerator for at least 24-48 hours. This allows the brine to fully penetrate the vegetables and for the flavors to meld and intensify. They often taste even better after a few days.


