Introduction
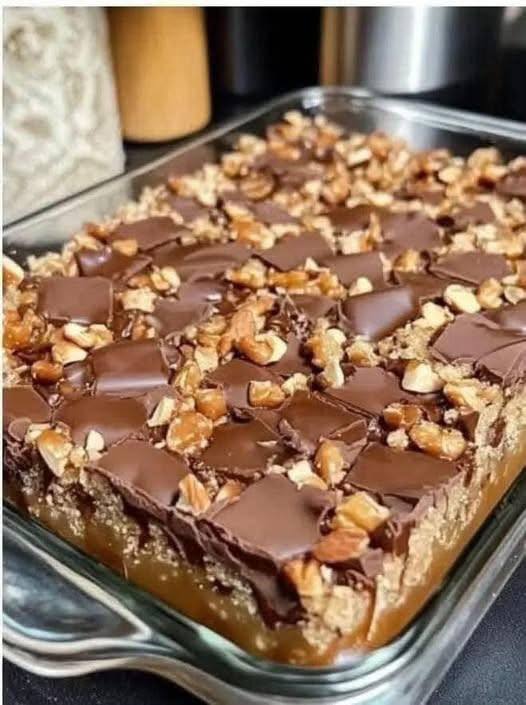
Prepare to meet your new favorite dessert: Caramel Chocolate Crunch Bars! These irresistible treats are a symphony of textures and flavors, combining a buttery, crunchy crust, a rich, chewy caramel layer, and a decadent chocolate topping studded with nuts. Imagine biting into a bar that delivers a satisfying snap, followed by gooey sweetness, and finishing with the luxurious taste of chocolate and toasted nuts. It’s a dessert that truly has it all, making it an instant crowd-pleaser for any occasion, from casual family gatherings to elegant dinner parties.
What makes these bars so special is their perfect balance. The sweetness of the caramel is beautifully complemented by the slight bitterness of the chocolate, while the varied crunch from the crust and nuts prevents any one texture from dominating. They’re surprisingly easy to make, requiring no complex techniques, just a little patience for chilling. Whether you’re an experienced baker or just starting out, you’ll find joy in creating these layered masterpieces that look as impressive as they taste.
These Caramel Chocolate Crunch Bars are more than just a dessert; they’re an experience. They’re the perfect treat to satisfy that sweet craving, a fantastic addition to any potluck spread, or a thoughtful homemade gift. Get ready to impress everyone with these delightful bars that are guaranteed to disappear quickly!
Nutritional Information
Per serving (approximate values):
- Calories: 320
- Protein: 4g
- Carbohydrates: 40g
- Fat: 18g
- Fiber: 2g
- Sodium: 150mg
Ingredients
For the Crust:
- 1 ½ cups all-purpose flour
- ½ cup granulated sugar
- ¼ teaspoon salt
- 1 cup (2 sticks) unsalted butter, softened
For the Caramel Layer:
- ½ cup (1 stick) unsalted butter
- ½ cup packed light brown sugar
- ¼ cup granulated sugar
- ¼ cup heavy cream
- 1 teaspoon vanilla extract
- ¼ teaspoon salt
For the Chocolate Topping:
- 1 ½ cups semi-sweet chocolate chips (or chopped chocolate bars)
- ½ cup milk chocolate chips (or chopped milk chocolate)
- 1 tablespoon unsalted butter
- 1 cup mixed nuts (such as walnuts and cashews), roughly chopped
Instructions
- Preheat your oven to 350°F (175°C). Line a 9×13-inch baking pan with parchment paper, leaving an overhang on the sides to easily lift the bars out later.
- Prepare the Crust: In a large bowl, combine the all-purpose flour, granulated sugar, and salt. Add the softened butter and mix with a pastry blender, a fork, or your fingertips until crumbly and well combined. The mixture should resemble coarse crumbs.
- Press the crust mixture evenly into the bottom of the prepared baking pan. You can use the bottom of a measuring cup or your hands to firmly press it down, ensuring it’s compact and level.
- Bake the crust for 18-22 minutes, or until lightly golden brown around the edges. Remove from the oven and set aside to cool slightly while you prepare the caramel.
- Prepare the Caramel Layer: In a medium saucepan, combine the butter, light brown sugar, granulated sugar, and heavy cream. Cook over medium heat, stirring constantly, until the butter is melted and the sugars are dissolved.
- Bring the mixture to a gentle boil, stirring occasionally. Allow it to boil for 3-5 minutes, without stirring, until it reaches a thick, syrupy consistency. Be careful not to let it burn.
- Remove the saucepan from the heat and stir in the vanilla extract and salt.
- Pour the hot caramel evenly over the warm, baked crust. Spread it gently with a spatula if needed to cover the entire surface.
- Return the pan to the oven and bake for another 10-12 minutes, or until the caramel is bubbly and slightly darker in color. Remove from the oven and let it cool completely on a wire rack. This is crucial for the caramel to set properly.
- Prepare the Chocolate Topping: Once the caramel layer is completely cool and firm, you can prepare the chocolate topping. In a microwave-safe bowl, combine the semi-sweet chocolate chips, milk chocolate chips, and 1 tablespoon of butter.
- Microwave on high in 30-second intervals, stirring well after each interval, until the chocolate is completely melted and smooth. Alternatively, you can melt the chocolate in a double boiler over simmering water, stirring until smooth.
- Stir the chopped mixed nuts into the melted chocolate.
- Pour the chocolate-nut mixture evenly over the cooled caramel layer, spreading it with a spatula to create a smooth, even topping.
- Refrigerate the bars for at least 2-3 hours, or until the chocolate topping is completely set and firm.
- Once chilled, lift the bars out of the pan using the parchment paper overhang. Place them on a cutting board.
- Using a sharp, warm knife (run it under hot water and wipe dry between cuts), cut the large slab into desired bar sizes. For cleaner cuts, wipe the knife clean after each slice.
- Serve and enjoy!
Cooking Tips and Variations
Achieving perfect Caramel Chocolate Crunch Bars is all about attention to detail, especially with the caramel and the final cut. For the caramel, consistently stirring until the butter melts and sugars dissolve is key. Once it boils, try to resist stirring too much as this can encourage crystallization. Watch it closely; a gentle boil for 3-5 minutes should yield a beautiful, chewy caramel. If your caramel seems too soft after cooling, don’t worry, it will firm up more in the refrigerator. If it becomes too hard, you might have boiled it for too long. For the chocolate topping, always melt chocolate gently to prevent scorching. Using a double boiler or microwaving in short bursts and stirring frequently will prevent it from seizing or burning. The addition of a tablespoon of butter to the chocolate helps create a smoother, shinier finish that’s easier to spread and cut.
When it comes to cutting the bars, patience is your best friend. Ensure the entire pan is thoroughly chilled for several hours, or even overnight, before attempting to cut. A cold bar will yield clean, crisp edges, whereas a warmer one will result in messy, crumbly cuts. For the cleanest slices, use a long, sharp knife. Running the knife under hot water and wiping it dry between each cut will help the blade glide through the chocolate and caramel layers without dragging. This small step makes a huge difference in the presentation of your bars.
These Caramel Chocolate Crunch Bars are incredibly versatile, allowing for numerous delicious variations. Don’t feel limited to walnuts and cashews; pecans, almonds, or even a mix of different nuts would be fantastic. For an extra layer of flavor and texture, toast your nuts lightly before adding them to the chocolate topping. This brings out their natural oils and deepens their flavor. If you’re not a fan of nuts or have allergies, you can easily omit them or substitute with other crunchy elements. Crushed pretzels can add a delightful salty-sweet crunch, while rice krispies or even crushed cornflakes can provide a lighter texture. Toffee bits scattered over the chocolate before it sets would also be a luxurious addition.
Experiment with different types of chocolate for the topping. A darker chocolate will provide a more intense, less sweet contrast to the caramel, while an all-milk chocolate topping will create a sweeter, creamier bar. You could even use a combination, as suggested in the recipe, to get the best of both worlds. White chocolate could also be used, perhaps drizzled over the set dark chocolate for a decorative touch and an extra layer of sweetness. For a hint of spice, a pinch of cayenne pepper in the chocolate topping can add an unexpected and exciting kick. A sprinkle of flaky sea salt over the finished chocolate layer before it sets can also enhance all the flavors, balancing the sweetness with a touch of savory. The possibilities are truly endless, so feel free to get creative and make these bars your own!
Storage and Reheating
To keep your Caramel Chocolate Crunch Bars fresh and delicious, proper storage is key. Once they are fully chilled and cut, store them in an airtight container. They will keep well at room temperature for up to 3-4 days, especially if your kitchen is cool. However, for a firmer texture and to extend their shelf life, storing them in the refrigerator is recommended. In the fridge, they can last for up to 1-2 weeks. Be sure to place parchment paper between layers of bars in the container to prevent them from sticking together. If you prefer, you can also wrap individual bars in plastic wrap before placing them in the container for even better protection and portion control.
These bars also freeze beautifully, making them an excellent make-ahead dessert. To freeze, arrange the cut bars in a single layer on a baking sheet and place them in the freezer until solid, about 1-2 hours. Once frozen, transfer the bars to a freezer-safe airtight container or heavy-duty freezer bag, again using parchment paper between layers. They can be stored in the freezer for up to 2-3 months. When you’re ready to enjoy them, simply remove the desired number of bars from the freezer and let them thaw at room temperature for about 15-30 minutes, or in the refrigerator for an hour or two. There’s generally no need to reheat these bars; they are best enjoyed chilled or at room temperature, as reheating can cause the chocolate to melt and the caramel to become too soft.
Frequently Asked Questions
What if my caramel doesn’t set properly?
If your caramel layer seems too soft after cooling and chilling, it likely didn’t cook long enough to reach the proper consistency. The key is to boil it for the specified time (3-5 minutes after coming to a gentle boil) to allow enough moisture to evaporate, concentrating the sugars. If it’s still too soft, you can try refrigerating the bars for an extended period, even overnight. In some cases, if it’s extremely soft, the only solution might be to gently scrape it off, recook it, or make a new batch, ensuring it boils sufficiently.
Can I make these bars gluten-free?
Yes, you can absolutely make these bars gluten-free. For the crust, simply substitute the all-purpose flour with a 1:1 gluten-free baking flour blend that contains xanthan gum. Ensure that all other ingredients, such as chocolate chips and vanilla extract, are certified gluten-free. The caramel and chocolate topping layers are naturally gluten-free, so no substitutions are needed there.
How do I prevent the chocolate topping from cracking when I cut the bars?
Cracking often occurs if the chocolate is too cold and brittle or if the knife isn’t sharp or warm enough. To prevent cracking, ensure the bars are thoroughly chilled but not frozen solid. Use a very sharp knife that has been warmed under hot water and wiped dry. Re-warm and wipe the knife after every few cuts. Cutting slowly and with firm, even pressure will also help create cleaner, crack-free slices.
Can I use a different type of pan?
While a 9×13-inch baking pan is ideal for the proportions in this recipe, you can use a different size. If you use a smaller pan (e.g., an 8×8-inch or 9×9-inch pan), your bars will be thicker, and you may need to adjust baking times slightly (possibly longer for the crust and caramel) and chilling times. If you use a larger pan, the layers will be thinner, and baking and chilling times might be reduced. Always line your pan with parchment paper, regardless of size, for easy removal.