
Introduction
Get ready to discover your new favorite dessert! Imagine a treat so effortlessly simple to make, yet so incredibly decadent that each spoonful feels like a sweet, creamy dream. This No Bake Creamy Biscuit Dessert is exactly that – a culinary marvel that skips the oven entirely, making it perfect for hot summer days, busy weeknights, or whenever a craving for something truly special strikes without the fuss.
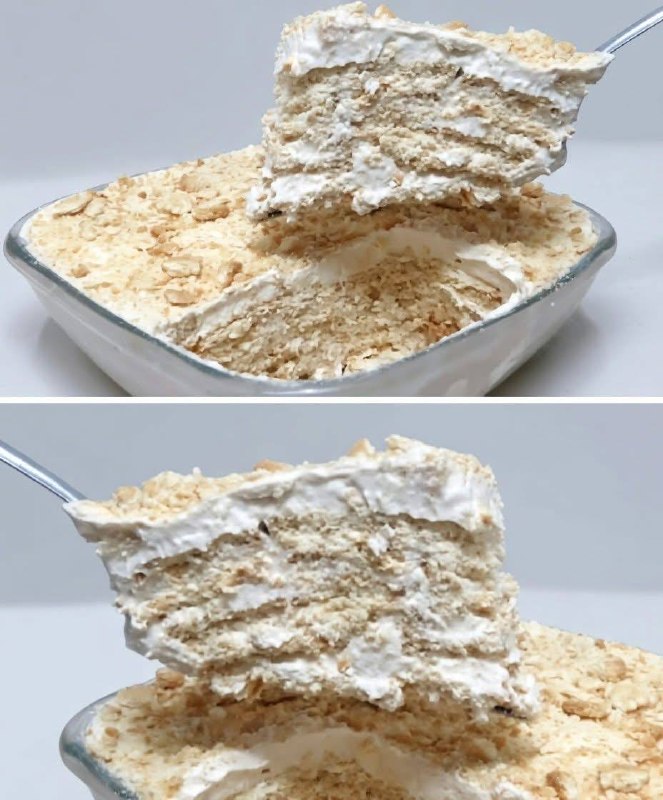
What makes this dessert truly shine, and live up to its “melts in your mouth” promise, is the magical transformation that happens during chilling. Ordinary biscuits, when layered with a rich, velvety cream, soften beautifully, absorbing the flavors and moisture to create a cake-like texture that’s impossibly tender. It’s a delightful interplay of soft and creamy, with just enough structure to hold its shape, delivering a satisfyingly smooth experience with every bite.
This recipe isn’t just about ease; it’s about pure, unadulterated pleasure. It’s a versatile canvas for your creativity, adaptable to various biscuits, creams, and toppings. Whether you’re a seasoned baker or a complete novice in the kitchen, this no-bake wonder guarantees impressive results with minimal effort, proving that the most delicious things in life can often be the simplest.
Nutritional Information
Per serving (approximate values):
- Calories: 350
- Protein: 5g
- Carbohydrates: 40g
- Fat: 20g
- Fiber: 2g
- Sodium: 200mg
Ingredients
- 200g digestive biscuits (about 20-24 biscuits)
- 250g cream cheese, softened
- 1/2 cup granulated sugar (or to taste)
- 1 teaspoon vanilla extract
- 1/4 cup milk (any type, for dipping)
- 1 cup heavy cream, cold
- 2 tablespoons powdered sugar (for whipped cream)
- Optional: 2 tablespoons cocoa powder (for chocolate variation)
- Optional: Chocolate shavings, fresh berries, or crushed biscuits for topping
Instructions
- Prepare the Biscuit Layer: Take your digestive biscuits. If using a rectangular dish, you might need to break some biscuits to fit the corners or gaps, ensuring a relatively flat layer. Set aside a few biscuits (about 3-4) to crush for a potential topping later.
- Make the Cream Cheese Filling: In a large mixing bowl, combine the softened cream cheese, granulated sugar, and vanilla extract. Beat with an electric mixer on medium speed until smooth, creamy, and no lumps remain. Scrape down the sides of the bowl as needed.
- Whip the Heavy Cream: In a separate, chilled bowl, pour the cold heavy cream. Add the powdered sugar. Beat with an electric mixer on high speed until stiff peaks form. Be careful not to overbeat, or it will turn into butter.
- Combine the Fillings: Gently fold about one-third of the whipped cream into the cream cheese mixture using a spatula. Once combined, gently fold in the remaining whipped cream until the mixture is light, airy, and uniformly combined. Do not overmix, or the cream will lose its volume. If making a chocolate variation, gently fold in the cocoa powder at this stage until just combined.
- Prepare for Layering: Pour the 1/4 cup of milk into a shallow dish or bowl. This will be used to quickly dip the biscuits.
- First Biscuit Layer: Quickly dip each digestive biscuit into the milk for just 1-2 seconds per side. Do not soak them, as they will become too mushy. Arrange a single layer of dipped biscuits at the bottom of your serving dish (an 8×8 inch square dish or a 9×5 inch loaf pan works well).
- First Cream Layer: Spread about one-third of the cream cheese mixture evenly over the first layer of biscuits.
- Repeat Layers: Create a second layer of milk-dipped biscuits over the cream. Then spread another one-third of the cream cheese mixture over this biscuit layer.
- Final Layers: Add a third and final layer of milk-dipped biscuits. Finish by spreading the remaining cream cheese mixture evenly over the top.
- Chill Thoroughly: Cover the dish loosely with plastic wrap. Transfer the dessert to the refrigerator and chill for a minimum of 4-6 hours, or preferably overnight. This crucial chilling time allows the biscuits to soften completely and absorb the flavors, creating that signature “melts in your mouth” texture.
- Garnish and Serve: Before serving, remove the dessert from the refrigerator. If desired, crush the reserved biscuits and sprinkle them over the top. You can also add chocolate shavings, fresh berries, or a dusting of cocoa powder for extra flair. Slice and serve cold.
Cooking Tips and Variations
Achieving that perfect “melts in your mouth” texture is all about balancing the creaminess with the softened biscuits. Here are some pro tips and exciting variations to make this dessert truly your own.
Tips for Best Results:
- Don’t Over-Soak the Biscuits: This is perhaps the most critical tip. A quick dip (1-2 seconds per side) is all that’s needed for the biscuits to absorb enough moisture during chilling. Over-soaked biscuits will result in a mushy, rather than tender, dessert.
- Use Cold Heavy Cream: For the best whipped cream, ensure your heavy cream is very cold. You can even chill your mixing bowl and whisk attachments for 10-15 minutes before whipping to help it reach stiff peaks faster and more effectively.
- Soften Cream Cheese Properly: Make sure your cream cheese is at room temperature. This allows it to whip up smoothly with the sugar, preventing lumps in your creamy filling.
- Gentle Folding: When combining the whipped cream with the cream cheese mixture, fold gently. This preserves the airiness of the whipped cream, contributing to the light and fluffy texture of the final dessert.
- Adequate Chilling Time is Key: Do not rush the chilling process. The 4-6 hours (or overnight) in the refrigerator is essential for the biscuits to fully soften and for the flavors to meld beautifully. This is where the magic happens!
- Even Layers: Try to spread the cream cheese mixture evenly over each biscuit layer. This ensures consistent texture and flavor throughout the dessert.
Recipe Variations:
- Biscuit Bonanza:
- Graham Crackers: A classic American choice, graham crackers offer a slightly honeyed, crumbly texture that softens beautifully.
- Ladyfingers: For an even more elegant touch, ladyfingers can be used, giving it a Tiramisu-like feel.
- Arrowroot Biscuits: These are a lighter, subtly sweet option.
- Shortbread Biscuits: If you prefer a richer, buttery undertone, shortbread biscuits work wonderfully.
- Flavorful Fillings:
- Chocolate Lover’s Dream: Stir 2-3 tablespoons of unsweetened cocoa powder into the cream cheese mixture for a rich chocolate cream. You can also add a layer of chocolate ganache or chocolate chips between layers.
- Fruity Freshness: Swirl in some fruit preserves (raspberry, strawberry, or apricot work well) into the cream cheese mixture, or layer thin slices of fresh fruit (like strawberries, bananas, or peaches) between the biscuit and cream layers.
- Coffee Kick: Dissolve 1-2 teaspoons of instant coffee or espresso powder in a tablespoon of hot water, let it cool, and then add it to the milk for dipping the biscuits, or mix it into the cream cheese filling.
- Nutty Indulgence: Fold in finely chopped nuts (pecans, walnuts, or almonds) into the cream, or sprinkle them between layers for added crunch and flavor.
- Lemon Zest: Add the zest of one lemon to the cream cheese mixture for a bright, refreshing twist. A squeeze of lemon juice can also enhance the flavor.
- Topping Temptations:
- Chocolate Shavings or Curls: A classic and elegant topping.
- Fresh Berries: Strawberries, raspberries, and blueberries add color, freshness, and a slight tartness that beautifully cuts through the creaminess.
- Crushed Biscuits/Cookies: Use some of the same biscuits you used in the dessert, or crush a few Oreos or shortbread cookies for a contrasting texture.
- Toasted Coconut Flakes: For a tropical note.
- Caramel Drizzle: A luscious addition for those with a sweet tooth.
- A Dusting of Cocoa Powder or Powdered Sugar: Simple, yet effective for presentation.
- Individual Servings: Instead of a large dish, assemble the dessert in individual glasses or ramekins for elegant single servings.
Storage and Reheating
This no-bake dessert is best enjoyed chilled and fresh, but it stores well for a few days, making it an excellent make-ahead option for gatherings or a sweet treat throughout the week.
Storage:
- In the Refrigerator: Cover the dessert tightly with plastic wrap or transfer any leftovers to an airtight container. Store in the refrigerator for up to 3-4 days. The biscuits will continue to soften over time, but the dessert will remain delicious.
- Freezing (Not Recommended): While technically possible, freezing this dessert is generally not recommended. The dairy in the cream cheese and whipped cream can separate and become grainy or watery upon thawing, affecting the smooth, creamy texture that makes this dessert so delightful. If you must freeze it, consume it directly from the freezer as a frozen treat, or be prepared for a change in texture upon thawing.
Reheating:
This is a chilled dessert and should not be reheated. It is designed to be served cold, directly from the refrigerator. Reheating would melt the delicate cream layers and ruin the texture of the softened biscuits.
For the best experience, always serve this No Bake Creamy Biscuit Dessert directly from the fridge, allowing it to sit out for just 5-10 minutes before serving if you prefer it slightly less firm, but never at room temperature for extended periods.
Frequently Asked Questions
What kind of biscuits are best for this dessert?
Digestive biscuits are a popular choice due to their neutral flavor and ability to soften beautifully. Graham crackers are another excellent option, offering a slightly sweeter, honeyed note. You can also experiment with ladyfingers, arrowroot biscuits, or even plain shortbread for different textures and flavors.
Can I make this dessert ahead of time?
Absolutely! In fact, making it ahead of time is highly recommended. The dessert requires a minimum of 4-6 hours of chilling, but it tastes even better when left to chill overnight. This extended period allows the biscuits to fully absorb moisture from the cream and for all the flavors to meld, resulting in that perfect “melts in your mouth” consistency.
Why did my cream cheese mixture turn out lumpy?
Lumpy cream cheese mixture is usually due to the cream cheese not being softened enough. Ensure your cream cheese is at room temperature before you start mixing it with the sugar. If it’s still cold, it won’t incorporate smoothly. You can gently warm it in the microwave for 10-15 seconds if you’re in a hurry, but be careful not to melt it.
How do I prevent the biscuits from becoming too soggy?
The key is a quick dip in the milk. Dip each biscuit for only 1-2 seconds per side. You just want to slightly moisten them, not saturate them. They will absorb more moisture from the cream mixture during the chilling process, so a light dip is sufficient to kickstart the softening without making them mushy.


