
Introduction
There are few desserts as universally adored as a classic cheesecake. Its rich, creamy texture and subtly sweet flavor make it the perfect ending to any meal, a comforting treat, or a showstopping centerpiece for special occasions. But let’s be honest, achieving that perfect, velvety smooth consistency at home can feel like a culinary Everest. We’ve all been there – the dreaded cracks, the dry, crumbly texture, or a cheesecake that just doesn’t quite live up to its potential. Fear not, fellow dessert enthusiasts, because today we’re unveiling the secrets to “The Creamiest Homemade Cheesecake” you will ever make. This isn’t just another recipe; it’s a guide to transforming simple ingredients into an ethereal dessert that will have everyone begging for the recipe.
What makes this particular cheesecake so special? It’s all in the details, from the careful selection of ingredients to the precise techniques that ensure every bite is pure bliss. We’ll delve into the importance of room temperature ingredients, the magic of a gentle water bath, and the art of patient cooling – all crucial steps that elevate a good cheesecake to an unforgettable one. Forget the myth that homemade cheesecake is daunting; we’re breaking down the process into easy-to-follow steps that guarantee success, even for novice bakers. Prepare to impress yourself and everyone lucky enough to share a slice of this magnificent creation.
This recipe promises a cheesecake that is dense yet incredibly tender, with a melt-in-your-mouth texture that absolutely lives up to its “creamiest” title. The subtle tang of the cream cheese perfectly balances the sweetness, creating a harmonious flavor profile that is both decadent and refreshing. Get ready to ditch the store-bought versions and embrace the satisfaction of crafting a truly magnificent dessert from your own kitchen. The aroma alone as it bakes will be enough to convince you that this is a recipe worth mastering.
Nutritional Information
Per serving (approximate values):
- Calories: 450-500
- Protein: 8-10g
- Carbohydrates: 35-40g
- Fat: 30-35g
- Fiber: 1-2g
- Sodium: 250-300mg
Ingredients
- For the Crust:
- 1 ½ cups graham cracker crumbs (about 10-12 full graham cracker sheets)
- ¼ cup granulated sugar
- 6 tablespoons unsalted butter, melted
- For the Filling:
- 3 (8-ounce) packages full-fat cream cheese, softened to room temperature
- 1 ½ cups granulated sugar
- ¼ cup all-purpose flour
- 1 teaspoon pure vanilla extract
- ¼ teaspoon salt
- 1 cup sour cream, full-fat, at room temperature
- 4 large eggs, at room temperature
- For the Water Bath:
- Boiling water
Instructions
- Prepare the Crust: Preheat your oven to 350°F (175°C). In a medium bowl, combine the graham cracker crumbs, ¼ cup granulated sugar, and melted butter. Mix until well combined and the crumbs resemble wet sand. Press the mixture evenly into the bottom of a 9-inch springform pan. You can use the back of a spoon or the bottom of a flat glass to achieve a firm, even layer. Bake for 10 minutes, then remove from the oven and let cool slightly while you prepare the filling. Reduce oven temperature to 325°F (160°C).
- Prepare the Springform Pan for Water Bath: Wrap the outside of the springform pan tightly with several layers of heavy-duty aluminum foil. Ensure there are no gaps or tears, as this will prevent water from seeping into the pan during the water bath.
- Prepare the Cream Cheese Filling: In a large mixing bowl using an electric mixer (stand mixer with paddle attachment or hand mixer), beat the softened cream cheese on medium speed until completely smooth and creamy, about 2-3 minutes. Make sure there are no lumps.
- Add Sugar and Flour: Gradually add the 1 ½ cups granulated sugar to the cream cheese, beating on low speed until just combined. Scrape down the sides of the bowl. Add the all-purpose flour and mix on low speed until fully incorporated, about 30 seconds. The flour helps prevent cracking.
- Add Flavorings and Sour Cream: Stir in the vanilla extract and salt. Add the sour cream and mix on low speed until just combined. Do not overmix at this stage.
- Incorporate Eggs: Add the eggs one at a time, mixing on low speed after each addition just until the yolk disappears into the batter. Scrape down the sides of the bowl after each egg. Overmixing the eggs can incorporate too much air, leading to cracks in the finished cheesecake. The mixture should be smooth and creamy.
- Pour and Prepare Water Bath: Pour the cheesecake filling evenly over the cooled graham cracker crust in the prepared springform pan. Gently tap the pan on the counter a few times to release any large air bubbles.
- Bake with Water Bath: Place the foil-wrapped springform pan into a larger roasting pan. Carefully pour boiling water into the roasting pan until it reaches about halfway up the sides of the springform pan.
- Bake the Cheesecake: Carefully transfer the roasting pan with the cheesecake to the preheated 325°F (160°C) oven. Bake for 60-75 minutes, or until the edges are set and slightly puffed, but the center 2-3 inches still jiggles slightly when the pan is gently shaken. It will continue to cook as it cools.
- Cool Slowly in Oven: Once baked, turn off the oven and prop the oven door open slightly with a wooden spoon. Leave the cheesecake in the water bath inside the cooling oven for 1 hour. This slow cooling process is crucial for preventing cracks.
- Cool to Room Temperature: After 1 hour, carefully remove the cheesecake from the water bath and remove the foil. Place it on a wire rack to cool completely to room temperature, which will take another 2-3 hours.
- Chill Thoroughly: Once cooled to room temperature, cover the cheesecake loosely with plastic wrap and refrigerate for at least 6-8 hours, or preferably overnight. Chilling is essential for the cheesecake to fully set and achieve its signature creamy texture.
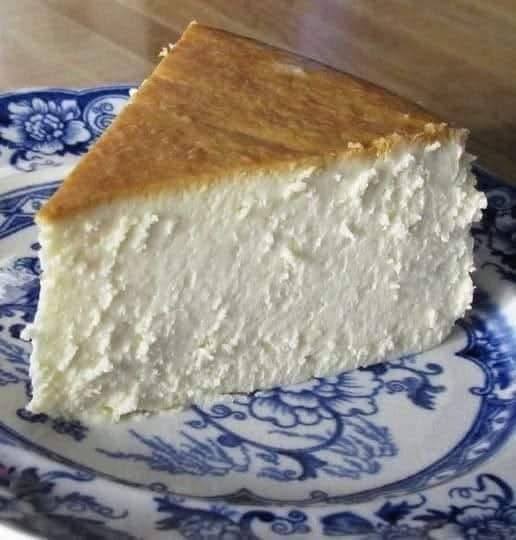
- Serve: When ready to serve, run a thin knife around the edge of the pan before releasing the springform sides. Slice and enjoy!
Cooking Tips and Variations
Achieving the perfect creamy cheesecake is all about precision and patience. Here are some essential tips and exciting variations to make your homemade cheesecake truly exceptional.
Tips for the Creamiest Cheesecake:
- Room Temperature Ingredients are Non-Negotiable: This is perhaps the most critical tip. Cold cream cheese will result in a lumpy batter, no matter how long you beat it. Cold eggs and sour cream won’t emulsify properly with the other ingredients. Plan ahead and take your cream cheese, eggs, and sour cream out of the refrigerator at least 1-2 hours before you start mixing.
- Don’t Overmix: Overmixing, especially after adding the eggs, incorporates too much air into the batter. This air puffs up during baking, then collapses as the cheesecake cools, leading to cracks. Beat on low speed and mix only until ingredients are just combined.
- The Power of the Water Bath: A water bath (bain-marie) creates a moist, even heat environment for your cheesecake, preventing the top from drying out and cracking. It also ensures the cheesecake cooks gently and evenly from the edges to the center, resulting in that perfectly smooth, creamy texture. Don’t skip it!
- Slow and Steady Cooling Wins the Race: Rapid temperature changes are the enemy of a smooth, crack-free cheesecake. Cooling the cheesecake slowly in the turned-off oven with the door ajar allows it to gradually adjust to room temperature, minimizing stress on the structure.
- Chill Thoroughly: Patience is a virtue, especially with cheesecake. A minimum of 6-8 hours, or even better, overnight chilling, allows the cheesecake to fully set, firm up, and develop its optimal flavor and texture. Don’t rush this step.
- Tap Out Air Bubbles: After pouring the batter into the crust, gently tap the pan on the counter a few times. This helps release any large air bubbles trapped in the batter, which can cause imperfections or small holes in the finished cheesecake.
- Clean Slices: For perfectly clean slices, dip your knife in hot water and wipe it clean between each cut.
Variations to Experiment With:
- Lemon Zest Infusion: For a bright, zesty flavor, add 1-2 tablespoons of finely grated lemon zest to the cream cheese mixture along with the vanilla extract.
- Chocolate Swirl: Melt 4 ounces of semi-sweet chocolate chips and let cool slightly. After pouring the main cheesecake batter into the crust, dollop spoonfuls of melted chocolate over the top. Use a knife or skewer to gently swirl the chocolate into the batter for a marbled effect.
- Berry Topping: While the cheesecake is cooling, prepare a simple berry compote. Combine 2 cups of mixed berries (fresh or frozen), ¼ cup sugar, and 1 tablespoon lemon juice in a saucepan. Simmer until the berries break down and the sauce thickens slightly. Cool completely before spooning over individual slices or the entire chilled cheesecake.
- Caramel Drizzle: A drizzle of homemade or store-bought caramel sauce adds a luxurious touch. You can also sprinkle with toasted pecans or walnuts.
- Oreo Crust: Substitute the graham cracker crumbs with 1 ½ cups crushed Oreo cookies (filling included) for a rich chocolate crust.
- Espresso Kick: Dissolve 1-2 teaspoons of instant espresso powder in 1 tablespoon of hot water, then add it to the cream cheese mixture for a subtle coffee flavor.
Storage and Reheating
Proper storage is key to maintaining the creamy texture and fresh taste of your homemade cheesecake. Reheating is generally not recommended for cheesecake, as it can alter the delicate texture.
Storage:
- Refrigeration: Leftover cheesecake should always be stored in the refrigerator. Cover the cheesecake loosely with plastic wrap or place individual slices in an airtight container. Stored this way, it will remain fresh for 3-5 days.
- Freezing Whole Cheesecake: For longer storage, cheesecake freezes beautifully. Once completely chilled and set, remove the cheesecake from the springform pan. Place it on a freezer-safe plate or cardboard round. Freeze uncovered for 1-2 hours until firm. Then, wrap the entire cheesecake tightly in several layers of plastic wrap, followed by a layer of aluminum foil. This double wrapping protects it from freezer burn.
- Freezing Slices: You can also freeze individual slices. Place slices on a baking sheet lined with parchment paper and freeze until solid. Then, wrap each slice tightly in plastic wrap and foil.
- Thawing Frozen Cheesecake: To thaw a whole frozen cheesecake, unwrap it and transfer it to the refrigerator to thaw overnight (8-12 hours). For individual slices, you can thaw them in the refrigerator for 2-4 hours, or at room temperature for about 30-60 minutes.
- Serving Frozen Cheesecake: For best results, allow frozen cheesecake to thaw completely in the refrigerator before serving.
Reheating:
- Generally Not Recommended: Reheating cheesecake, especially in an oven or microwave, is generally not recommended. The heat can cause the cream cheese to separate, making the texture rubbery or grainy, and can lead to a greasy appearance.
- Serve Chilled or Room Temperature: Cheesecake is best served chilled directly from the refrigerator. If you prefer it slightly less cold, you can let individual slices sit at room temperature for 15-20 minutes before serving, but avoid any active heating.
Frequently Asked Questions
Why did my cheesecake crack?
Cracks are a common issue, often caused by rapid temperature changes, overmixing the batter (which incorporates too much air), or overbaking. Ensure all ingredients are at room temperature, mix only until just combined (especially after adding eggs), use a water bath, and allow the cheesecake to cool very slowly in the oven with the door ajar before chilling.
Do I really need a water bath?
Yes, a water bath is highly recommended for the creamiest, crack-free cheesecake. It creates a moist, even heat environment that prevents the cheesecake from drying out and cooking too quickly around the edges while the center is still unset. This gentle cooking ensures a smooth, uniform texture.
How can I tell if my cheesecake is done?
The cheesecake is done when the edges are set and slightly puffed, but the center 2-3 inches still jiggles slightly when the pan is gently shaken. It will continue to set as it cools. If you bake it until it’s completely firm, it will likely be overbaked and dry.
Can I make this cheesecake ahead of time?
Absolutely! Cheesecake is an excellent make-ahead dessert. In fact, it tastes even better the next day after the flavors have had a chance to meld and the cheesecake has fully set. You can bake and refrigerate it up to 3-4 days in advance, or freeze it for longer storage as described in the “Storage” section.


