
Introduction
In the bustling world of culinary delights, sometimes the most profound satisfaction comes from the simplest creations. Today, we’re diving into a recipe that embodies this philosophy perfectly: “3 Apples Milk and Eggs The Easiest Cake Ever.” This isn’t just a catchy title; it’s a promise of a dessert so straightforward, so utterly delicious, and so incredibly easy to whip up, it will redefine your understanding of home baking. Imagine golden-brown apple slices nestled in a tender, custard-like cake, baked to perfection in a single pan. This cake is a testament to the magic that happens when humble ingredients are brought together with a dash of love and minimal fuss.
What makes this cake so special, beyond its undeniable ease? It’s the harmonious marriage of textures and flavors. The apples, whether crisp and tart or sweet and mellow, soften beautifully in the oven, releasing their natural sugars and creating pockets of fruity goodness. The batter, a simple concoction of milk, eggs, flour, and sugar, bakes into a light, airy, yet satisfyingly moist base that cradles the apples. It’s reminiscent of rustic European tarts or clafoutis, where the fruit is the star and the surrounding cake is merely a delicate embrace. This isn’t a cake that demands hours of intricate layering or specialized equipment; it’s a celebration of wholesome ingredients and uncomplicated joy, perfect for novice bakers and seasoned pros alike.
This “Easiest Cake Ever” is poised to become a staple in your kitchen, a go-to recipe for those moments when you crave something sweet and comforting without the culinary acrobatics. It’s the kind of cake that evokes childhood memories, fills your home with an intoxicating aroma, and brings smiles to faces with every bite. Whether you’re serving it warm from the oven with a dollop of whipped cream, a scoop of vanilla ice cream, or simply dusted with a cloud of powdered sugar, its charm is undeniable. Get ready to discover the pure, unadulterated pleasure of a cake that lives up to its name and then some.
Nutritional Information
Per serving (approximate values):
- Calories: 320 kcal
- Protein: 7g
- Carbohydrates: 45g
- Fat: 13g
- Fiber: 3g
- Sodium: 180mg
Ingredients
- 3 medium apples (Honeycrisp, Fuji, Gala, or Granny Smith work well), peeled, cored, and thinly sliced
- 1 cup (240ml) whole milk
- 2 large eggs
- 1 cup (120g) all-purpose flour
- ½ cup (100g) granulated sugar, plus 1 tablespoon for apples
- 2 tablespoons unsalted butter, melted, plus extra for greasing
- 1 teaspoon vanilla extract (optional)
- ½ teaspoon baking powder
- ¼ teaspoon salt
- ½ teaspoon ground cinnamon (optional, for apples)
- 2 tablespoons powdered sugar, for dusting
Instructions
- Preheat your oven to 375°F (190°C). Grease a 9-inch cast-iron skillet or an 8×8-inch baking pan generously with butter.
- Prepare the apples: In a medium bowl, combine the thinly sliced apples with 1 tablespoon of granulated sugar and ½ teaspoon of ground cinnamon (if using). Toss gently to coat the apples evenly.
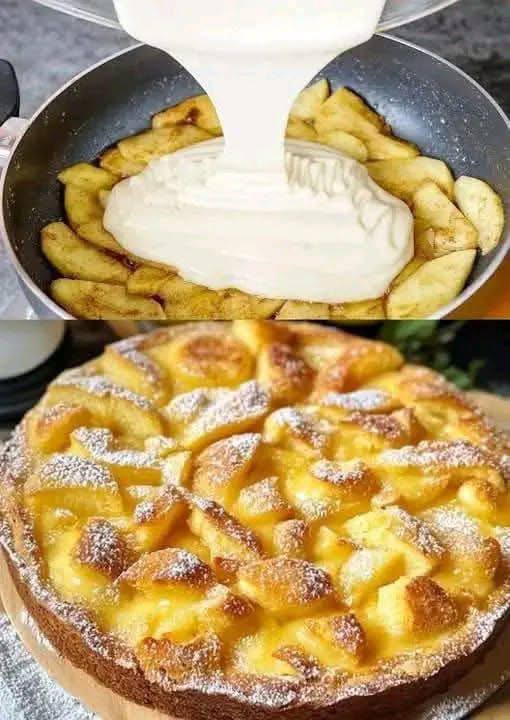
- Arrange the apples: Neatly arrange the sugared apple slices in a single layer at the bottom of the prepared skillet or baking pan. Overlap them slightly to create an appealing pattern.
- Prepare the batter: In a large mixing bowl, whisk together the all-purpose flour, the remaining ½ cup of granulated sugar, baking powder, and salt until well combined.
- In a separate medium bowl, whisk the whole milk, large eggs, and vanilla extract (if using) until the mixture is smooth and well incorporated.
- Slowly pour the wet ingredients into the dry ingredients, whisking continuously until a smooth batter forms. Be careful not to overmix; a few small lumps are acceptable.
- Pour the melted butter into the batter and whisk briefly until just combined.
- Pour the batter evenly over the arranged apple slices in the skillet or baking pan. Gently tap the pan on the counter a few times to help the batter settle and remove any large air bubbles.
- Bake the cake: Transfer the skillet or baking pan to the preheated oven. Bake for 30-35 minutes, or until the cake is golden brown on top, springs back when lightly touched, and a toothpick inserted into the center (avoiding the apples) comes out clean.
- Cool and serve: Once baked, carefully remove the cake from the oven. Let it cool in the pan on a wire rack for at least 10-15 minutes before serving. This allows the cake to set and makes it easier to handle.
- Before serving, generously dust the top of the cake with powdered sugar. Serve warm or at room temperature.
Cooking Tips and Variations
Achieving the perfect “Easiest Cake Ever” is not only about following the instructions but also understanding a few nuances that can elevate your baking experience. One crucial tip is to choose the right apples. While many varieties work, apples like Honeycrisp, Fuji, or Gala will offer a sweeter profile and a tender bite, while Granny Smith apples will provide a lovely tart contrast that cuts through the sweetness of the cake. For an even richer apple flavor, consider briefly sautéing your apple slices in a tablespoon of butter with a sprinkle of brown sugar and cinnamon for 3-5 minutes before arranging them in the pan. This step caramelizes the apples slightly and intensifies their flavor, adding another layer of deliciousness to your cake.
When it comes to mixing the batter, resist the urge to overmix. Overmixing flour develops the gluten too much, which can lead to a tough, rubbery cake. Whisk until the ingredients are just combined and the batter is mostly smooth; a few small lumps are perfectly fine and often preferred in quick breads and cakes. The melted butter should be added last, ensuring it’s not too hot, as this could inadvertently cook the eggs. Gently fold it in until just incorporated.
For variations, the possibilities are endless. To add a nutty crunch, sprinkle a handful of chopped walnuts or pecans over the apples before pouring the batter. If you’re a fan of spices, feel free to increase the amount of cinnamon or add a pinch of nutmeg or cardamom to the batter for a warmer, more intricate flavor profile. A tablespoon of lemon zest added to the batter can brighten the overall taste and complement the apples beautifully. You could also experiment with other fruits; thinly sliced pears or peaches would work wonderfully in this recipe, adjusting the baking time slightly as needed. For a dairy-free option, plant-based milks like almond or oat milk can be substituted, though the richness might vary slightly. When using alternative milks, ensure they are unsweetened to control the overall sweetness of the cake.
The pan you choose also makes a difference. A cast-iron skillet not only bakes beautifully, providing a lovely crust, but it also makes for a charming presentation. If you don’t have one, an 8×8-inch or 9-inch round baking pan will work just as well. Just be sure to grease it thoroughly to prevent sticking. If using a larger pan, the cake will be thinner and might bake a bit faster, so keep an eye on it. Conversely, a smaller pan will result in a thicker cake, possibly requiring a few extra minutes in the oven. Always test for doneness by inserting a toothpick into the center; it should come out clean, indicating the cake is fully baked and set. Allowing the cake to cool slightly in the pan before serving is also key; this helps it firm up and makes for cleaner slices, ensuring your “Easiest Cake Ever” looks as good as it tastes.
Storage and Reheating
Proper storage is essential to maintain the freshness and deliciousness of your “Easiest Cake Ever.” Once the cake has cooled completely to room temperature, cover it tightly with plastic wrap or aluminum foil, or store it in an airtight container. This helps prevent the cake from drying out and absorbing odors from other foods in the refrigerator. The cake will stay fresh at room temperature for up to 2 days, especially if your kitchen is cool. For longer storage, it’s best to refrigerate it. When refrigerated, the cake will maintain its quality for up to 4-5 days. While the texture might become slightly denser when chilled, the flavors will still be delightful.
For reheating, there are a few simple methods to bring your cake back to its warm, comforting best. If you’re reheating individual slices, the microwave is your quickest option. Place a slice on a microwave-safe plate and heat for 15-30 seconds, or until just warmed through. Be careful not to overheat, as this can make the cake rubbery. The goal is to gently warm it, not cook it further. Another excellent method for reheating, especially if you have a larger piece or the whole cake, is the oven. Preheat your oven to 300°F (150°C). Place the cake on a baking sheet, loosely covered with aluminum foil to prevent the top from browning too much. Heat for 10-15 minutes, or until warmed through. This method helps to crisp up the edges slightly and restore some of the cake’s original texture, making it almost as good as freshly baked. You can also use a toaster oven for individual slices, heating them for a few minutes until warm. Regardless of the method, freshly warmed cake with a scoop of ice cream or a dollop of whipped cream is always a treat, making leftovers just as enjoyable as the first slice.
Frequently Asked Questions
Can I use frozen apples for this recipe?
While fresh apples are highly recommended for the best texture and flavor, you can use frozen apple slices if necessary. If using frozen apples, thaw them completely and drain any excess liquid before tossing with sugar and cinnamon. This step is crucial to prevent the cake from becoming too watery. Be aware that the texture of frozen apples might be slightly softer once baked compared to fresh ones.
What kind of pan is best for this cake?
A 9-inch cast-iron skillet is ideal for this recipe as it provides excellent heat distribution and a beautiful rustic presentation. However, an 8×8-inch square baking pan or a 9-inch round cake pan will work perfectly well. Ensure you grease the pan generously with butter, regardless of the type, to prevent sticking and ensure easy removal of the cake.
Can I make this cake ahead of time?
Yes, this cake is a great make-ahead dessert. It can be baked a day in advance and stored at room temperature, covered tightly. For longer storage, refrigerate it for up to 4-5 days. While it’s delicious warm, it’s also very good served at room temperature, making it convenient for potlucks or gatherings. You can always warm individual slices before serving for that freshly baked experience.
How do I know when the cake is fully baked?
The cake is fully baked when the top is golden brown, the edges are set, and the center springs back when lightly touched. You can also insert a clean toothpick into the center of the cake (making sure to avoid hitting an apple slice). If the toothpick comes out clean or with only a few moist crumbs attached, the cake is done. If it comes out with wet batter, continue baking for a few more minutes and test again.


