
Introduction
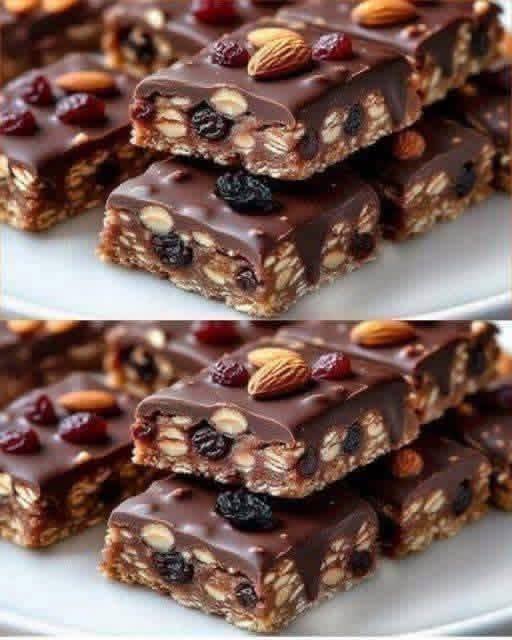
Craving something sweet, satisfying, and ridiculously easy to make? Look no further than these incredible No-Bake Chocolate Nut & Fruit Bars! Imagine a chewy, wholesome base packed with oats, crunchy nuts, and sweet dried fruits, all crowned with a luscious layer of rich, dark chocolate. These bars are not just a treat for your taste buds; they’re a godsend for busy schedules, hot days when turning on the oven is a non-starter, or anytime you need a quick, energy-boosting snack. They strike the perfect balance between indulgence and natural goodness, making them an ideal pick-me-up or a delightful dessert.
What sets these no-bake wonders apart is their sheer simplicity and adaptability. The “no-bake” aspect means less fuss and more time enjoying your creation. They’re incredibly customizable, allowing you to tailor them to your personal preferences or whatever ingredients you have on hand. Whether you’re a fan of specific nuts, love a certain dried fruit, or prefer dark chocolate over milk, these bars are your canvas. They’re also a fantastic way to sneak in some wholesome ingredients like oats, healthy fats from nuts, and natural sweetness from dried fruits, making them a slightly more virtuous option than many store-bought snacks.
These bars are destined to become a staple in your kitchen. They’re perfect for meal prepping healthy snacks for the week, a thoughtful edible gift, or simply a delicious treat to share (or not share!) with loved ones. Their robust texture, with the satisfying chew of the base and the smooth, snappy chocolate topping, offers a delightful contrast in every bite. So, get ready to ditch the oven, gather your ingredients, and prepare to fall in love with your new favorite easy-to-make dessert. Let’s dive into creating these irresistible No-Bake Chocolate Nut & Fruit Bars!
Nutritional Information
Per serving (approximate values):
- Calories: 280
- Protein: 7g
- Carbohydrates: 30g
- Fat: 16g
- Fiber: 4g
- Sodium: 50mg
Ingredients
- 1 ½ cups rolled oats (old-fashioned, not instant)
- ½ cup chopped peanuts
- ½ cup chopped almonds
- ¼ cup raisins
- ¼ cup dried cranberries
- ½ cup creamy peanut butter (or other nut butter)
- ⅓ cup honey or maple syrup
- 1 teaspoon vanilla extract
- ¼ teaspoon salt
- 1 cup dark chocolate chips (or chopped dark chocolate)
- 1 tablespoon coconut oil (optional, for chocolate topping)
- 2 tablespoons mixed chopped nuts and dried fruit (for garnish)
Instructions
- Line an 8×8 inch baking pan with parchment paper, leaving an overhang on the sides to easily lift the bars out later.
- In a large mixing bowl, combine the rolled oats, chopped peanuts, chopped almonds, raisins, and dried cranberries. Stir well to ensure all ingredients are evenly distributed.
- In a microwave-safe bowl, combine the peanut butter, honey (or maple syrup), vanilla extract, and salt. Microwave on high for 30-60 seconds, or until the mixture is warm and runny, stirring halfway through. Alternatively, heat gently in a small saucepan over low heat until smooth and warm.
- Pour the warm peanut butter mixture over the dry oat and nut mixture in the large bowl. Stir vigorously with a sturdy spoon or spatula until all the dry ingredients are thoroughly coated and a thick, cohesive mixture forms.
- Transfer the oat mixture into the prepared 8×8 inch pan. Using the back of a spoon, a spatula, or your hands (lightly dampened to prevent sticking), press the mixture down very firmly and evenly into the pan. The firmer you press, the less likely the bars are to crumble when cut. Ensure the surface is as flat and compact as possible.
- Place the pan in the refrigerator while you prepare the chocolate topping.
- In a clean, microwave-safe bowl, combine the dark chocolate chips and coconut oil (if using). Microwave on high in 30-second intervals, stirring well after each interval, until the chocolate is completely melted and smooth. Alternatively, melt the chocolate in a double boiler over simmering water, stirring until smooth. The coconut oil helps create a smoother, more pourable topping and a nicer “snap” when the chocolate sets.
- Remove the pan with the pressed base from the refrigerator. Pour the melted chocolate evenly over the top of the oat and nut base. Use a spatula to spread the chocolate right to the edges, creating a smooth, uniform layer.
- Immediately sprinkle the reserved 2 tablespoons of mixed chopped nuts and dried fruit over the melted chocolate topping. This step is optional but adds visual appeal and extra texture.
- Return the pan to the refrigerator and chill for at least 2-3 hours, or until the chocolate topping is completely firm and set. This is crucial for clean slicing.
- Once thoroughly chilled and firm, use the parchment paper overhangs to carefully lift the entire slab out of the pan and onto a cutting board.
- Using a large, sharp knife, cut the slab into 12-16 bars. For cleaner cuts, you can run your knife under hot water and wipe it dry between each cut.
- Serve immediately or store for later enjoyment.
Cooking Tips and Variations
To achieve the perfect No-Bake Chocolate Nut & Fruit Bars, attention to a few key details can make all the difference. Firstly, when pressing the base into the pan, be sure to press it down as firmly and evenly as possible. This is the secret to bars that hold together beautifully and don’t crumble when you cut or eat them. A handy trick is to use the bottom of a flat-sided glass or a clean, heavy measuring cup to really compact the mixture. Don’t be shy with the pressure! Another important aspect is the quality of your ingredients. Using fresh, good-quality nuts and dried fruits will elevate the flavor profile significantly. For the chocolate topping, avoid overheating the chocolate when melting, as this can cause it to seize and become grainy. Melting in short bursts in the microwave or using a double boiler over gentle heat will ensure a silky-smooth consistency. Adding a touch of coconut oil to your chocolate not only helps with its melt and spread but also contributes to a lovely shine and a satisfying snap when the bars are set.
The beauty of these bars lies in their incredible versatility. You can easily swap out ingredients to suit your taste, dietary needs, or what you have available in your pantry. For the nuts, feel free to experiment with walnuts, pecans, cashews, or even sunflower seeds for a nut-free option (though check for cross-contamination if allergies are severe). The dried fruit selection is equally flexible; try chopped dried apricots, dates, figs, blueberries, or even candied ginger for a spicy kick. If you’re not a fan of honey or maple syrup, brown rice syrup or agave nectar can be used as alternative binding agents. For the nut butter, almond butter, cashew butter, or sunflower seed butter are all excellent substitutes for peanut butter, each offering a slightly different flavor profile. You can also play with the chocolate; milk chocolate chips will give a sweeter, creamier topping, while white chocolate or even a marbled swirl of different chocolates can create a stunning visual effect. For a truly decadent twist, sprinkle a pinch of flaky sea salt over the chocolate topping just after spreading it – the salt enhances the chocolate flavor beautifully.
Dietary adaptations are simple with this recipe. To make these bars gluten-free, ensure you use certified gluten-free rolled oats. For a vegan version, opt for maple syrup (or agave/brown rice syrup) instead of honey, use a plant-based nut butter, and choose a dairy-free or vegan chocolate. Many dark chocolate brands are naturally vegan, but always check the label. To boost the flavor even further, consider adding some citrus zest, like orange or lemon, to the base mixture for a bright counterpoint to the rich chocolate and nuts. A dash of cinnamon, nutmeg, or cardamom can also introduce a warm, spiced aroma. Remember to chill the bars thoroughly before cutting them; this is key to achieving clean, neat slices. A warm knife wiped clean between cuts can also help. These variations ensure that you can make these No-Bake Chocolate Nut & Fruit Bars a truly personal and delightful treat every time.
Storage and Reheating
Storing your No-Bake Chocolate Nut & Fruit Bars properly is essential to maintain their freshness, texture, and delicious flavor. Once cut, the bars should be stored in an airtight container. This prevents them from drying out and absorbing odors from other items in your refrigerator. Place a layer of parchment paper or wax paper between layers of bars if stacking them to prevent sticking. These bars are best kept in the refrigerator, where the chocolate topping will remain firm and the base will stay chewy. Stored this way, they will last for up to 1-2 weeks. While they don’t require reheating, some people prefer to let them sit at room temperature for 5-10 minutes before eating, especially if they prefer a slightly softer chocolate and a less firm base. This allows the flavors to meld and the texture to soften just a touch, enhancing the eating experience. However, they are perfectly delicious straight from the fridge as well.
For longer-term storage, these bars freeze exceptionally well. To freeze, arrange the cut bars in a single layer on a baking sheet and place them in the freezer for about an hour, or until they are solid. This flash-freezing step prevents them from sticking together. Once frozen solid, transfer the bars to an airtight freezer-safe container or a heavy-duty freezer bag, again using parchment paper between layers if stacking. Label the container with the date. Frozen bars can be stored for up to 2-3 months. When you’re ready to enjoy them, simply remove the desired number of bars from the freezer and let them thaw in the refrigerator for a few hours, or at room temperature for about 30-60 minutes. Do not attempt to microwave them to thaw, as this can melt the chocolate and alter the texture of the base. Freezing is a fantastic way to prepare a large batch and have a convenient, wholesome snack or dessert ready whenever a craving strikes.
Frequently Asked Questions
Why are my no-bake bars crumbling?
The most common reason for crumbling no-bake bars is not pressing the base mixture firmly enough into the pan. It’s crucial to compact the mixture very tightly and evenly. Use the back of a sturdy spoon, a spatula, or even the bottom of a flat-sided glass to apply significant pressure. This step creates a dense base that holds together when cut and eaten. Also, ensuring the binding agents (peanut butter and honey/syrup) are warm and well-mixed with the dry ingredients helps create a cohesive mixture.
Can I make these bars vegan?
Absolutely! To make these bars vegan, you’ll need to make a few simple substitutions. First, swap the honey for an equal amount of maple syrup, agave nectar, or brown rice syrup. Second, ensure you are using a plant-based nut butter (most peanut butters are vegan, but always check the label for added dairy). Lastly, choose a dairy-free or vegan chocolate for the topping. Many dark chocolate chips are naturally vegan, but check the ingredient list to confirm.
How long do these bars need to chill before cutting?
For the best results and clean, neat cuts, these bars should be chilled in the refrigerator for a minimum of 2-3 hours. This allows both the base to firm up completely and the chocolate topping to set hard. If you try to cut them before they are fully chilled, the chocolate layer might crack unevenly, or the base might be too soft and crumble. For even firmer bars, you can chill them overnight.
What if I don’t have coconut oil for the chocolate topping?
While coconut oil helps create a smoother, shinier chocolate topping with a nice “snap,” it’s not strictly essential. You can omit it if you don’t have any. The chocolate will still melt and set, but it might be slightly thicker and less glossy. Alternatively, you can use a tiny amount of neutral-flavored vegetable oil (like canola or grapeseed) or even a small pat of unsalted butter (if not making vegan bars) to achieve a similar effect in terms of smoothness.


