
Introduction
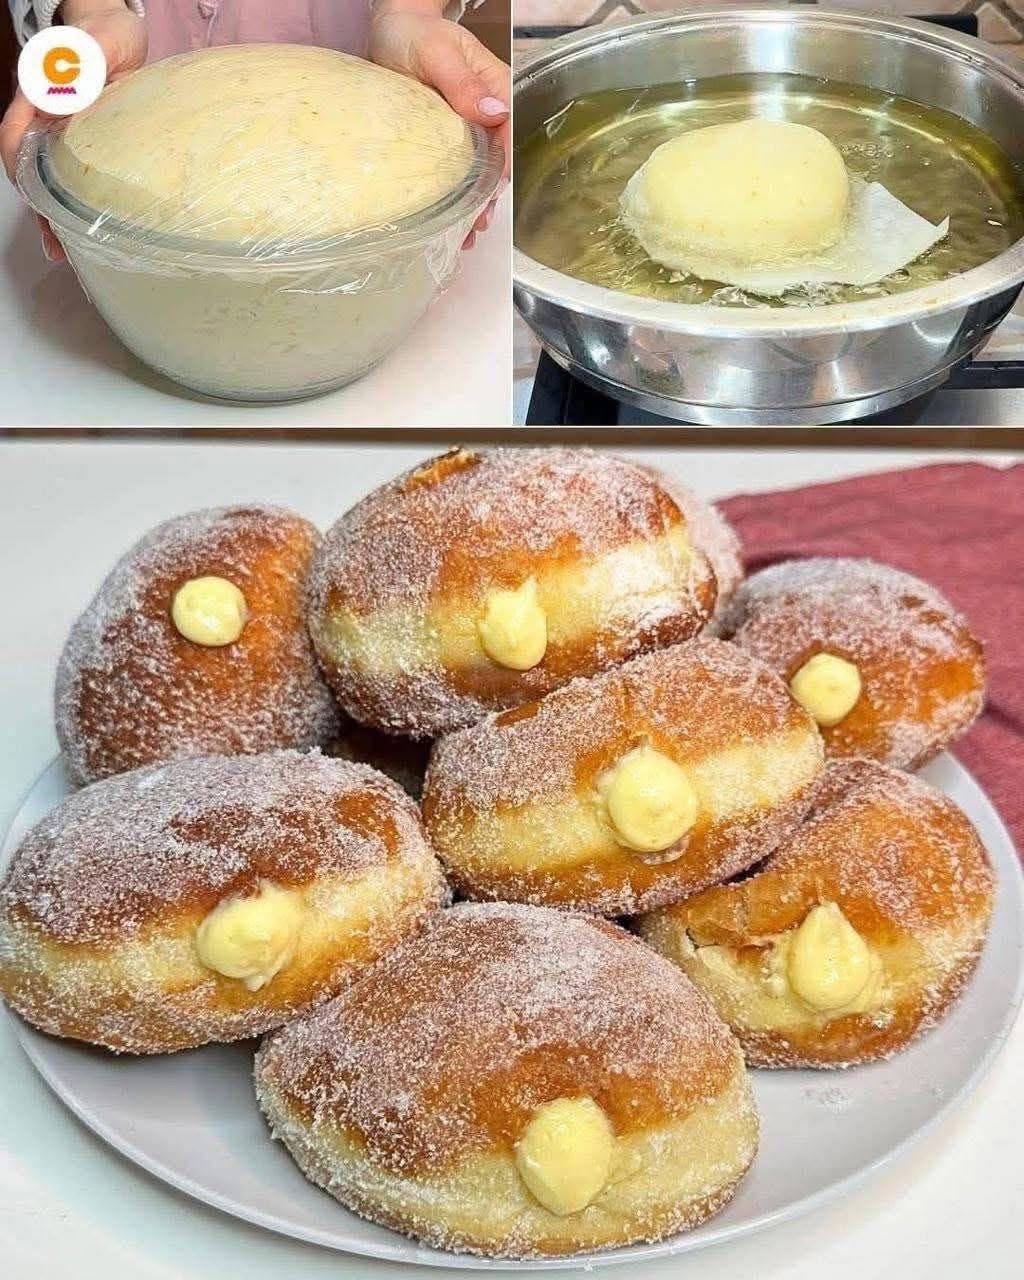
Prepare to fall head over heels for a dessert that’s truly explosive in flavor and texture: Creamy Fried Bombs! Imagine a golden-fried, sugar-dusted pillow of fluffy dough, yielding to the slightest touch, only to reveal a luscious, velvety cream filling that bursts forth with every bite. These aren’t just doughnuts; they’re an experience, a symphony of sweet indulgence that transports you straight to dessert heaven. Whether you know them as bomboloni, Berliner Pfannkuchen, or simply irresistible cream-filled delights, these homemade treats are guaranteed to become a new favorite in your repertoire.
What makes these “bombs” so utterly captivating? It starts with the dough – a perfectly proofed, yeast-leavened creation that fries up to a beautiful golden hue, light as air on the inside, with just a hint of chew. Then comes the magic of the filling: a rich, smooth, and aromatic custard, often infused with vanilla or a touch of citrus, that provides a delightful counterpoint to the fried exterior. Rolled in granulated sugar while still warm, they offer a satisfying crunch before melting away in your mouth. This recipe is designed to help you master the art of creating these delectable pastries in your own kitchen, transforming simple ingredients into something truly extraordinary.
While the idea of deep-frying might seem daunting to some, fear not! With a few key tips and careful attention to detail, you’ll be producing bakery-quality Creamy Fried Bombs that are far superior to anything you can buy. The satisfaction of biting into a warm, freshly fried, and generously filled doughnut that you made yourself is unparalleled. So, gather your ingredients, clear your schedule for a delightful baking adventure, and get ready to impress your taste buds and loved ones with these utterly irresistible, creamy, fried delights!
Nutritional Information
Per serving (approximate values):
- Calories: 380
- Protein: 7g
- Carbohydrates: 50g
- Fat: 17g
- Fiber: 1g
- Sodium: 200mg
Ingredients
For the Dough:
- 1 cup (240ml) warm milk (105-115°F / 40-46°C)
- 2 ¼ teaspoons (1 standard packet) active dry yeast
- ¼ cup (50g) granulated sugar, plus 1 teaspoon for yeast
- 1 large egg, at room temperature
- 1 large egg yolk, at room temperature
- 4 tablespoons (56g) unsalted butter, melted and cooled slightly
- 3 ½ cups (420g) all-purpose flour, plus more for dusting
- ¾ teaspoon salt
For the Creamy Vanilla Filling:
- 2 cups (480ml) whole milk
- ½ cup (100g) granulated sugar
- ¼ cup (30g) cornstarch
- 3 large egg yolks
- 2 tablespoons (28g) unsalted butter, softened
- 1 teaspoon pure vanilla extract
- Pinch of salt
For Frying and Coating:
- 6-8 cups vegetable oil, canola oil, or other neutral oil, for deep frying
- 1 cup (200g) granulated sugar, for rolling
Instructions
- Prepare the Dough: In a large bowl or the bowl of a stand mixer, combine the warm milk and 1 teaspoon of granulated sugar. Sprinkle the active dry yeast over the top and let it sit for 5-10 minutes until foamy, indicating the yeast is active.
- Add the remaining ¼ cup granulated sugar, the egg, egg yolk, and melted butter to the yeast mixture. Whisk until well combined.
- In a separate bowl, whisk together the flour and salt. Gradually add the dry ingredients to the wet ingredients, mixing with a wooden spoon or the dough hook of your stand mixer on low speed until a shaggy dough forms.
- Increase the speed to medium-low and knead for 8-10 minutes (or by hand on a lightly floured surface for 10-15 minutes) until the dough is smooth, elastic, and pulls away from the sides of the bowl. It should be slightly sticky but manageable.
- Lightly grease a large bowl with oil. Transfer the dough to the bowl, turning it once to coat. Cover the bowl tightly with plastic wrap or a clean kitchen towel.
- First Proofing: Let the dough rise in a warm, draft-free place for 1 ½ to 2 hours, or until it has doubled in size. This can take longer in cooler environments.
- Prepare the Creamy Vanilla Filling: While the dough is proofing, prepare the filling. In a medium saucepan, heat 1 ½ cups of the milk over medium heat until it just begins to simmer around the edges. Do not boil.
- In a separate medium bowl, whisk together the remaining ½ cup milk, granulated sugar, cornstarch, egg yolks, and pinch of salt until smooth and no lumps remain.
- Gradually temper the hot milk into the egg yolk mixture: slowly pour about half of the hot milk into the egg mixture while continuously whisking to prevent the eggs from scrambling.
- Pour the tempered egg mixture back into the saucepan with the remaining hot milk. Return the saucepan to medium heat and cook, whisking constantly, until the mixture thickens considerably and comes to a gentle boil. Continue to cook for another minute, whisking, to ensure the cornstarch is fully cooked.
- Remove the saucepan from the heat. Stir in the softened butter and vanilla extract until fully incorporated and smooth.
- Pour the custard into a clean bowl. Press a piece of plastic wrap directly onto the surface of the custard to prevent a skin from forming. Refrigerate for at least 2-3 hours, or until completely chilled and firm.
- Shape the Dough: Once the dough has doubled, gently punch it down to release the air. Turn the dough out onto a lightly floured surface.
- Roll the dough out to about ½-inch thick. Using a 3-inch round cutter (or a glass rim), cut out circles of dough. Reroll the scraps gently and cut out more circles until all dough is used.
- Place the cut dough circles on individual squares of parchment paper (about 3×3 inches). This makes transferring them to the hot oil much easier.
- Second Proofing: Arrange the dough circles on a baking sheet, leaving some space between them. Cover loosely with plastic wrap or a clean kitchen towel. Let them rise in a warm place for another 30-45 minutes, or until visibly puffy and almost doubled in size again.
- Fry the Bombs: In a large, heavy-bottomed pot or Dutch oven, pour enough neutral oil to reach a depth of about 3 inches. Heat the oil over medium heat until it reaches 350-375°F (175-190°C). A thermometer is highly recommended for accurate temperature control.
- Once the oil is at temperature, carefully lift a proofed dough circle using the parchment paper square, and gently lower it into the hot oil. The parchment paper will detach. Fry 2-3 bombs at a time, depending on the size of your pot, without overcrowding.
- Fry for 2-3 minutes per side, or until deeply golden brown and cooked through. Use a slotted spoon or spider to flip them.
- Once fried, remove the bombs from the oil and transfer them to a plate lined with paper towels to drain excess oil.
- While still warm (but not hot to handle), roll each fried bomb generously in the granulated sugar. Place them on a wire rack to cool completely.
- Fill the Bombs: Once the fried bombs are completely cooled and the custard filling is thoroughly chilled, transfer the custard to a piping bag fitted with a long, thin piping tip (a Bismark tip is ideal).
- Carefully insert the piping tip into the side of each fried bomb. Gently squeeze the piping bag to inject the creamy filling until the bomb feels plump and heavy, and a small amount of filling just begins to peek out. Repeat with all the bombs.
- Serve immediately and enjoy your homemade Creamy Fried Bombs!
Cooking Tips and Variations
Dough Consistency is Key: The dough should be soft, pliable, and slightly sticky after kneading, but not wet. If it’s too sticky, add a little more flour, one tablespoon at a time. If it’s too dry, add a teaspoon of milk. A well-kneaded dough will result in light and airy bombs.
Proofing Perfection: Don’t rush the proofing process. The first rise develops flavor, and the second rise creates the airy texture. If your kitchen is cool, you can proof dough in a slightly warmed (but turned off) oven, or near a sunny window.
Oil Temperature Control: This is arguably the most crucial step for perfect fried bombs. Too low, and they’ll absorb too much oil and be greasy. Too high, and they’ll brown too quickly on the outside and be raw in the middle. Invest in a good deep-fry thermometer. Aim for a consistent 350-375°F (175-190°C).
Don’t Overcrowd the Pot: Frying too many bombs at once will drop the oil temperature significantly, leading to greasy results. Fry in small batches.
Cooling the Custard: Ensure the custard is completely cold before filling. Warm custard will make the doughnuts soggy and can thin out, leading to less stable filling.
Filling Variations:
- Chocolate Cream: Whisk 2-3 tablespoons of cocoa powder into the cornstarch mixture for the filling, or melt in 2 ounces of chopped dark chocolate after the custard is cooked.
- Lemon Curd: Replace the vanilla extract with 1-2 tablespoons of fresh lemon juice and 1 teaspoon of lemon zest for a tangy alternative.
- Nutella: Simply warm Nutella slightly until pipeable, or whisk it into a portion of the cooled vanilla custard for a chocolate-hazelnut twist.
- Raspberry Jam: For a simpler, fruitier filling, use a high-quality seedless raspberry jam, warmed slightly to make it easier to pipe.
Coating Variations:
- Cinnamon Sugar: Mix ½ cup granulated sugar with 1 teaspoon ground cinnamon.
- Powdered Sugar: For a less sweet coating, simply dust generously with powdered sugar after cooling.
- Glaze: Mix 1 cup powdered sugar with 2-3 tablespoons milk or lemon juice for a simple drizzle.
Make Ahead Tips: The dough can be prepared the night before and allowed to do its first proofing in the refrigerator overnight. Punch it down in the morning, let it come to room temperature for 30 minutes, then proceed with shaping and the second proof. The custard can also be made a day in advance and chilled.
Storage and Reheating
Creamy Fried Bombs are truly at their best when enjoyed fresh, ideally on the same day they are made. The delicate balance of fluffy dough and creamy filling is most exquisite when just prepared.
Storage: If you have any leftovers, store them in an airtight container at room temperature for up to 1 day, or in the refrigerator for up to 2-3 days. Be aware that the dough will start to dry out and the sugar coating may dissolve over time, especially in humid conditions or in the refrigerator. The quality will diminish significantly after the first day, particularly if stored in the fridge, as the dough tends to firm up and the filling can become less vibrant.
Reheating: Reheating fried bombs is generally not recommended, especially if they are filled with fresh custard, as the texture of the dough can become tough or soggy, and the filling may separate or become watery. If you must reheat, a very brief (10-15 second) zap in the microwave might slightly soften the dough, but it will not restore the fresh-from-the-fryer crispness or fluffiness. It’s best to enjoy them as is, or consider making smaller batches if you anticipate having many leftovers.
Frequently Asked Questions
What’s the difference between a doughnut and a bomboloni?
While often used interchangeably, bomboloni are typically a type of Italian doughnut that are traditionally filled (often with pastry cream or jam) and don’t have a hole in the middle, unlike many American doughnuts. They are known for their light, airy dough and generous filling, much like these Creamy Fried Bombs.
Can I make these without a stand mixer?
Absolutely! You can mix and knead the dough by hand. It will require a bit more arm work, typically 10-15 minutes of kneading on a lightly floured surface, until the dough is smooth and elastic. The process is the same, just adjust for manual labor.
My dough isn’t rising, what went wrong?
The most common reasons for dough not rising are inactive yeast (check the expiration date and ensure your milk isn’t too hot or cold for activation) or a cold environment. Ensure your milk is between 105-115°F (40-46°C) for yeast activation, and place the dough in a warm, draft-free spot for proofing. Patience is also key; sometimes dough just needs more time.
How do I know if the oil is at the right temperature without a thermometer?
While a thermometer is highly recommended for best results, you can test the oil by dropping a small piece of dough into it. If it immediately sizzles and floats to the top, the oil is ready. If it browns too quickly, the oil is too hot; if it just sits there or browns very slowly, it’s not hot enough. Adjust the heat accordingly and test again.
Can I use a different type of flour?
This recipe is developed for all-purpose flour, which provides a good balance of structure and tenderness. Using bread flour might result in a chewier dough, while cake flour could make it too delicate. For best results, stick with all-purpose flour unless you are an experienced baker and understand the necessary adjustments.


