
Introduction
Imagine waking up to the irresistible aroma of freshly baked pastries, a sweet and tangy treat ready to greet your morning without any frantic rush. That dream becomes a delicious reality with these Overnight Strawberry Cream Cheese Rolls! This isn’t just any breakfast; it’s a culinary hug in a pan, designed to bring joy and ease to your busiest mornings or make a leisurely weekend brunch feel effortlessly gourmet. These rolls combine the best of a fluffy, tender yeast dough with a vibrant, sweet strawberry filling and a rich, tangy cream cheese swirl, all magically prepared the night before.
What makes these rolls truly special is their ingenious make-ahead design. The dough, bursting with flavor from its overnight proof, develops an incredible depth and softness that’s simply unparalleled. Paired with the juicy, slightly cooked-down strawberries that burst with summery sweetness and the creamy, decadent cream cheese filling that adds a perfect counterpoint of tang, each bite is a symphony of textures and tastes. These rolls are more than just a breakfast item; they’re a celebration, perfect for holiday mornings, special family gatherings, or simply treating yourself to something extraordinary.
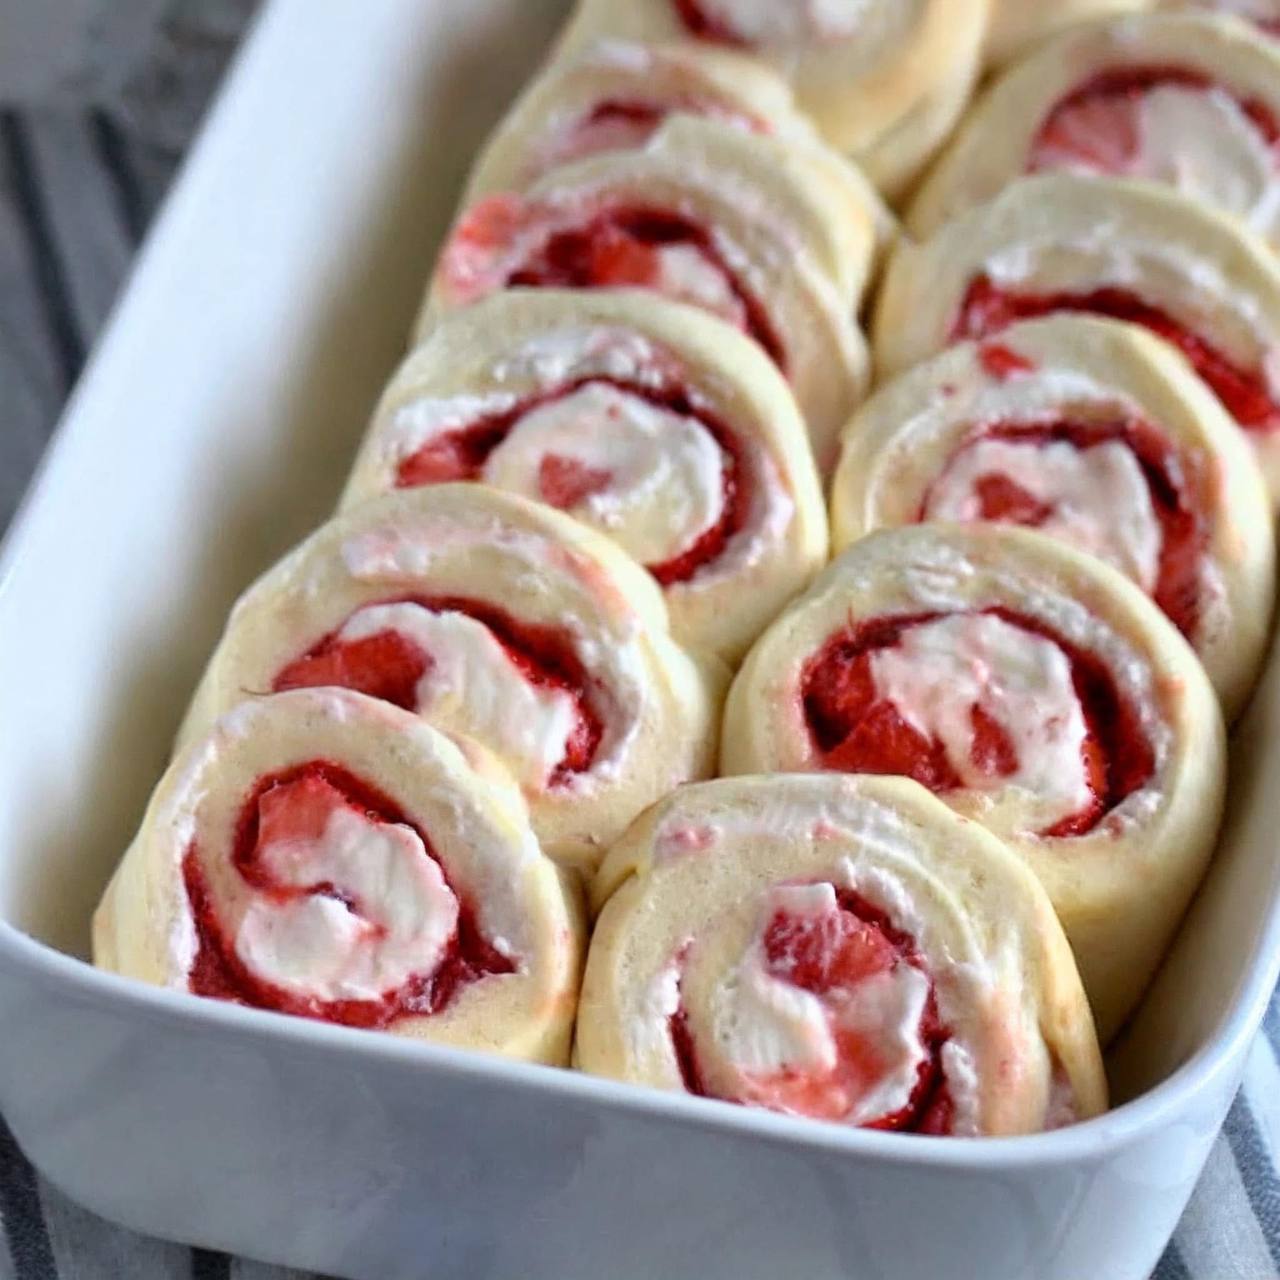
Forget the stress of early morning baking. With a little prep the evening before, you can wake up, pop these beauties into the oven, and emerge a kitchen hero. The visual appeal alone is enough to impress – neat spirals showcasing the vibrant red of the strawberries and the creamy white of the cheese, all nestled in a golden-brown embrace. Get ready to transform your mornings and delight your taste buds with this simple yet elegant recipe that promises sweet satisfaction with minimal morning effort!
Nutritional Information
Per serving (approximate values):
- Calories: 380
- Protein: 7g
- Carbohydrates: 55g
- Fat: 15g
- Fiber: 2g
- Sodium: 280mg
Ingredients
- For the Dough:
- 1 cup (240ml) whole milk, warmed to 105-115°F (40-46°C)
- 2 ¼ teaspoons (1 standard packet) active dry yeast
- ¼ cup (50g) granulated sugar
- 1 large egg, at room temperature
- ½ teaspoon salt
- ¼ cup (56g) unsalted butter, melted and cooled slightly
- 3 ½ cups (420g) all-purpose flour, plus more for dusting
- For the Strawberry Filling:
- 2 cups (about 300g) fresh or frozen strawberries, hulled and finely diced
- ½ cup (100g) granulated sugar
- 2 tablespoons cornstarch
- 1 tablespoon lemon juice (optional, for brightness)
- For the Cream Cheese Filling:
- 8 ounces (226g) cream cheese, softened
- ½ cup (60g) powdered sugar
- 1 teaspoon vanilla extract
- For the Glaze (Optional):
- 1 cup (120g) powdered sugar
- 2-3 tablespoons milk or cream
- ½ teaspoon vanilla extract
Instructions
- Prepare the Dough: In the bowl of a stand mixer fitted with a dough hook, or a large mixing bowl, combine the warm milk and yeast. Let sit for 5-10 minutes until foamy.
- Add the ¼ cup granulated sugar, egg, salt, and melted butter to the yeast mixture. Mix until well combined.
- Gradually add the flour, about a cup at a time, mixing on low speed until a shaggy dough forms. Increase speed to medium-low and knead for 5-7 minutes, or until the dough is smooth, elastic, and pulls away from the sides of the bowl. If kneading by hand, knead on a lightly floured surface for 8-10 minutes.
- Lightly grease a large bowl with cooking spray or oil. Place the dough in the bowl, turning once to coat. Cover the bowl tightly with plastic wrap and refrigerate for at least 8 hours or up to 24 hours. The dough will slowly rise in the refrigerator.
- Prepare the Strawberry Filling: In a medium saucepan, combine the diced strawberries, ½ cup granulated sugar, and cornstarch. If using lemon juice, add it now. Cook over medium heat, stirring frequently, for 5-7 minutes, or until the mixture thickens and the strawberries have softened slightly. Remove from heat and let cool completely.
- Prepare the Cream Cheese Filling: In a medium bowl, beat the softened cream cheese, powdered sugar, and vanilla extract with an electric mixer until smooth and creamy. Set aside.
- Assemble the Rolls: Lightly flour a clean work surface. Remove the dough from the refrigerator and punch it down gently. Roll the dough into a large rectangle, approximately 12×18 inches (30×45 cm) and about ¼ inch (0.6 cm) thick.
- Evenly spread the cream cheese filling over the entire surface of the dough, leaving a ½ inch (1.2 cm) border along one of the long edges.
- Carefully spread the cooled strawberry filling over the cream cheese layer, again leaving the same ½ inch border.
- Starting from the long edge opposite the border, tightly roll the dough into a log. Pinch the seam gently to seal.
- Using a sharp knife or unflavored dental floss, cut the log into 12 even slices, approximately 1 ½ inches (3.8 cm) thick.
- Lightly grease a 9×13 inch (23×33 cm) baking dish. Arrange the sliced rolls in the prepared dish, leaving a little space between them.
- The Overnight Rest: Cover the baking dish tightly with plastic wrap or aluminum foil. Refrigerate overnight for 8-12 hours.
- Morning Bake & Finish: The next morning, remove the rolls from the refrigerator and let them sit at room temperature for 30-60 minutes while your oven preheats. This allows them to warm up slightly and finish their final proof.
- Preheat your oven to 375°F (190°C).
- Bake the rolls for 25-30 minutes, or until golden brown and puffed. The internal temperature should reach 200-205°F (93-96°C).
- While the rolls are baking, prepare the optional glaze: In a small bowl, whisk together the powdered sugar, milk or cream, and vanilla extract until smooth. Adjust consistency by adding more sugar for a thicker glaze or more liquid for a thinner one.
- Once the rolls are out of the oven, let them cool in the pan for 5-10 minutes. Drizzle generously with the prepared glaze, if using.
- Serve warm and enjoy!
Cooking Tips and Variations
For the fluffiest, most tender rolls, ensuring your yeast is active is paramount. Always use milk that is warm to the touch, but not hot – between 105-115°F (40-46°C) is ideal. Water that is too hot will kill the yeast, and water that is too cold won’t activate it. You’ll know your yeast is happy when it becomes bubbly and foamy after sitting in the warm milk for a few minutes. When kneading the dough, don’t be tempted to add too much extra flour. A slightly sticky dough is often a sign of a perfectly hydrated dough that will result in a soft crumb. If using a stand mixer, let it do the work until the dough is smooth and elastic. Over-kneading can lead to tough rolls, so stop once the dough is no longer shaggy and has developed a good amount of elasticity.
The strawberry filling is a star here, and its consistency is key. If you’re using fresh strawberries, make sure they are finely diced to prevent large, watery pockets in the rolls. For frozen strawberries, thaw them completely and drain any excess liquid before cooking them down with the sugar and cornstarch. The cornstarch is crucial for thickening the filling, preventing it from making the rolls soggy. Cooking the filling slightly on the stovetop not only thickens it but also intensifies the strawberry flavor. If you prefer a less sweet, more tart filling, reduce the amount of granulated sugar by a tablespoon or two. For an added layer of flavor, consider incorporating a teaspoon of lemon zest into the cream cheese filling; its bright citrus notes pair beautifully with strawberries.
When assembling the rolls, a lightly floured surface is your friend, but don’t go overboard. Too much flour will dry out the dough. Rolling the dough into a consistent rectangle ensures that your rolls will be uniform in size and shape. Spread your fillings all the way to the edges, except for that small border on the last long edge, which helps seal the roll. Roll the dough as tightly as you can without tearing it; this creates those beautiful, well-defined spirals. For clean cuts, use a very sharp, un-serrated knife, or for the ultimate trick, use unflavored dental floss. Simply slide the floss under the log, cross the ends over the top, and pull to slice through. This technique prevents squishing the delicate layers. Finally, when arranging them in the baking dish, give them a little room to expand. They will puff up significantly during their second rise and baking.
The overnight proofing is the magic behind these rolls. It not only provides incredible convenience but also allows the yeast to slowly ferment, developing deeper, more complex flavors in the dough. Ensure your baking dish is covered tightly with plastic wrap to prevent the dough from drying out in the refrigerator. In the morning, don’t skip the step of letting the rolls come to room temperature for 30-60 minutes before baking. This crucial step allows the yeast to wake up and complete its final rise, resulting in light and airy rolls. If you bake them straight from the fridge, they might be dense. Keep an eye on the rolls during baking; ovens vary, so the baking time might need slight adjustment. They should be golden brown on top and feel springy to the touch. For variations, consider swapping strawberries for other berries like raspberries or blueberries, or even a mix. A sprinkle of chopped nuts like pecans or walnuts can be added to the filling for extra texture. Instead of a simple glaze, you could make a richer cream cheese frosting for an even more decadent treat.
Storage and Reheating
These Overnight Strawberry Cream Cheese Rolls are undoubtedly at their absolute best when served warm, straight from the oven, with the glaze still slightly gooey and the fillings soft and melty. However, if you find yourself with leftovers (a rare but possible occurrence!), they can be stored and reheated to enjoy later.
To store, allow the rolls to cool completely to room temperature. Once cooled, transfer them to an airtight container. You can store them in a single layer or stack them with parchment paper in between to prevent sticking. Refrigerate for up to 3-4 days. Storing them in the refrigerator helps maintain their freshness and prevents the cream cheese and fruit filling from spoiling.
When you’re ready to enjoy your leftover rolls, there are a few gentle reheating methods to bring them back to life. For a single roll or a small batch, the microwave is a quick option. Place a roll on a microwave-safe plate and heat for 15-30 seconds, or until just warmed through. Be careful not to overheat, as this can make them tough and rubbery. For larger quantities or a crispier exterior, the oven is your best bet. Preheat your oven to 300°F (150°C). Place the rolls in an oven-safe dish, cover loosely with aluminum foil to prevent drying out, and heat for 10-15 minutes, or until warmed through. The foil helps to steam them slightly, keeping them moist. An air fryer can also work wonders for reheating; place rolls in a single layer and air fry at 300°F (150°C) for 3-5 minutes. No matter the method, always serve reheated rolls immediately for the best texture and flavor.
Frequently Asked Questions
Can I use frozen strawberries instead of fresh?
Yes, absolutely! Frozen strawberries work perfectly well for this recipe. Just be sure to thaw them completely before dicing and cooking for the filling. It’s also crucial to drain any excess liquid that accumulates during thawing to prevent the filling from becoming too watery, which could make your rolls soggy.
Can I prepare the rolls more than 24 hours in advance for the overnight rest?
While the dough can technically be refrigerated for up to 2 days, for the best texture and rise in your finished rolls, it’s recommended to stick within the 8-24 hour overnight rest period. Beyond 24 hours, the yeast might become over-proofed, leading to a less desirable texture and potentially a slightly alcoholic flavor in the dough.
What if my dough doesn’t rise overnight in the refrigerator?
It’s normal for the dough to have a slower, less dramatic rise in the refrigerator compared to a warm room temperature rise. However, it should still increase in size noticeably. If your dough shows almost no activity, it could be due to inactive yeast (too old or killed by hot liquid) or a refrigerator that’s too cold. If this happens, you can try letting the rolls proof at room temperature for 1-2 hours in a warm spot before baking to encourage a final rise.
Can I make these rolls dairy-free or gluten-free?
Adapting this recipe to be entirely dairy-free or gluten-free would require significant substitutions and might alter the final texture and flavor considerably. For dairy-free, you would need to use plant-based milk, vegan butter, and dairy-free cream cheese. For gluten-free, you would need to use a gluten-free all-purpose flour blend (preferably one designed for yeast baking) and potentially add a binder like xanthan gum. Both variations would require testing and might not yield the exact same results as the original recipe.


