
Introduction
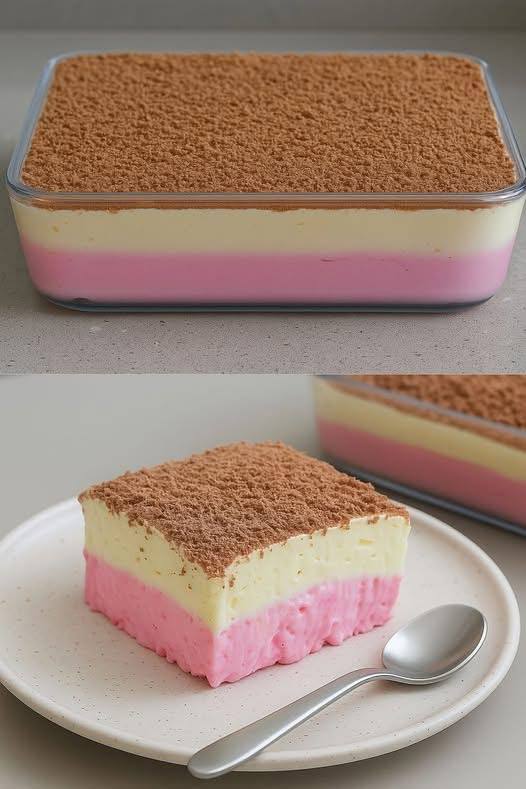
Craving a sweet escape without turning on the oven? Look no further! This No-Bake Strawberry and Pineapple Layered Dessert is your new go-to for a vibrant, refreshing, and incredibly easy treat. Imagine layers of creamy, fruit-infused goodness, topped with a delightful cocoa crunch – all coming together with minimal effort. It’s the perfect dessert for those warm summer days when you want something cool and light, or any time you need a fast, impressive dessert that doesn’t require an oven. The beauty of this recipe lies in its simplicity and the stunning visual appeal of its distinct layers, making it a true showstopper for any gathering.
What makes this dessert truly special is the harmonious blend of flavors and textures. Each spoonful delivers the tangy sweetness of sun-ripened strawberries, followed by the tropical burst of juicy pineapple, all enveloped in a rich, velvety creaminess. The experience is then elevated by the surprising crunch and subtle bitterness of the chocolatey crumb topping, creating a perfectly balanced symphony for your taste buds. This dessert isn’t just delicious; it’s a celebration of fresh fruit and simple indulgence, proving that you don’t need complicated techniques to create something extraordinary.
Beyond its delicious taste, this No-Bake Strawberry and Pineapple Layered Dessert is a testament to convenience. It’s quick to assemble, forgiving for beginner bakers (or non-bakers!), and delivers a dessert that looks like it took hours of painstaking effort. Whether you’re hosting a party, looking for a refreshing family treat, or simply want to satisfy a sweet craving, this recipe promises to deliver a delightful experience every single time. Get ready to impress with this creamy, fruity, and utterly irresistible no-bake masterpiece!
Nutritional Information
Per serving (approximate values):
- Calories: 320 kcal
- Protein: 4g
- Carbohydrates: 45g
- Fat: 15g
- Fiber: 3g
- Sodium: 180mg
Ingredients
- For the Strawberry Layer:
- 2 cups (about 300g) fresh or frozen strawberries, hulled
- 1/2 cup (100g) granulated sugar (adjust to taste)
- 2 tablespoons cornstarch
- 1/4 cup cold water
- 1 cup (240ml) heavy cream, whipped to soft peaks
- 1/2 teaspoon vanilla extract
- Optional: 2-3 drops pink food coloring (for vibrant color)
- For the Pineapple Layer:
- 1 (20-ounce/567g) can crushed pineapple, well drained
- 1/4 cup (50g) granulated sugar (adjust to taste)
- 2 tablespoons cornstarch
- 1/4 cup cold water
- 1 cup (240ml) heavy cream, whipped to soft peaks
- 1/2 teaspoon vanilla extract
- Optional: 1/4 teaspoon pineapple extract (for enhanced flavor)
- For the Crumb Topping:
- 1 1/2 cups (about 180g) digestive biscuits or graham crackers, finely crushed
- 2 tablespoons unsweetened cocoa powder
- 2 tablespoons melted unsalted butter (optional, for richer crumbs)
- For Assembly:
- An 8×8 inch (20×20 cm) or 9×5 inch (23×13 cm) rectangular glass dish
Instructions
- Prepare the Strawberry Layer Base: If using fresh strawberries, wash and hull them. If using frozen, thaw them slightly. In a blender or food processor, puree the strawberries until smooth. You should have about 1 1/2 cups of puree.
- Cook the Strawberry Mixture: In a medium saucepan, combine the strawberry puree and 1/2 cup granulated sugar. Bring to a gentle simmer over medium heat, stirring constantly. In a small bowl, whisk together 2 tablespoons cornstarch with 1/4 cup cold water until smooth. Slowly pour the cornstarch slurry into the simmering strawberry mixture, whisking continuously. Continue to cook and stir for 2-3 minutes, until the mixture thickens significantly, resembling a thick sauce. Remove from heat and let it cool completely to room temperature. This step is crucial; do not add whipped cream to a warm mixture. Stir in 1/2 teaspoon vanilla extract and optional pink food coloring.
- Fold in Cream for Strawberry Layer: Once the strawberry mixture is completely cool, gently fold in 1 cup of whipped heavy cream until no streaks remain and the mixture is uniformly pink and creamy.
- Assemble Strawberry Layer: Pour the strawberry cream mixture into your chosen rectangular glass dish. Spread it evenly across the bottom using a spatula. Place the dish in the refrigerator and chill for at least 1-2 hours, or until the layer is firm and set. This will prevent the next layer from mixing.
- Prepare the Pineapple Layer Base: Ensure the crushed pineapple is very well drained. You can press it gently with a spoon against a sieve or paper towels to remove excess moisture. In a medium saucepan, combine the drained crushed pineapple and 1/4 cup granulated sugar. Bring to a gentle simmer over medium heat, stirring occasionally.
- Cook the Pineapple Mixture: In a small bowl, whisk together 2 tablespoons cornstarch with 1/4 cup cold water until smooth. Slowly pour the cornstarch slurry into the simmering pineapple mixture, whisking continuously. Continue to cook and stir for 2-3 minutes, until the mixture thickens. Remove from heat and let it cool completely to room temperature. Stir in 1/2 teaspoon vanilla extract and optional pineapple extract.
- Fold in Cream for Pineapple Layer: Once the pineapple mixture is completely cool, gently fold in 1 cup of whipped heavy cream until no streaks remain and the mixture is uniformly pale yellow and creamy.
- Assemble Pineapple Layer: Carefully spoon the pineapple cream mixture over the chilled and set strawberry layer. Gently spread it evenly using a spatula, being careful not to disturb the layer beneath. Return the dish to the refrigerator and chill for another 2-3 hours, or until the pineapple layer is firm and set.
- Prepare the Crumb Topping: In a food processor, pulse the digestive biscuits or graham crackers until finely crushed. Alternatively, place them in a zip-top bag and crush with a rolling pin. Transfer the crumbs to a medium bowl. Add 2 tablespoons unsweetened cocoa powder and mix well until the crumbs are uniformly brown. If desired for a richer, slightly clumpy topping, pour in 2 tablespoons of melted unsalted butter and mix until combined.
- Add Crumb Topping: Once the pineapple layer is completely set, evenly sprinkle the cocoa crumb topping over the entire surface of the dessert.
- Final Chill and Serve: Return the dessert to the refrigerator for a final chill of at least 30 minutes before serving. This allows the flavors to meld and ensures the dessert is perfectly cold. To serve, slice into individual portions directly from the dish. Enjoy your quick and creamy layered delight!
Cooking Tips and Variations
Achieving clean, distinct layers is key to the visual appeal of this dessert, and the most important tip is patience with chilling. Ensure each layer is thoroughly chilled and firm before adding the next. Rushing this step will lead to layers bleeding into each other, compromising the beautiful separation. Typically, 1-2 hours for the first layer and 2-3 hours for the second layer is sufficient, but if you have time, an overnight chill for the fruit layers guarantees a perfect set. When spreading each subsequent layer, do so gently with the back of a spoon or an offset spatula, starting from the center and working outwards, to avoid disturbing the layer below.
For the fruit layers, the consistency of your cooked fruit base is crucial. If it’s too thin after cooking with cornstarch, it won’t set well. If it’s too thick, it might be difficult to fold in the whipped cream. Aim for a thick, pudding-like consistency. Remember that the mixture will thicken further as it cools. Always cool the fruit base completely to room temperature before folding in the whipped cream; adding cream to a warm mixture will cause the cream to melt and the layers to become runny.
Sweetness is subjective, so always taste the fruit mixtures before adding the whipped cream and adjust the sugar content to your preference. Ripe strawberries are naturally sweeter, so you might need less sugar. For the pineapple, the canned variety can vary in sweetness, so adjust accordingly. For a dairy-free variation, you can substitute the heavy cream with full-fat canned coconut cream, chilled overnight and whipped. Ensure you only use the thick cream from the top of the can.
The crumb topping offers a fantastic opportunity for variation. Instead of digestive biscuits or graham crackers, consider using shortbread cookies, vanilla wafers, or even chocolate sandwich cookies (like Oreos, with the cream filling removed). For a different flavor profile, omit the cocoa powder and add a pinch of cinnamon or cardamom to the crumbs. You could also toast some shredded coconut and mix it into the crumbs for an added tropical crunch. Alternatively, for a completely different topping, consider a layer of fresh fruit (sliced strawberries, pineapple chunks) or a dollop of whipped cream garnished with mint leaves just before serving.
Don’t be afraid to experiment with other fruit combinations. Mango and passion fruit, raspberry and peach, or even blueberry and lemon curd could make delicious alternatives for the layered fruit components. Just ensure the fruit purees can be thickened similarly with cornstarch or gelatin. For an extra touch of decadence, you can add a thin layer of melted white chocolate or dark chocolate between the fruit layers (after they’ve set) to create an additional textural element and flavor contrast.
Storage and Reheating
This No-Bake Strawberry and Pineapple Layered Dessert is best enjoyed chilled and fresh. Once assembled, it should be stored in the refrigerator, covered tightly with plastic wrap or aluminum foil to prevent it from absorbing any odors from the fridge and to keep the layers from drying out. When properly covered and refrigerated, this dessert will maintain its quality for 2 to 3 days. The crumb topping may soften slightly over time, but the creamy fruit layers will remain delicious. For optimal texture and flavor, it is recommended to consume it within this timeframe.
Due to its creamy, no-bake nature and the use of fresh fruit and whipped cream, this dessert is not suitable for freezing. Freezing will alter the texture of the creamy layers, causing them to become icy and potentially separate upon thawing, and the fruit may become mushy. The crumb topping would also likely become soggy. Therefore, it is best to prepare this dessert when you know you’ll be serving it within a few days.
This dessert is designed to be served cold, so there is no reheating involved. Simply remove it from the refrigerator, slice, and serve. If you are preparing it for a party, you can assemble it up to a day in advance, keeping it covered in the refrigerator. If you prefer the crumb topping to be extra crunchy, you can prepare the fruit layers and chill them, then add the crumb topping just a few hours before serving. This helps maintain the crispness of the crumbs for as long as possible.
Frequently Asked Questions
What if my fruit layers don’t set properly?
If your fruit layers aren’t setting, the most common culprits are either not cooking the cornstarch mixture long enough or not cooling the fruit base completely before folding in the whipped cream. Ensure that when you cook the fruit puree with cornstarch, it reaches a thick, pudding-like consistency. It should be visibly bubbling and thickened. Also, always allow the cooked fruit base to cool completely to room temperature before incorporating the whipped cream; otherwise, the cream will melt and prevent the layer from firming up. Insufficient chilling time between layers can also lead to a soft set; make sure each layer is firm to the touch before adding the next.
Can I use different fruits for this recipe?
Absolutely! This recipe is incredibly versatile and can be adapted with various fruits. Good options include pureed mango, peaches, raspberries, or blueberries. The key is to ensure the fruit puree can be thickened effectively with cornstarch or gelatin, similar to the strawberry and pineapple. You might need to adjust the amount of sugar depending on the natural sweetness or tartness of the fruit you choose. Always taste and adjust as you go. For fruits with a high water content, like watermelon, you might need to reduce the amount of added water or increase the cornstarch slightly.
How far in advance can I make this dessert?
This dessert can be made up to 1-2 days in advance. It’s actually beneficial to make it ahead of time, as the chilling period allows the layers to fully set and the flavors to meld beautifully. However, for the best texture, especially for the crumb topping, it’s recommended to add the topping closer to serving time, perhaps a few hours before. If the topping is added too far in advance, it can absorb moisture from the creamy layers and become less crunchy. Store the assembled dessert tightly covered in the refrigerator until ready to serve.


