
Introduction
Ever found yourself staring at a dessert menu, torn between two incredible options? The luscious fruitiness of strawberry or the comforting sweetness of banana pudding? Good news, dessert lovers! We’ve crafted the ultimate solution to this delicious dilemma: a show-stopping No-Bake Strawberry Crunch and Banana Pudding Cheesecake that brings the best of both worlds into one glorious pan. This isn’t just a dessert; it’s a culinary masterpiece designed to satisfy every craving, offering a vibrant, tangy strawberry crunch experience right alongside a classic, creamy banana pudding delight.
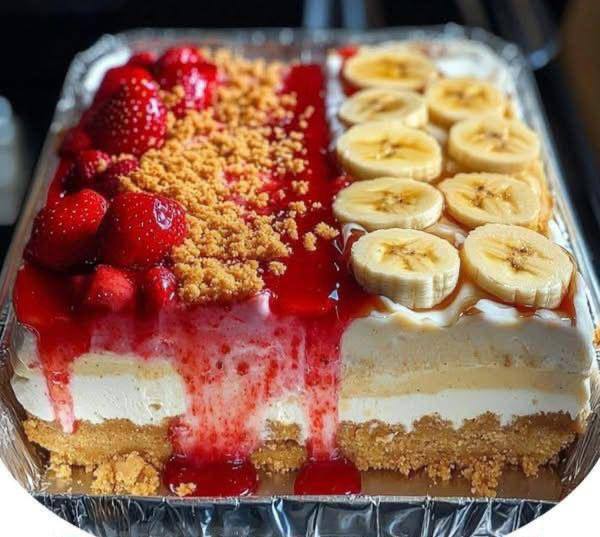
Imagine a dessert so visually appealing, it becomes the centerpiece of any gathering. Our dual-flavor cheesecake is precisely that. With a distinct line dividing two equally irresistible cheesecake creations, it’s perfect for parties, potlucks, or simply when you can’t make up your mind (and frankly, why should you have to?). This recipe is a testament to the fact that variety truly is the spice of life, especially when it comes to cheesecake. Forget the oven; this easy, no-bake approach means less fuss and more time to enjoy the delightful combination of flavors and textures.
What makes this cheesecake truly special is its clever design and incredible taste. On one side, you’ll find a dreamy, creamy cheesecake base topped with a glistening strawberry sauce, fresh strawberry slices, and a crave-worthy, crispy strawberry crunch crumble that echoes the beloved ice cream bar. On the other, a smooth, banana-infused cheesecake is crowned with perfectly ripe banana slices, capturing all the nostalgic charm of a classic banana pudding. Each bite offers a harmonious blend of sweet, tangy, creamy, and crunchy, making it an unforgettable treat that everyone will adore.
Nutritional Information
Per serving (approximate values):
- Calories: 580
- Protein: 8g
- Carbohydrates: 65g
- Fat: 35g
- Fiber: 3g
- Sodium: 300mg
Ingredients
For the Crust (for both sides):
- 2 cups (about 20 full sheets) graham cracker crumbs
- 1/2 cup (1 stick) unsalted butter, melted
- 1/4 cup granulated sugar
For the Strawberry Crunch Cheesecake:
- 16 oz (two 8-oz blocks) cream cheese, softened
- 1 cup powdered sugar
- 1 teaspoon vanilla extract
- 1/4 cup sour cream (full fat)
- 1 1/2 cups heavy cream, cold
- 1 cup fresh strawberries, hulled and diced, plus more for topping
- 1/4 cup granulated sugar (for strawberry sauce)
- 1 tablespoon lemon juice (for strawberry sauce)
- 1 tablespoon cornstarch (for strawberry sauce)
For the Strawberry Crunch Topping:
- 1 cup vanilla wafer crumbs (or shortbread cookie crumbs)
- 1/4 cup unsalted butter, melted
- 1/4 cup granulated sugar
- 1/2 teaspoon strawberry Jell-O powder (optional, for color and flavor)
For the Banana Pudding Cheesecake:
- 16 oz (two 8-oz blocks) cream cheese, softened
- 1 cup powdered sugar
- 1 teaspoon vanilla extract
- 1/4 cup sour cream (full fat)
- 1 1/2 cups heavy cream, cold
- 1/2 cup mashed ripe banana (about 1 medium banana)
- 1/2 teaspoon banana extract (optional, for enhanced flavor)
- 1/4 cup instant banana pudding mix (powder only)
- 3-4 medium ripe bananas, sliced, for topping
- 1 tablespoon lemon juice (for banana slices)
Instructions
- Prepare the Crust: In a medium bowl, combine graham cracker crumbs, melted butter, and 1/4 cup granulated sugar. Mix until well combined and resembles wet sand. Press the mixture firmly and evenly into the bottom of a 9×13-inch baking dish or a similarly sized foil pan. Place in the freezer to chill while you prepare the fillings.
- Prepare the Strawberry Crunch Topping: In a small bowl, combine vanilla wafer crumbs, melted butter, 1/4 cup granulated sugar, and strawberry Jell-O powder (if using). Mix until crumbly. Spread the mixture evenly on a small baking sheet lined with parchment paper. Bake at 350°F (175°C) for 8-10 minutes, or until lightly golden and fragrant. Let cool completely. Once cool, break into smaller crumbles if necessary.
- Prepare the Strawberry Sauce: In a small saucepan, combine diced strawberries, 1/4 cup granulated sugar, lemon juice, and cornstarch. Cook over medium heat, stirring frequently, until the sauce thickens and the strawberries soften, about 5-7 minutes. Remove from heat and let cool completely.
- Make the Strawberry Crunch Cheesecake Filling: In a large bowl, using an electric mixer, beat softened cream cheese until smooth and creamy. Add powdered sugar and vanilla extract, beating until fully incorporated. Stir in the sour cream. In a separate, cold bowl, whip the 1 1/2 cups cold heavy cream until stiff peaks form. Gently fold the whipped cream into the cream cheese mixture until no streaks remain.
- Make the Banana Pudding Cheesecake Filling: In another large bowl, using an electric mixer, beat softened cream cheese until smooth and creamy. Add powdered sugar and vanilla extract, beating until fully incorporated. Stir in the sour cream, mashed banana, banana extract (if using), and instant banana pudding mix. In a separate, cold bowl, whip the remaining 1 1/2 cups cold heavy cream until stiff peaks form. Gently fold the whipped cream into the banana cream cheese mixture until no streaks remain.
- Assemble the Dual Cheesecake: Remove the chilled crust from the freezer. To create a clean division, you can use a piece of parchment paper or aluminum foil folded multiple times to create a sturdy barrier down the center of the pan. Alternatively, carefully spoon half of the banana pudding cheesecake filling onto one side of the crust, spreading it evenly. Then, spoon half of the strawberry crunch cheesecake filling onto the other side of the crust, spreading it evenly. If using a barrier, remove it gently once both fillings are in place.
- Chill the Cheesecake Base: Place the pan in the refrigerator and chill for at least 2-3 hours to allow the cheesecake layers to firm up slightly before adding toppings.
- Add Toppings: Once the cheesecake base is slightly firm, gently spread the cooled strawberry sauce over the strawberry crunch cheesecake side. Arrange fresh strawberry slices on top of the sauce. Sprinkle the prepared strawberry crunch topping generously over the strawberries. For the banana pudding cheesecake side, arrange the sliced bananas on top. To prevent browning, you can lightly brush the banana slices with lemon juice before placing them on the cheesecake.
- Final Chill: Return the cheesecake to the refrigerator and chill for at least 4-6 more hours, or preferably overnight, to allow it to fully set. The longer it chills, the firmer and easier it will be to slice.
- Serve: Once fully set, slice and serve. For clean slices, use a warm, sharp knife, wiping it clean between each cut.
Cooking Tips and Variations
Achieving cheesecake perfection, especially with two flavors, is all about technique and a few clever tricks. For the smoothest cheesecake fillings, ensure your cream cheese is truly at room temperature; this prevents lumps. When whipping heavy cream, make sure both the cream and your mixing bowl are very cold – this helps it whip up faster and hold its volume better. For a super clean line between the two flavors, a temporary barrier made from aluminum foil, folded into a thick strip, can be pressed into the crust before adding the fillings. Once both sides are filled, carefully lift the barrier straight up. Don’t worry if it’s not absolutely perfect; the toppings will distract from any minor imperfections!
Preventing banana browning is key for the visual appeal of the banana pudding side. A quick dip or brush of lemon juice on your sliced bananas before placing them on the cheesecake will do the trick. Alternatively, add the banana slices just before serving if you’re concerned about browning over an extended period. For the crust, feel free to experiment! While graham crackers are classic, Nilla Wafers make an excellent crust for the banana side, and golden Oreos or even shortbread cookies can be fantastic for the strawberry side. If you’re short on time for the strawberry crunch topping, many stores sell pre-made strawberry shortcake crumbles that work wonderfully.
This dual-flavor concept opens up a world of possibilities for variations. Imagine a rich Chocolate Caramel Cheesecake paired with a zesty Lemon Blueberry version. Or a tropical Mango Coconut alongside a classic Key Lime. The key is to choose flavors that complement each other without clashing. You can also play with the crunch factor: toasted coconut flakes for a tropical twist, chopped nuts for an earthy crunch, or even different flavored crushed cookies. For an extra touch of elegance, consider adding a dollop of whipped cream and a mint sprig to each slice just before serving. Remember, quality ingredients make a difference, especially with fresh fruit and good cream cheese.
Storage and Reheating
Storing your No-Bake Strawberry Crunch and Banana Pudding Cheesecake correctly is crucial to maintain its freshness and deliciousness. The cheesecake should always be stored in an airtight container in the refrigerator. If you don’t have a container large enough, cover the entire pan tightly with plastic wrap, ensuring no air can get in to dry out the cheesecake or cause the bananas to brown prematurely. When properly stored, this cheesecake will remain fresh for up to 3-4 days in the refrigerator. However, please note that the fresh banana slices, even if treated with lemon juice, may begin to soften and darken slightly after the first day, so it’s best enjoyed within 24-48 hours for optimal appearance.
This is a no-bake dessert, so there’s no reheating involved! It’s designed to be served chilled, straight from the refrigerator. If you’ve frozen any portions (see below), allow them to thaw slowly in the refrigerator for several hours or overnight before serving. Serving it too cold might mute some of the flavors, so letting it sit at room temperature for about 10-15 minutes before serving can enhance the creaminess and flavor profile of the fillings. Just be careful not to leave it out for too long, especially on a warm day, as the dairy components can soften quickly.
For longer storage, this cheesecake can be frozen, though with a few considerations. For best results, freeze individual slices without the fresh banana topping. Wrap each slice tightly in plastic wrap, then an additional layer of aluminum foil, and place in a freezer-safe bag or container. It can be frozen for up to 1 month. When you’re ready to enjoy, thaw the frozen slices in the refrigerator overnight. Just before serving, add fresh banana slices to the banana pudding side. The texture of the strawberry crunch topping might soften slightly upon thawing, but the overall flavor will still be delightful.
Frequently Asked Questions
What kind of pan should I use for this dual-flavor cheesecake?
A standard 9×13-inch baking dish or a similarly sized foil pan works perfectly for this recipe. The foil pan is especially convenient if you plan to transport the cheesecake to a party or gathering. The larger surface area allows for a clear division between the two flavors and provides plenty of servings.
Can I make this cheesecake ahead of time?
Absolutely! This no-bake cheesecake is an excellent make-ahead dessert. You can prepare the entire cheesecake, including adding the strawberry crunch topping, 1-2 days in advance. However, for the freshest appearance of the banana pudding side, it’s best to add the fresh banana slices no more than a few hours before serving, or just before serving, to prevent browning and maintain their firm texture. Store it covered in the refrigerator until ready to serve.
How do I get a clean slice when serving a dual-flavor cheesecake?
For pristine slices that showcase both flavors beautifully, use a long, sharp knife. Before each cut, dip the knife in hot water and wipe it clean with a paper towel. This warms the blade and helps it glide through the creamy cheesecake layers without dragging or sticking. Make a straight cut down through the cheesecake, then repeat the hot water and wipe process for the next slice. This extra step makes a big difference in presentation.


