
Introduction
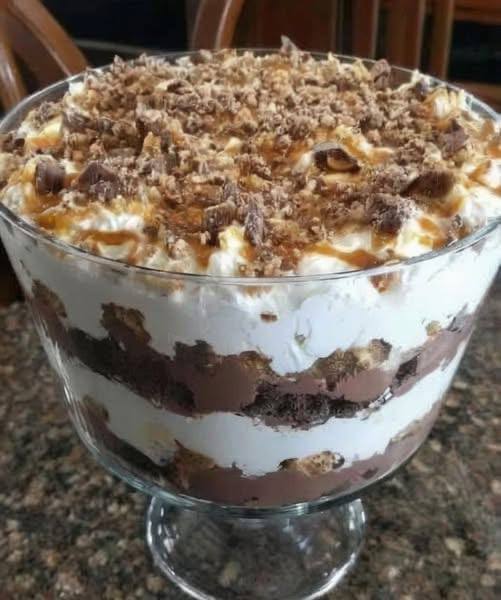
Prepare to embark on a journey of pure indulgence with our Decadent Chocolate Trifle recipe! This show-stopping dessert isn’t just a treat for the taste buds; it’s a feast for the eyes, a symphony of textures, and an absolute crowd-pleaser. Imagine layers upon layers of rich chocolate cake, silky smooth chocolate pudding, fluffy whipped cream, and delightful crunchy bits, all elegantly presented in a clear trifle bowl. It’s the kind of dessert that elicits gasps of delight and excited murmurs before the first spoonful even touches the tongue.
What makes a chocolate trifle so irresistible? It’s the perfect harmony of contrasts. You get the deep, comforting flavor of chocolate in multiple forms, from tender cake to creamy pudding. The lightness of whipped cream provides a refreshing counterpoint, while unexpected crunchy elements add an exciting textural surprise. This recipe is designed to be as easy to assemble as it is impressive to behold, making it a fantastic choice for everything from casual family gatherings to elegant dinner parties. Whether you’re a seasoned baker or a beginner looking to impress, this chocolate trifle is your ticket to dessert glory.
Beyond its stunning appearance and luxurious taste, this chocolate trifle offers incredible versatility. While we’ll guide you through a classic, utterly delicious combination, the beauty of a trifle lies in its adaptability. You can customize it with your favorite chocolate varieties, add a hint of coffee or liqueur, or incorporate fresh fruits for a brighter note. It’s a dessert that celebrates abundance and creativity, promising a delightful experience with every single scoop. Get ready to create a masterpiece that will have everyone asking for the recipe!
Nutritional Information
Per serving (approximate values):
- Calories: 550
- Protein: 7g
- Carbohydrates: 65g
- Fat: 30g
- Fiber: 3g
- Sodium: 250mg
Ingredients
- 1 (13×9-inch) chocolate cake, baked and cooled (homemade or store-bought, preferably a dense, moist cake or brownies)
- 2 (3.9-ounce) packages instant chocolate pudding mix
- 4 cups cold milk (for pudding, whole milk recommended for creaminess)
- 1 teaspoon vanilla extract (for pudding)
- 1 (12-ounce) container frozen whipped topping, thawed (like Cool Whip), or 3 cups heavy cream, whipped with 1/2 cup powdered sugar and 1 teaspoon vanilla extract
- 1/2 cup caramel sauce (store-bought or homemade)
- 1 cup chocolate-covered toffee bits, crushed chocolate bars (e.g., Heath bar, Snickers), or chocolate cookies (e.g., Oreos, chocolate wafers), crushed
- 1/2 cup chocolate chunks or chopped chocolate candy bars for garnish
- Optional: 2 tablespoons coffee liqueur (like Kahlua) or rum, for drizzling over cake layers
Instructions
- Prepare the Cake/Brownies: If using a homemade cake or brownies, ensure it is completely cooled. Cut the cake or brownies into 1-inch cubes. If desired, lightly brush or drizzle the cake cubes with coffee liqueur or rum for added moisture and flavor. Set aside.
- Prepare the Chocolate Pudding: In a large mixing bowl, whisk together the instant chocolate pudding mix and 4 cups of cold milk for 2 minutes, or until the mixture begins to thicken. Stir in 1 teaspoon of vanilla extract. Let the pudding stand for 5 minutes to fully set.
- Prepare the Whipped Cream: If using frozen whipped topping, ensure it is fully thawed. If making homemade whipped cream, beat 3 cups of cold heavy cream with 1/2 cup powdered sugar and 1 teaspoon vanilla extract in a cold bowl with a cold whisk until stiff peaks form.
- Begin Layering – First Cake Layer: Place about one-third of the cake cubes evenly in the bottom of a large, clear trifle bowl (typically 3-4 quart capacity). Gently press them down to form a relatively flat layer.
- First Pudding Layer: Carefully spoon about one-third of the prepared chocolate pudding over the cake layer, spreading it gently to cover the cake.
- First Whipped Cream Layer: Dollop about one-third of the whipped cream over the chocolate pudding, spreading it out to form an even layer.
- First Caramel Drizzle & Crunch: Drizzle about one-third of the caramel sauce over the whipped cream. Sprinkle about one-third of the crushed chocolate-covered toffee bits or crushed cookies over the caramel.
- Repeat Layers: Repeat steps 4-7 two more times, creating a total of three distinct layers of cake, pudding, whipped cream, caramel, and crunch. Ensure you end with a layer of whipped cream on top.
- Final Topping: Generously sprinkle the remaining crushed chocolate bits/cookies and the chocolate chunks/chopped candy bars over the very top layer of whipped cream. Drizzle any remaining caramel sauce if desired, creating an attractive pattern.
- Chill the Trifle: Cover the trifle bowl loosely with plastic wrap. Refrigerate for at least 2-4 hours to allow the flavors to meld and the layers to set properly. For best results and optimal flavor development, chill overnight.
- Serve: When ready to serve, remove from the refrigerator. Use a large spoon to scoop out generous portions, ensuring each serving gets a bit of every delicious layer. Enjoy!
Cooking Tips and Variations
Tips for Trifle Perfection:
- Choose a Clear Bowl: A clear glass trifle bowl is essential for showcasing the beautiful layers. If you don’t have one, a large glass punch bowl or even individual clear glass dessert cups can work.
- Moisten Your Cake: Dry cake is the enemy of a good trifle. If your cake seems a little dry, a light drizzle of milk, espresso, or a complementary liqueur (like Kahlua, rum, or Bailey’s Irish Cream) over the cake cubes before layering will add moisture and depth of flavor.
- Don’t Be Afraid of Store-Bought: This recipe is incredibly forgiving and delicious even with store-bought components. Use a good quality boxed cake mix, pre-made brownies from the bakery, instant pudding, and thawed whipped topping to save time without sacrificing flavor.
- Chill, Chill, Chill: This is perhaps the most crucial step. A well-chilled trifle not only holds its layers better but also allows the flavors to truly meld and develop, resulting in a more harmonious dessert. Don’t rush it!
- Layering Technique: For clean, distinct layers, try to spread each component gently to the edges of the bowl, but avoid pressing down too hard, especially on the lighter whipped cream layers.
- Garnish Just Before Serving: While the trifle can be assembled ahead of time, add any crunchy toppings (like crushed cookies or toffee bits) and fresh drizzles (like caramel or chocolate sauce) just before serving. This prevents them from becoming soggy and ensures maximum crunch and visual appeal.
- Ingredient Quality Matters: While store-bought components are fine, using good quality chocolate for your pudding or toppings will elevate the overall taste significantly.
Delicious Variations to Try:
- Fruity Chocolate Trifle: Add layers of fresh raspberries, sliced strawberries, or pitted cherries between the chocolate layers. Berries pair wonderfully with chocolate and add a burst of freshness and color.
- Mint Chocolate Trifle: Use mint-flavored chocolate cookies (like Thin Mints) for crumbled layers, and add a few drops of mint extract to your whipped cream or pudding. Top with chocolate shavings and a sprig of fresh mint.
- Coffee Lover’s Trifle: Use coffee-flavored liqueur to moisten the cake layers. You can also add a teaspoon of instant espresso powder to your chocolate pudding mix for an intensified mocha flavor.
- Nutty Trifle: Incorporate chopped toasted pecans, walnuts, or almonds into your crunchy layers for an added nutty flavor and texture.
- White Chocolate Dream: Substitute white chocolate pudding for the dark chocolate, and use white chocolate shavings or white chocolate-covered pretzels for your crunchy topping.
- Peanut Butter Bliss: Make a peanut butter whipped cream by folding in a few tablespoons of creamy peanut butter once your whipped cream is stiff. Use crushed peanut butter cookies or Reese’s Peanut Butter Cups for the crunchy layer.
- Boozy Adult Trifle: Beyond coffee liqueur, consider rum, brandy, or even a chocolate liqueur to soak your cake layers. Adjust the amount to your preference.
- Individual Trifles: For elegant single servings, assemble the trifle in clear glasses, mason jars, or small ramekins. This makes for beautiful presentation and easy portion control.
- Different Cake Bases: Instead of plain chocolate cake, try using chocolate fudge cake, devil’s food cake, or even a chocolate chip cookie cake for a different base flavor and texture.
Storage and Reheating
Storage:
This chocolate trifle is a fantastic make-ahead dessert, which is one of its many charms. Once assembled, it should be covered loosely with plastic wrap to prevent it from drying out and to absorb any refrigerator odors. Store the trifle in the refrigerator for up to 3-4 days. The flavors will continue to meld and deepen over time, often tasting even better on the second day. However, keep in mind that any crunchy toppings added directly to the layers or on top will soften over time due to moisture from the other components. If you want to maintain maximum crunch, it’s best to add those elements right before serving.
If you’ve added fresh fruit to your trifle, its shelf life might be slightly reduced, as some fruits (especially berries) can become softer or release more liquid over time. For best quality with fruit, aim to consume within 2-3 days.
Reheating:
A chocolate trifle is a chilled dessert and is not meant to be reheated. Reheating would melt the whipped cream, alter the texture of the pudding, and likely make the cake soggy, completely destroying the delightful layered structure and creamy consistency that makes a trifle so appealing. Always serve the trifle cold, directly from the refrigerator.
If you prefer your dessert less intensely cold, you can remove the trifle from the refrigerator about 15-20 minutes before serving, especially if it has been chilled overnight. This allows the components to slightly soften and the flavors to open up a bit more, but it should still be cool to the touch. Avoid leaving it out at room temperature for extended periods, especially on a warm day, as the dairy components can spoil.
For any leftover portions, simply cover them tightly and return them to the refrigerator. They will be just as delicious the next day!
Frequently Asked Questions
Can I make this chocolate trifle ahead of time?
Absolutely! In fact, making this trifle ahead of time is highly recommended. Assembling it the day before you plan to serve allows all the flavors to meld beautifully and the layers to set firmly. Just be sure to cover it loosely with plastic wrap and refrigerate for at least 4 hours, and ideally overnight. If you’re adding any crunchy toppings, it’s best to add those right before serving to maintain their crispness.
What kind of chocolate cake or brownies should I use?
For the best results, use a moist, dense chocolate cake or fudgy brownies. You can bake your own from scratch or use a good quality boxed mix. Store-bought brownies or pre-baked chocolate sheet cake from a bakery work wonderfully for convenience. Avoid very light or airy cakes, as they tend to get too soggy when combined with the other layers. The key is a cake that can hold its structure a bit when cubed.
Can I use homemade whipped cream instead of store-bought whipped topping?
Yes, and many people prefer it for its richer flavor and lighter texture! To make homemade whipped cream, simply beat 3 cups of cold heavy cream with 1/2 cup of powdered sugar and 1 teaspoon of vanilla extract until stiff peaks form. Ensure your cream, bowl, and whisk are very cold for the best results. Homemade whipped cream will be slightly less stable than a commercial whipped topping, but it adds an undeniable freshness.
How can I prevent my trifle layers from getting too soggy?
Several factors contribute to a non-soggy trifle. First, use a dense cake or brownie that can absorb some moisture without disintegrating. Second, don’t over-moisten the cake layers with liqueurs or milk; a light drizzle is usually sufficient. Third, and most importantly, ensure your pudding is fully set before layering. Allowing the trifle to chill thoroughly for at least 4 hours (or overnight) gives everything time to firm up and prevents excessive liquid release, keeping your layers distinct and delicious.


