
Introduction
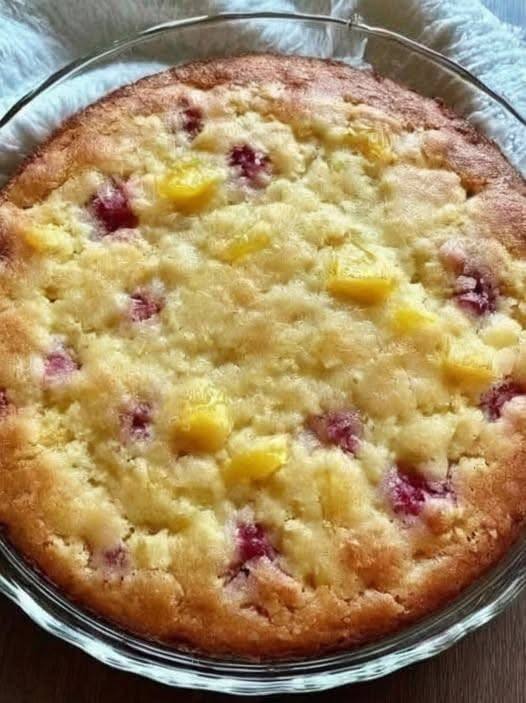
Get ready to meet your new favorite dessert, the “Cuppa Cuppa Cake”! This isn’t just any cake; it’s a celebration of simplicity, home-style comfort, and utterly delicious flavor. The name itself, “Cuppa Cuppa Cake,” whispers promises of an easy, approachable recipe where measurements are as straightforward as, well, a cup! Forget complicated techniques or endless lists of ingredients. This cake is designed for everyone, from the seasoned baker looking for a quick weeknight treat to the absolute beginner taking their first delicious steps into the world of baking. Imagine a golden-brown crust, a tender and moist crumb, and bursts of sweet, juicy fruit in every single bite. That’s the magic of the Cuppa Cuppa Cake.
What makes this cake so special? Its charm lies in its no-fuss nature. It’s the kind of cake you can whip up on a whim when a craving strikes or when unexpected guests arrive. It’s incredibly versatile, adapting beautifully to whatever fruits you have on hand, making it a year-round delight. We’re talking about a cake that delivers maximum flavor with minimal effort, making it a true kitchen hero. Whether it’s enjoyed warm from the oven with a scoop of vanilla ice cream, or cool with a dollop of whipped cream for an afternoon pick-me-up, the Cuppa Cuppa Cake is guaranteed to bring smiles to faces and warmth to any occasion. It embodies the essence of homemade goodness without the stress, proving that sometimes, the simplest recipes are the most satisfying.
In this article, we’ll dive into everything you need to know to create your own perfect Cuppa Cuppa Cake. We’ll guide you through each step, from gathering your basic pantry staples to achieving that irresistible golden crust and perfectly moist interior. We’ll also share our best tips for success, creative variations to keep things exciting, and answers to all your burning questions. So, tie on your apron, preheat your oven, and prepare to fall in love with the effortless joy of baking this delightful Cuppa Cuppa Cake. It’s more than just a recipe; it’s an invitation to savor the sweet moments, one delicious slice at a time.
Nutritional Information
Per serving (approximate values):
- Calories: 385 kcal
- Protein: 5g
- Carbohydrates: 58g
- Fat: 15g
- Fiber: 2g
- Sodium: 280mg
Ingredients
- 2 cups (240g) all-purpose flour
- 1 cup (200g) granulated sugar
- 2 teaspoons baking powder
- 1/2 teaspoon salt
- 2 large eggs
- 1 cup (240ml) whole milk (or buttermilk for extra tang)
- 1/2 cup (120ml) vegetable oil or melted unsalted butter
- 1 teaspoon vanilla extract
- 1 cup (about 160g) canned pineapple chunks, well-drained and patted dry
- 1 cup (about 125g) fresh or frozen mixed berries (raspberries, blueberries, or sliced strawberries work well)
- Optional: 1 tablespoon all-purpose flour for tossing with frozen berries
- Optional: Zest of 1/2 lemon for extra brightness
- Optional: 1 tablespoon coarse sugar for sprinkling on top
Instructions
- Preheat your oven to 350°F (175°C). Lightly grease and flour a 9-inch round baking dish or pie plate. If using a glass dish, reduce oven temperature by 25°F (15°C) if recommended by the manufacturer.
- In a large mixing bowl, whisk together the dry ingredients: all-purpose flour, granulated sugar, baking powder, and salt until well combined. Make sure there are no lumps.
- In a separate medium bowl, whisk together the wet ingredients: eggs, milk, vegetable oil (or melted butter), and vanilla extract. Whisk until the mixture is smooth and well incorporated. If using lemon zest, add it to the wet ingredients now.
- Pour the wet ingredients into the dry ingredients. Using a spatula or wooden spoon, gently fold the mixture until just combined. Be careful not to overmix; a few small lumps are perfectly fine and will lead to a more tender cake. Overmixing develops the gluten in the flour, resulting in a tough cake.
- If using frozen berries, toss them with 1 tablespoon of all-purpose flour in a small bowl. This helps prevent them from sinking to the bottom of the cake during baking. Gently fold in the well-drained pineapple chunks and the berries into the cake batter. Distribute them as evenly as possible without mashing the fruit.
- Pour the batter into the prepared baking dish, spreading it evenly with your spatula. If desired, sprinkle the top of the batter with 1 tablespoon of coarse sugar for a sparkling, slightly crisp crust.
- Bake for 35 to 45 minutes, or until the cake is golden brown on top and a wooden skewer or toothpick inserted into the center comes out clean. Baking times can vary depending on your oven and the material of your baking dish.
- Once baked, remove the cake from the oven and place it on a wire rack to cool for at least 15-20 minutes before slicing and serving. This allows the cake to set and prevents it from crumbling.
- Serve warm or at room temperature. Enjoy your delicious homemade Cuppa Cuppa Cake!
Cooking Tips and Variations
For the most tender Cuppa Cuppa Cake, resist the urge to overmix your batter. Mix until the dry and wet ingredients are just combined; a few lumps are perfectly acceptable and will result in a lighter, fluffier texture. Overmixing develops gluten, leading to a tougher cake. When it comes to fruit, if you’re using canned pineapple, ensure it’s thoroughly drained and patted dry to avoid adding excess moisture to the batter, which can make the cake soggy. For frozen berries, tossing them in a tablespoon of flour before folding them into the batter is a game-changer. This simple trick prevents them from sinking to the bottom of the pan, ensuring an even distribution of fruity goodness throughout the cake. Always preheat your oven properly; this ensures the cake begins baking at the correct temperature, promoting an even rise and golden crust. A reliable oven thermometer can be invaluable.
The Cuppa Cuppa Cake is incredibly forgiving and adaptable, making it a fantastic canvas for various flavor combinations. Feel free to swap out the pineapple and berries for other fruits you love or have on hand. Sliced peaches, diced apples (especially a tart variety like Granny Smith), blueberries, or even pitted cherries would be delightful. If using apples or peaches, consider adding a sprinkle of cinnamon or nutmeg to the dry ingredients for a warm, spiced flavor profile. For a citrusy twist, incorporate the zest of an orange or lime along with the lemon zest. You can also add a handful of chopped nuts, such as walnuts or pecans, for extra crunch and nutty flavor. Chocolate chips, white chocolate chunks, or even a swirl of cream cheese frosting (added after baking) can transform this simple cake into a more decadent dessert. Don’t be afraid to experiment with different extracts too; almond extract can add a lovely depth of flavor, especially when paired with berries or stone fruits. For a slightly richer crumb, you can replace half of the milk with buttermilk, which reacts with the baking powder to create an even more tender texture.
The type of pan you use can also influence baking time and results. A glass or ceramic dish will often conduct heat differently than a metal one, sometimes requiring a slight temperature adjustment (typically a 25°F reduction for glass). Always check for doneness with a toothpick inserted into the center – it should come out clean. Allowing the cake to cool slightly in the pan before attempting to cut or remove it is crucial. This cooling period allows the cake to firm up and prevents it from falling apart. The Cuppa Cuppa Cake is wonderfully versatile in how it’s served. It’s fantastic plain, but it truly shines with a scoop of vanilla bean ice cream, a dollop of freshly whipped cream, or even a light dusting of powdered sugar. A simple fruit compote or a drizzle of warm caramel sauce can elevate it further, making it suitable for a more elegant presentation. For a breakfast or brunch option, reduce the sugar by about a quarter cup and serve with a side of yogurt. This cake is designed to be enjoyed in many ways, so let your creativity guide you!
Storage and Reheating
Storing your Cuppa Cuppa Cake properly is key to maintaining its freshness and delicious flavor. Once the cake has completely cooled to room temperature, you can store it in an airtight container at room temperature for up to 2-3 days. Make sure it’s fully cooled before sealing, as any residual warmth can create condensation inside the container, leading to a soggy cake. If you live in a particularly warm or humid climate, or if your cake contains fresh dairy toppings like whipped cream, it’s best to store it in the refrigerator. In the fridge, it will stay fresh for up to 4-5 days. Be aware that refrigeration can sometimes alter the texture slightly, making the cake a bit denser, but it will still be perfectly enjoyable.
For longer storage, the Cuppa Cuppa Cake freezes beautifully. Once the cake is completely cool, you can wrap individual slices or the entire cake (if it fits) tightly in plastic wrap, followed by a layer of aluminum foil. This double layer of protection helps prevent freezer burn. Label with the date, and it can be stored in the freezer for up to 2-3 months. When you’re ready to enjoy, simply transfer the frozen cake or slices to the refrigerator overnight to thaw. Alternatively, individual slices can be thawed more quickly at room temperature for an hour or two.
Reheating your Cuppa Cuppa Cake can bring back some of that freshly baked warmth and aroma. If you’re reheating a whole cake or a large portion, you can place it in an oven preheated to 300°F (150°C) for about 10-15 minutes, or until warmed through. Keep an eye on it to prevent drying out. For individual slices, the microwave is your best friend. Place a slice on a microwave-safe plate and heat for 15-30 seconds, depending on your microwave’s power, until it’s warm. Be careful not to overheat, as this can make the cake tough or rubbery. A gentle warming is all you need to enjoy that comforting, just-baked taste. Whether you’re enjoying it fresh, from the fridge, or reheated from the freezer, the Cuppa Cuppa Cake remains a delightful treat.
Frequently Asked Questions
What does “Cuppa Cuppa Cake” mean?
The name “Cuppa Cuppa Cake” is an endearing and informal term that signifies the simplicity of the recipe. It implies that most, if not all, of the ingredients are measured in “cups,” making it incredibly easy to follow without needing a kitchen scale or precise measurements. This style of recipe is often associated with straightforward, home-style baking, perfect for beginners or anyone looking for a quick, no-fuss dessert.
Can I use fresh fruit instead of canned or frozen?
Absolutely! Fresh fruit works wonderfully in this cake. If using fresh berries, there’s no need to toss them in flour. If using fresh pineapple or other juicy fruits like peaches, make sure to pat them very dry after dicing to remove any excess moisture. Too much moisture from fresh fruit can make the cake soggy or prevent it from baking properly. Adjust the quantity slightly based on your preference and the juiciness of the fruit.
What if I don’t have buttermilk?
If the recipe calls for buttermilk and you don’t have it, you can easily make a substitute at home. For 1 cup of buttermilk, simply measure out 1 cup of regular milk (whole or 2%) and stir in 1 tablespoon of white vinegar or lemon juice. Let it sit for 5-10 minutes until it slightly curdles and thickens. This homemade buttermilk substitute will provide the necessary acidity to react with the baking powder, contributing to a tender and moist crumb in your cake.
How can I tell if my cake is fully baked?
The best way to check for doneness is to insert a wooden skewer or toothpick into the very center of the cake. If it comes out clean, with no wet batter attached, your cake is ready. You should also notice that the edges of the cake are pulling slightly away from the sides of the pan, and the top will be golden brown and spring back lightly when gently pressed. If it’s still wobbly in the center or the toothpick comes out with wet batter, continue baking for a few more minutes and re-test.


