
Introduction
Get ready to redefine your dessert game with a treat that’s as delightful to look at as it is to eat: Cheesecake Deviled Strawberries! Imagine the juicy, vibrant sweetness of fresh strawberries, perfectly paired with a rich, creamy cheesecake filling, all crowned with a delicate, crunchy strawberry crumble. This isn’t just a dessert; it’s a culinary cleverness, taking the beloved “deviled” concept usually reserved for eggs and giving it a sweet, fruity makeover. It’s refreshing, elegant, and surprisingly simple to whip up, making it an instant crowd-pleaser for any occasion.
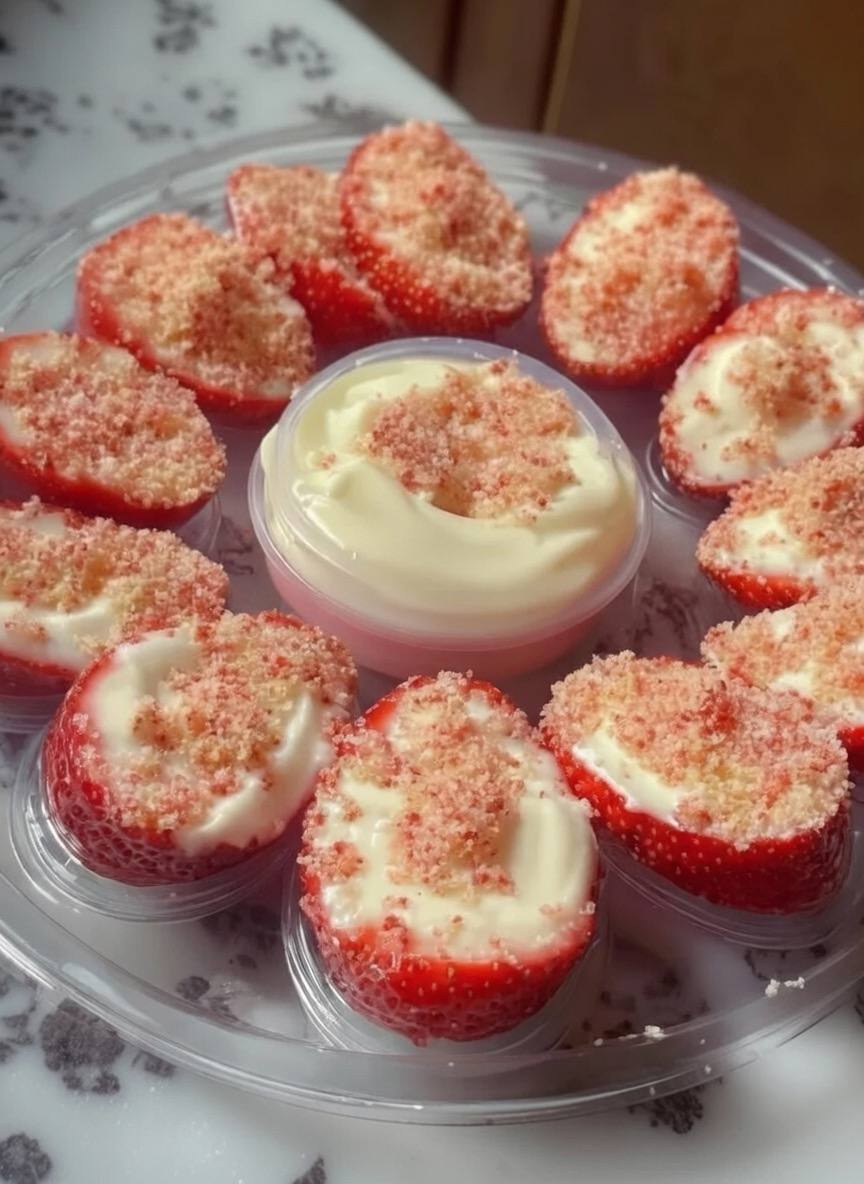
So, what exactly are “Cheesecake Deviled Strawberries”? Picture this: plump, ripe strawberries are gently halved, their natural hollow becoming the perfect vessel for a luscious, tangy-sweet cheesecake filling. This creamy core is the “yolk” of our deviled creation. But the magic doesn’t stop there! Instead of paprika, we sprinkle a vibrant, flavorful strawberry crumble over the top, adding a delightful textural contrast and a burst of concentrated berry goodness. The result is a bite-sized marvel that’s light enough for a summer afternoon yet sophisticated enough for a dinner party.
Why should these be your next go-to recipe? Beyond their undeniable charm, Cheesecake Deviled Strawberries are incredibly versatile. They’re perfect for parties as an elegant finger food, a light and satisfying dessert after a meal, or even a refreshing snack on a warm day. The best part? This recipe is largely no-bake, making it quick and accessible for home cooks of all skill levels. With just a few simple steps and readily available ingredients, you can create a show-stopping treat that will have everyone asking for the recipe. Get ready to impress with this sweet, creamy, and crunchy sensation!
Nutritional Information
Per serving (approximate values):
- Calories: 85
- Protein: 1.5g
- Carbohydrates: 10g
- Fat: 5g
- Fiber: 1g
- Sodium: 45mg
Ingredients
- 1 pound fresh large strawberries, firm and ripe
- 8 ounces cream cheese, softened
- 1/2 cup powdered sugar, sifted
- 1 teaspoon vanilla extract
- 1 tablespoon lemon juice (optional, for tang)
- 1/4 cup heavy cream (optional, for lighter filling)
- For the Strawberry Crumble Topping:
- 1/2 cup vanilla wafer crumbs (about 10-12 wafers, finely crushed)
- 2 tablespoons freeze-dried strawberries, crushed into a fine powder (or strawberry flavored gelatin powder for color/flavor)
- 1 tablespoon unsalted butter, melted (optional, for a richer crumble)
- Optional Garnish: fresh mint sprigs, chocolate shavings
Instructions
- Prepare the Strawberries: Gently wash the strawberries under cool running water. Pat them completely dry with paper towels; this is crucial to prevent a watery filling. Using a small paring knife or a strawberry huller, carefully remove the green tops and hull, creating a small cavity. Cut each strawberry in half lengthwise, from tip to stem, ensuring they lay flat. Arrange the halved strawberries, cut-side up, on a serving platter or baking sheet lined with parchment paper.
- Make the Cheesecake Filling: In a medium mixing bowl, combine the softened cream cheese, sifted powdered sugar, and vanilla extract. If using, add the lemon juice. Beat with an electric mixer on medium speed until the mixture is completely smooth and creamy, with no lumps. If you desire a lighter, airier filling, gently fold in 1 tablespoon of heavy cream until just combined. Taste and adjust sweetness or tanginess as needed.
- Prepare the Strawberry Crumble Topping: In a small bowl, combine the finely crushed vanilla wafer crumbs and the crushed freeze-dried strawberry powder (or strawberry gelatin powder). If using, drizzle in the melted butter and mix until the crumbs are evenly coated and resemble coarse sand. This step adds a bit more richness and helps the crumble hold together slightly.
- Assemble the “Deviled” Strawberries: Transfer the cheesecake filling to a piping bag fitted with a star tip (a round tip or even a zip-top bag with the corner snipped off will also work). Pipe a generous dollop of the cheesecake filling into the hollowed-out center of each strawberry half. Alternatively, use a small spoon to carefully place the filling.
- Add the Crumble Topping: Generously sprinkle the prepared strawberry crumble over the cheesecake filling in each strawberry. Ensure a good coating for both flavor and visual appeal.
- Chill and Serve: Once all strawberries are filled and topped, carefully transfer the platter to the refrigerator. Chill for at least 30 minutes to allow the filling to firm up slightly and the flavors to meld. If desired, garnish with a small fresh mint sprig or a few chocolate shavings just before serving. Serve chilled.
Cooking Tips and Variations
Preparation Tips:
- Strawberry Selection: Choose firm, ripe, and uniformly sized strawberries for the best presentation and taste. Avoid overly soft or bruised berries.
- Drying is Key: After washing, ensure your strawberries are completely dry. Any excess moisture will cause the filling to become watery and reduce shelf life.
- Hulling Technique: Use a small, sharp paring knife or a dedicated strawberry huller. Aim to create a neat cavity without removing too much of the fruit, which will leave more room for that delicious filling.
- Softened Cream Cheese: Make sure your cream cheese is at room temperature. This is crucial for achieving a smooth, lump-free filling. If it’s too cold, it will be difficult to mix.
- Sifted Powdered Sugar: Sifting the powdered sugar prevents lumps in your cheesecake filling, ensuring a silky-smooth texture.
- Piping vs. Spooning: A piping bag with a star tip gives the strawberries a professional, elegant look. However, a small spoon works perfectly fine for a more rustic charm. Don’t stress if you don’t have a piping bag!
- Chilling the Filling: If your kitchen is warm or if you find your filling a bit too soft, pop it in the fridge for 15-20 minutes before piping. This will make it easier to work with.
- Make Ahead: You can prepare the cheesecake filling and crumble up to a day in advance and store them separately in airtight containers in the refrigerator. Assemble the strawberries closer to serving time to ensure the best texture and prevent the crumble from getting soggy.
- Adding Crumble: For maximum crunch, add the strawberry crumble just before serving. If added too early, it can absorb moisture from the filling and lose its crispness.
Flavor Variations:
- Filling Enhancements:
- Citrus Zest: Add 1/2 teaspoon of orange or lemon zest to the filling for an extra bright, fresh note.
- Vanilla Bean Paste: Substitute vanilla extract with vanilla bean paste for a more intense vanilla flavor and beautiful specks.
- Other Fruit Purees: For a different twist, fold a tablespoon of raspberry or blueberry puree into a portion of the filling.
- Chocolate Chips: Mini chocolate chips or finely chopped white chocolate can be folded into the filling for a rich surprise.
- Nutella Swirl: Swirl a tiny bit of Nutella into the cream cheese filling for a chocolate-hazelnut twist.
- Topping Transformations:
- Graham Cracker Crumbs: A classic cheesecake pairing, graham cracker crumbs make an excellent alternative to vanilla wafers.
- Crushed Shortbread: For a buttery, delicate crunch, use crushed shortbread cookies.
- Chopped Nuts: Finely chopped pistachios, almonds, or pecans can add a sophisticated nutty flavor and crunch.
- Coconut Flakes: Toasted coconut flakes would provide a tropical flair.
- Different Flavored Crumbles: Experiment with crushed ginger snaps, lemon shortbread, or even finely crushed pretzels for a salty-sweet contrast.
- Chocolate Drizzle: A light drizzle of melted dark or white chocolate over the finished strawberries adds another layer of decadence.
- Garnish Options:
- Fresh Herbs: Beyond mint, consider a tiny sprig of fresh basil for an unexpected but delightful aromatic touch.
- Powdered Sugar Dusting: A light dusting of powdered sugar over the finished strawberries can enhance their visual appeal.
- Dietary Adjustments:
- Low-Sugar: Use a sugar substitute equivalent to powdered sugar in the filling.
- Dairy-Free: Opt for plant-based cream cheese and a dairy-free whipped topping for the filling. Ensure your crumble ingredients are also dairy-free.
- Gluten-Free: Use gluten-free vanilla wafers or graham crackers for the crumble.
Storage and Reheating
Storage:
Cheesecake Deviled Strawberries are best enjoyed fresh, within 1-2 hours of assembly, when the strawberries are at their juiciest and the crumble is crisp. However, they can be stored in an airtight container in the refrigerator for up to 24 hours. To prevent the crumble from getting soggy, it’s ideal to add the crumble just before serving if you are making them ahead. If you’ve already added the crumble, know that it might soften slightly over time.
To store, arrange the strawberries in a single layer in a shallow, airtight container. If you need to stack them, place a piece of parchment paper between layers to prevent them from sticking or getting squashed. Keep them away from strong-smelling foods in the refrigerator, as cream cheese can absorb odors.
Reheating:
These are a no-bake dessert and should not be reheated. They are meant to be served chilled and refreshing. Reheating would cause the strawberries to become mushy and the cream cheese filling to melt and separate, ruining the texture and presentation.
Frequently Asked Questions
What kind of strawberries are best for this recipe?
For the best results, choose large, firm, and ripe strawberries. Larger strawberries provide a better base for the filling and are easier to handle. Ensure they are sweet and juicy for optimal flavor, as they are the star of this dish. Avoid overly soft or bruised strawberries.
Can I make the cheesecake filling ahead of time?
Absolutely! The cheesecake filling can be prepared up to 2 days in advance. Store it in an airtight container in the refrigerator. Before using, give it a quick stir or beat it briefly with an electric mixer to restore its creamy consistency. This is a great time-saver for entertaining.
My crumble isn’t very pink. What can I do?
The color of your crumble will depend on the intensity of your freeze-dried strawberry powder or the type of strawberry gelatin you use. If you want a more vibrant pink, you can add a tiny drop of red food coloring to the melted butter before mixing it with the crumbs, or simply use more freeze-dried strawberry powder. Alternatively, you can embrace the natural, subtler hue.
How can I make these suitable for a crowd?
For a crowd, double or triple the recipe as needed. You can streamline the process by preparing the filling and crumble components a day in advance. On the day of the event, wash and halve the strawberries, then pipe the filling and add the crumble just before guests arrive. Arrange them beautifully on large platters for an impressive display. They are perfect finger foods!


