Introduction
There’s something uniquely comforting about a pastry, especially one that’s generously stuffed with a savory filling. These homemade stuffed pastries, often referred to as hand pies, empanadas, or turnovers, are the epitome of hearty comfort food. Imagine a flaky, golden crust encasing a warm, flavorful filling – it’s a complete meal in a convenient, portable package. Perfect for a cozy dinner, a fuss-free lunch, or even a satisfying snack, these pastries are a testament to the simple joy of homemade goodness.
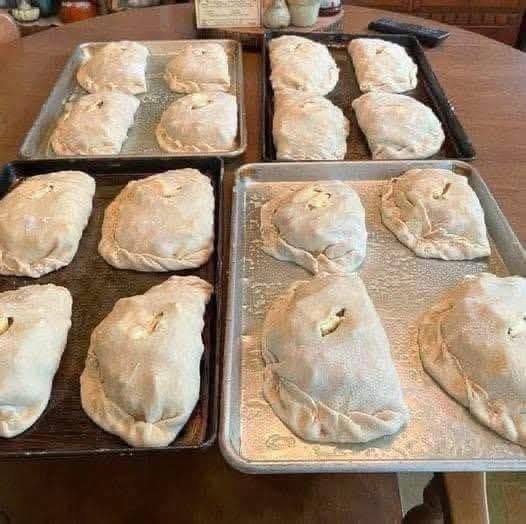
What makes these particular pastries so appealing is their “ready-for-baking” state. This recipe is designed with convenience in mind, allowing you to prepare them ahead of time and store them uncooked. This makes them an absolute lifesaver for busy weeknights, meal prepping, or when you need a quick, delicious option to pull out of the freezer. The satisfaction of crafting your own dough and creating a customized filling is immense, and the aroma that fills your kitchen as they bake is simply irresistible. Get ready to embrace the art of pastry making and delight in these savory pockets of deliciousness.
Our “uncooked stuffed pastries” are a versatile canvas for your culinary creativity. While we’ll provide a classic, crowd-pleasing filling suggestion, the beauty of this dish lies in its adaptability. Whether you’re a seasoned baker or a kitchen novice, the step-by-step instructions will guide you through creating perfectly sealed, beautifully crimped pastries that are just waiting for their moment in the oven. Prepare to impress your family and friends with these substantial, comforting treats that are sure to become a staple in your recipe repertoire.
Nutritional Information
Per serving (approximate values):
- Calories: 450-550
- Protein: 18-25g
- Carbohydrates: 40-50g
- Fat: 25-35g
- Fiber: 3-5g
- Sodium: 400-600mg
Ingredients
For the Pastry Dough (yields 8-10 pastries)
- 3 cups all-purpose flour, plus more for dusting
- 1 teaspoon salt
- 1 cup (2 sticks) unsalted butter, very cold and cut into 1/2-inch cubes
- 1/2 cup ice water, plus 1-2 tablespoons more if needed
- 1 large egg, for egg wash
- 1 tablespoon water, for egg wash
For the Savory Beef & Potato Filling
- 1 tablespoon olive oil
- 1 pound ground beef (80/20 lean recommended)
- 1 large yellow onion, finely chopped
- 2 cloves garlic, minced
- 2 medium russet potatoes, peeled and diced into 1/4-inch cubes
- 1 cup beef broth
- 1/2 cup frozen peas
- 1/4 cup fresh parsley, chopped
- 1 teaspoon dried thyme
- 1/2 teaspoon smoked paprika
- Salt and freshly ground black pepper to taste
- 1/2 cup shredded sharp cheddar cheese (optional, for extra richness)
Instructions
- Prepare the Pastry Dough: In a large mixing bowl, whisk together the flour and salt. Add the cold butter cubes. Using a pastry blender, your fingertips, or a food processor, cut the butter into the flour until the mixture resembles coarse meal with some pea-sized pieces of butter remaining.
- Gradually add the ice water, 1 tablespoon at a time, mixing until the dough just comes together. Be careful not to overmix. The dough should be shaggy but hold together when squeezed.
- Divide the dough into two equal portions. Flatten each portion into a disk, wrap tightly in plastic wrap, and refrigerate for at least 30 minutes, or up to 2 days. Chilling is crucial for a flaky crust.
- Prepare the Filling: While the dough chills, heat the olive oil in a large skillet or Dutch oven over medium heat. Add the ground beef and cook, breaking it apart with a spoon, until browned. Drain any excess fat.
- Add the chopped onion to the skillet and cook until softened, about 5-7 minutes. Stir in the minced garlic, dried thyme, and smoked paprika, cooking for another minute until fragrant.
- Add the diced potatoes and beef broth to the skillet. Bring to a simmer, then reduce heat, cover, and cook for 10-15 minutes, or until the potatoes are tender.
- Stir in the frozen peas and chopped fresh parsley. Cook for another 2-3 minutes until the peas are heated through. Remove from heat and season generously with salt and freshly ground black pepper to taste. If using, stir in the shredded cheddar cheese until just melted.
- Transfer the filling to a bowl and allow it to cool completely before assembling the pastries. This is very important; hot filling will melt the butter in the dough and make it difficult to work with. You can speed up cooling by placing it in the refrigerator.
- Assemble the Pastries: Preheat your oven to 400°F (200°C) if baking immediately. Line two baking sheets with parchment paper.
- On a lightly floured surface, roll out one disk of chilled dough into a large circle, about 1/8-inch thick. Use a 5-6 inch round cutter (or a bowl/lid as a guide) to cut out circles from the dough. Reroll scraps gently, if necessary, to get more circles.
- Place about 1/4 to 1/3 cup of the cooled filling onto one half of each dough circle, leaving a small border around the edge.
- In a small bowl, whisk together the egg and 1 tablespoon of water to make an egg wash. Lightly brush the edges of the dough circles with egg wash.
- Fold the other half of the dough over the filling, creating a half-moon shape. Gently press down around the edges to seal.
- Use a fork to crimp the edges firmly, ensuring a tight seal. This not only looks nice but also prevents the filling from leaking out during baking.
- Place the assembled pastries on the prepared baking sheets. Using a sharp knife, cut 2-3 small slits on the top of each pastry to allow steam to escape during baking.
- Bake the Pastries: Brush the tops of the pastries with the remaining egg wash for a golden, shiny crust.
- Bake for 20-25 minutes, or until the pastries are golden brown and the crust is flaky. Baking time may vary depending on your oven and the size of your pastries.
- Remove from the oven and let cool slightly on the baking sheets before serving. They are best served warm.
- Optional: Freezing Uncooked Pastries: If you plan to freeze them, skip the egg wash for now. After assembling and venting, place the uncooked pastries on a parchment-lined baking sheet in a single layer.
- Flash freeze for 1-2 hours, or until solid. Once solid, transfer the frozen pastries to a freezer-safe bag or airtight container. They can be stored for up to 3 months.
- To bake from frozen, preheat oven to 400°F (200°C). Place frozen pastries on a parchment-lined baking sheet, brush with egg wash, and bake for 30-35 minutes, or until golden brown and cooked through.
Cooking Tips and Variations
Dough Handling for Flakiness: The key to a flaky pastry is keeping everything cold. Use very cold butter and ice water. Avoid overworking the dough, as this develops gluten and can lead to a tough crust. Handle the dough as little as possible. If the dough gets too warm during rolling, pop it back into the fridge for 10-15 minutes.
Preventing a Soggy Bottom: Ensure your filling is completely cooled before assembling the pastries. A hot or warm filling will melt the butter in the dough, leading to a soggy bottom. Also, make sure your filling isn’t too wet. If it is, you can thicken it slightly with a teaspoon of cornstarch mixed with a tablespoon of cold water, added to the filling while it’s still warm on the stove.
Perfect Sealing: A good seal is crucial to prevent your filling from leaking out. After folding the dough, press firmly around the edges with your fingers, then use a fork to create a decorative and secure crimp. If the dough seems dry, a little extra egg wash or water on the edges can help it stick.
Dough Variations: Experiment with different flours. You can substitute up to half of the all-purpose flour with whole wheat flour for a nuttier flavor. For an herbed dough, add a teaspoon of dried herbs like rosemary or thyme to the flour mixture. For a richer dough, use half butter and half cream cheese.
Filling Variations: The possibilities are endless!
- Chicken & Vegetable: Cook shredded chicken with diced carrots, celery, and peas in a creamy sauce.
- Spinach & Feta: Sautéed spinach, crumbled feta, cream cheese, and a pinch of nutmeg make a delicious vegetarian option.
- Mushroom & Thyme: Sautéed mixed mushrooms with caramelized onions and fresh thyme. Add a splash of white wine for extra depth.
- Breakfast Pastries: Scrambled eggs, cooked sausage or bacon, and shredded cheese.
- Spicy Southwest: Ground turkey or black beans with corn, black beans, diced bell peppers, and a generous amount of chili powder and cumin.
Serving Suggestions: These pastries are hearty enough on their own, but they pair wonderfully with a simple side salad dressed with a vinaigrette. A dollop of sour cream or a side of homemade ketchup or a spicy dipping sauce can also elevate the experience.
Troubleshooting:
- Cracked Crust: This usually happens if the dough is too dry or overworked. Ensure enough moisture and handle gently.
- Pastries Losing Shape: Make sure the dough is properly chilled before rolling and assembly.
- Pale Crust: Ensure your oven is at the correct temperature and that you’ve applied an egg wash. For extra browning, you can increase the baking time slightly or move them to a higher rack in the oven.
Storage and Reheating
Storing Baked Pastries: Once baked and completely cooled, store the pastries in an airtight container at room temperature for up to 2 days. For longer storage, refrigerate for up to 4 days.
Reheating Baked Pastries:
- Oven: For best results, reheat baked pastries in a preheated oven at 350°F (175°C) for 10-15 minutes, or until warmed through and the crust is crisp again.
- Microwave: While convenient, microwaving may make the crust less crisp. Heat for 30-60 seconds, or until warm. This method is best for very quick reheating.
Freezing Baked Pastries: Baked pastries can also be frozen. Allow them to cool completely, then wrap each pastry individually in plastic wrap, then again in foil, or place in a freezer-safe bag. Freeze for up to 2 months. To reheat from frozen, unwrap and bake in a preheated oven at 350°F (175°C) for 20-30 minutes, or until heated through.
Frequently Asked Questions
Can I make the dough ahead of time?
Absolutely! The dough can be made up to 2 days in advance and stored tightly wrapped in plastic in the refrigerator. In fact, chilling the dough for an extended period often results in a flakier, more tender crust. You can also freeze the dough disks for up to 1 month; thaw overnight in the refrigerator before rolling.
What is the best way to prevent the filling from leaking out?
The most important steps are to ensure your filling is completely cooled before assembling and that it is not excessively wet. When sealing, press the edges firmly together after folding, and then crimp thoroughly with a fork. You can also lightly brush the inside edges of the dough with egg wash before folding to help create a stronger seal.
Can I use store-bought pie crust for this recipe?
Yes, you can certainly use store-bought pie crust for a quicker option. One package of refrigerated pie crust (containing two crusts) is usually sufficient for 6-8 average-sized pastries. Follow the same assembly and baking instructions, keeping in mind that the baking time might be slightly adjusted based on the thickness of the store-bought crust.
How do I make sure the pastries are cooked through, especially if baking from frozen?
When baking, look for a deep golden-brown crust, which indicates doneness. The slits on top of the pastry also allow you to see if the filling is bubbling, another good sign. If baking from frozen, ensure you add the extra baking time as directed. If you’re concerned, you can use an instant-read thermometer to check the internal temperature of the filling; it should be at least 165°F (74°C).