
After This Recipe, You Will No Longer Buy Bread, You Will Make It Yourself at Home
There is something magical about homemade bread. The aroma fills the kitchen, the crust turns golden and crisp, and the inside comes out soft, warm, and comforting in a way that store-bought bread can never match. With this simple recipe, you can bake beautiful artisan-style bread right in your own kitchen using ingredients you probably already have at home. You don’t need special baking skills, you don’t need a machine, and you don’t need complicated steps. Just mix, rise, and bake. This recipe has gone viral because it is foolproof, affordable, and consistently produces bakery-quality results. One loaf and you will understand why so many people say they will never buy bread again.
Homemade bread isn’t just about saving money, though that is a nice bonus. It is about creating something wholesome, fresh, and delicious with your own hands. It is about enjoying the smell of warm bread filling your home, about serving slices of fresh bread with butter or olive oil, and about surprising your family with something that tastes like it came straight from an artisan bakery. If you have always wanted to bake bread but felt intimidated, this recipe is the perfect place to start. It is simple enough for beginners, yet the result looks like it took hours of expertise. Whether you want to enjoy it with breakfast, use it for sandwiches, or serve it with soup or pasta, this bread will quickly become your daily favorite.
Ingredients
4 tablespoons (60 ml) olive oil
1 tablespoon (10 g) dry yeast
1 teaspoon salt
1 1⁄3 cups (320 ml) warm water
4 3⁄4 cups (570 g) plain flour
Mixing and activating the yeast
The first step in making this homemade bread is activating the yeast. This process helps jump-start the rising and gives your loaf the airy, fluffy texture everyone loves. In a large mixing bowl, combine the warm water, olive oil, and dry yeast. The water should be warm but not hot, ideally around body temperature. If the water is too hot, it can kill the yeast. If it is too cold, the yeast will not activate properly. Within a few minutes, you’ll notice small bubbles forming on the surface. This means the yeast is alive and ready to work. Let it rest for about 5 to 10 minutes until it becomes foamy. This step ensures your bread rises beautifully in the oven.
Adding the flour and forming the dough
Once your yeast mixture is bubbly, stir in the salt. Then begin adding the flour gradually, mixing after each addition. As the dough comes together, it will feel slightly sticky but manageable. This is exactly what you want. A dough that is too dry leads to dense bread. A dough that is soft and slightly sticky results in a fluffy interior and a perfect crust. When all the flour is incorporated, transfer the dough to a lightly floured surface. Knead it for around 8 minutes. Kneading helps develop gluten, which gives bread structure and elasticity. As you knead, you will feel the dough becoming smoother and more elastic under your hands. This transformation is one of the most satisfying parts of bread making.
Letting the dough rise to perfection
Once the dough is smooth, place it into a clean bowl that has been lightly oiled. Turn the dough once so it’s coated in the oil, which will prevent it from drying out. Cover the bowl with a clean towel or plastic wrap. This step begins the first rise. The yeast will start producing air bubbles inside the dough, allowing it to expand and grow. Set the bowl in a warm, draft-free area and let the dough rise for about one hour, or until it doubles in size. This rise time is essential because it develops both flavor and texture. A well-risen dough bakes into soft, airy bread with a beautiful crumb. The more the dough rises, the better your final loaf will taste.
Shaping the dough into a round artisan loaf
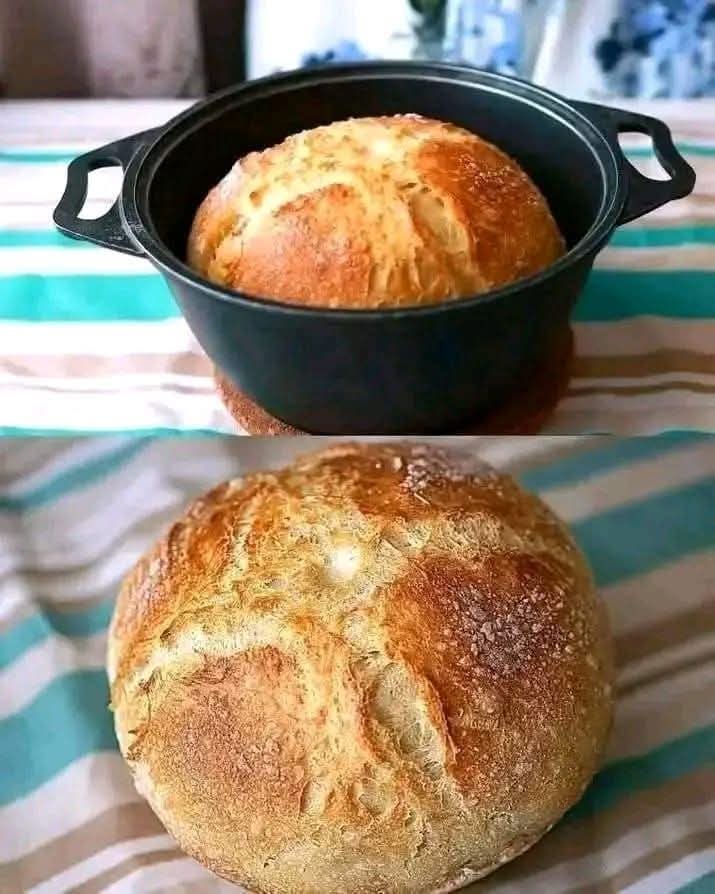
After the dough has risen, gently punch it down to release excess air. This does not harm the dough; it simply redistributes the air pockets and prepares it for shaping. Turn the dough back onto your work surface and gently form it into a round loaf. Tuck the edges underneath to create surface tension on top. This smooth upper surface helps the loaf expand upward rather than sideways as it bakes, giving it that classic bakery-style dome shape. Place the shaped dough onto a baking tray or into a round Dutch oven, just like in your photo. Using a Dutch oven helps trap steam, which creates a crisp, golden, crackly crust. If you don’t have one, you can still bake it on a tray and achieve excellent results.
The second rise and preparing for baking
Once shaped, let the dough rest again for about 20 to 30 minutes. This second rise is shorter but very important. It allows the dough to relax, puff up slightly, and be ready for the oven. During this time, preheat your oven to 400°F (200°C). A hot oven is essential for good oven spring, which is the final rise that happens during the first few minutes of baking. This rapid rise helps create an impressive round loaf with those beautiful cracks on top. If you want an extra rustic look, you can lightly dust the top with flour or make a small shallow cut across the surface. This controls where the bread expands and creates a professional finish.
Baking the bread until golden and aromatic
Place the dough in the oven and bake for 25 to 30 minutes. If you’re using a Dutch oven, keep the lid on for the first part of baking, then remove it for the last 10 minutes to encourage browning. As the bread bakes, your home will fill with the irresistible scent of warm yeast, flour, and olive oil. When the surface becomes golden brown and crisp, the bread is ready. One final test is to tap the bottom of the loaf. If it sounds hollow, it has baked through perfectly. Remove it from the oven and allow it to cool for a few minutes before slicing. Cutting bread immediately can compress the crumb, so giving it a short rest keeps the texture beautifully airy.
The perfect texture every time
This homemade bread delivers the ideal combination of textures. The crust comes out golden and slightly chewy with natural crackling on the surface. Inside, the crumb is tender, soft, and lightly moist. The olive oil adds richness while keeping the bread from drying out. The flavor is mild and comforting, making it perfect for both sweet and savory use. You can spread it with butter, serve it alongside soups, toast it for breakfast, or enjoy it plain. The simplicity of this bread is its superpower. It pairs well with anything, and it tastes even better the next day. Many people bake two loaves at once because it disappears quickly.
Why homemade bread is better than store-bought
Store-bought bread often contains preservatives, conditioners, and additives that extend shelf life but reduce flavor and freshness. Homemade bread is pure, simple, and made with ingredients you recognize. It is healthier, richer in flavor, and completely customizable. You can add herbs, cheese, seeds, or spices to create endless variations. You can shape it into rolls, baguettes, or sandwich loaves. Once you master this basic recipe, the possibilities are endless. More importantly, homemade bread offers comfort and satisfaction that no supermarket loaf can match. Hands-on baking transforms your kitchen into a warm and inviting space, and the result is something you can proudly share with family and friends.
A recipe you will treasure and return to often
This recipe is more than instructions; it’s an invitation to enjoy the beauty of homemade baking. Many people who try it once make it every week. It is reliable, forgiving, and incredibly rewarding. Whether you are new to baking or already love making bread, this simple method gives professional results in your own kitchen. The golden loaf you saw in the photo is exactly what you can expect every single time. With this recipe in your hands, you will understand why so many people say they will no longer buy bread. They bake this soft, rustic, artisan-style loaf at home and never look back.
Conclusion
Homemade bread doesn’t have to be complicated. This recipe proves that with just a few ingredients and a little patience, anyone can bake a beautiful loaf that beats anything from the store. The crust is golden, the interior is soft, and the flavor is comforting and rich. Whether for daily meals or special occasions, this bread will become a staple in your home. Try it once, and you’ll see exactly why making bread at home is one of the most satisfying kitchen experiences. Enjoy it warm, share it with loved ones, and celebrate the joy of baking from scratch.


