
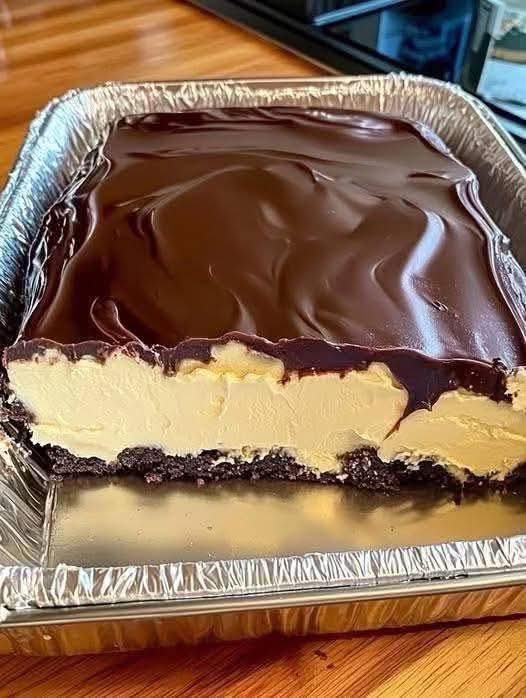
No Bake Chocolate Ganache Cream Bars
There’s something magical about creamy desserts layered with chocolate. This no-bake Chocolate Ganache Cream Bar is smooth, rich, and indulgent, yet incredibly easy to make. With a crunchy cookie crust, velvety cream filling, and glossy ganache topping, this dessert is perfect for potlucks, parties, or simply treating yourself at home.
Ingredients
For the Crust
- 2 cups crushed Oreo cookies (without filling)
- ½ cup melted unsalted butter
For the Cream Filling
- 2 cups cream cheese, softened
- 1 cup powdered sugar
- 1 box (3.4 oz) instant vanilla or custard pudding mix
- 1 ½ cups cold milk
- 2 cups whipped cream or Cool Whip
For the Ganache Topping
- 1 ½ cups semi-sweet chocolate chips
- ¾ cup heavy cream
Optional garnish: whipped cream swirls, chocolate curls, or crushed Oreos
Instructions
Step 1: Make the Crust
- Crush Oreo cookies into fine crumbs using a food processor or a ziplock bag and rolling pin.
- Mix the crumbs with melted butter until combined.
- Press firmly into the bottom of a greased or foil-lined baking pan.
- Chill in the refrigerator while preparing the filling.
Step 2: Prepare the Cream Layer
- In a mixing bowl, beat softened cream cheese with powdered sugar until smooth.
- In a separate bowl, whisk pudding mix with cold milk until thick.
- Fold the pudding into the cream cheese mixture.
- Gently fold in whipped cream until light and fluffy.
- Spread evenly over the chilled crust.
Step 3: Add the Ganache Topping
- Heat the heavy cream in a small saucepan until hot but not boiling.
- Pour over chocolate chips in a bowl and let sit for 2 minutes.
- Stir until smooth and glossy.
- Pour ganache over the cream layer and spread evenly with a spatula.
Step 4: Chill and Serve
- Refrigerate for at least 4 hours or overnight to fully set.
- Slice into bars with a sharp knife.
- Garnish with whipped cream, chocolate curls, or extra cookie crumbs if desired.
Pro Tips
- Use high-quality chocolate for the ganache for a smoother finish.
- To cut clean slices, dip your knife in hot water, wipe dry, then cut.
- Add a teaspoon of espresso powder to the ganache for a mocha twist.
- For a lighter version, use Greek yogurt in the filling instead of cream cheese.
Variations
- Mint Chocolate Bars: Add ½ teaspoon peppermint extract to the filling.
- Peanut Butter Cream Bars: Blend ½ cup peanut butter into the cream layer.
- Strawberry Delight: Layer sliced strawberries between the cream and ganache.
- Cookies & Cream: Fold chopped Oreos into the cream filling.
- Nutty Chocolate Bars: Sprinkle chopped pecans or hazelnuts over the ganache before chilling.
Storage and Reheating
- Refrigerator: Store covered for up to 5 days.
- Freezer: Wrap tightly in foil and freeze for up to 2 months. Thaw in the fridge before serving.
- Reheating: Not needed — these are best served chilled.
Nutritional Information (per bar, approx.)
| Nutrient | Amount |
|---|---|
| Calories | 315 |
| Protein | 4 g |
| Carbohydrates | 32 g |
| Fat | 20 g |
| Saturated Fat | 12 g |
| Sugar | 22 g |
| Sodium | 210 mg |
FAQs
Can I make this ahead of time?
Yes! This dessert actually tastes better after chilling overnight.
Can I use different pudding flavors?
Absolutely — try chocolate, butterscotch, or banana pudding.
How do I keep the ganache shiny?
Don’t overheat the cream. Letting it gently melt the chocolate keeps it glossy.
Can I use whipped cream instead of Cool Whip?
Yes, fresh whipped cream works beautifully, just whip it to stiff peaks before folding.
What if I don’t have Oreos?
Any chocolate cookies or graham crackers will work.
Serving Ideas
- Serve chilled with fresh berries on the side.
- Cut into small squares for a bite-sized dessert platter.
- Pair with coffee or a glass of milk for the ultimate indulgence.
- Add a drizzle of caramel sauce for extra decadence.
Final Thoughts
No-Bake Chocolate Ganache Cream Bars are rich, luscious, and surprisingly easy to prepare. The layers of chocolate, cream, and cookie crust create a dessert that looks bakery-worthy but only takes minutes to assemble. Whether you’re hosting a party or just craving something sweet, this recipe will become a go-to favorite in your kitchen.


