Introduction
Imagine the aroma of freshly baked bread wafting through your kitchen, a golden-brown loaf cooling on the rack, ready to be sliced and savored. Now, imagine achieving this blissful scene with just two simple ingredients and absolutely no fuss, no kneading, and no waiting for yeast to activate. Sounds like a dream, right? Well, prepare for that dream to become your delicious reality with our “2 Ingredient Miracle Bread No Yeast No Fuss” recipe!
This isn’t just another quick bread; it’s a game-changer for anyone who loves the comfort of homemade bread but is intimidated by traditional baking methods. Whether you’re a seasoned baker looking for a shortcut or a complete novice stepping into the kitchen for the first time, this recipe promises success. It’s the perfect solution for busy weeknights, impromptu gatherings, or simply satisfying that sudden craving for warm, crusty bread.
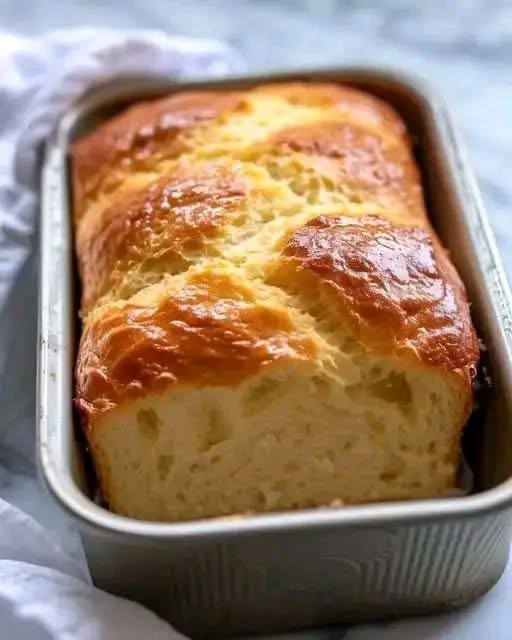
What makes this bread so miraculous? It’s the ingenious combination of self-rising flour and Greek yogurt. These two humble ingredients work in harmony to create a wonderfully soft, slightly tangy, and delightfully chewy loaf that will surprise and impress everyone who tries it. Forget complex steps and lengthy proofing times; this recipe is all about simplicity, speed, and utterly delicious results.
Nutritional Information
Per serving (approximate values):
- Calories: 250
- Protein: 10g
- Carbohydrates: 40g
- Fat: 5g
- Fiber: 2g
- Sodium: 450mg
Ingredients
- 2 cups (240g) self-rising flour, plus more for dusting
- 1 cup (240g) plain full-fat Greek yogurt
- Optional: 1 tablespoon olive oil or melted butter for brushing (for a golden crust)
- Optional: A pinch of sea salt for sprinkling
Instructions
- Preheat your oven to 375°F (190°C). Lightly grease and flour a standard 9×5-inch loaf pan, or line it with parchment paper for easy removal.
- In a large mixing bowl, combine the self-rising flour and the Greek yogurt.
- Using a sturdy spatula or a wooden spoon, mix the ingredients together until a shaggy dough forms. It will be quite thick and sticky at this stage.
- Once the dough starts to come together, use your hands to gently knead it within the bowl for about 1-2 minutes. The goal is just to bring all the flour into the dough and form a cohesive ball, not to develop gluten extensively. Avoid overmixing, as this can lead to a tough bread.
- Lightly dust a clean work surface with a small amount of self-rising flour. Turn the dough out onto the floured surface.
- Gently shape the dough into a rough loaf shape that will fit comfortably into your prepared loaf pan. You can fold the edges underneath to create a smoother top.
- Carefully transfer the shaped dough into the prepared loaf pan. If desired, brush the top of the dough with a little olive oil or melted butter for a richer, golden crust, and sprinkle with a pinch of sea salt.
- Bake in the preheated oven for 30-40 minutes, or until the top is golden brown and a wooden skewer or toothpick inserted into the center comes out clean. The internal temperature should register around 200-210°F (93-99°C).
- Once baked, remove the loaf pan from the oven and let the bread cool in the pan for about 10 minutes.
- After 10 minutes, carefully remove the bread from the pan and transfer it to a wire rack to cool completely before slicing. This step is crucial for the bread’s texture; slicing hot bread can make it gummy.
Cooking Tips and Variations
This 2-ingredient miracle bread is incredibly forgiving, but a few tips can elevate your results from great to extraordinary. First, always use fresh self-rising flour. Over time, the leavening agents in self-rising flour lose their potency, which could result in a denser loaf. If your self-rising flour has been sitting in the pantry for ages, it’s best to grab a fresh bag. Second, opt for full-fat plain Greek yogurt. The fat content contributes significantly to the bread’s tender crumb and rich flavor. Low-fat or non-fat varieties can work, but the texture might be slightly less moist. Also, avoid flavored yogurts, as they will alter the taste of your bread significantly.
When mixing, be gentle. Unlike traditional yeast breads that benefit from extensive kneading, this dough requires minimal handling. Overmixing can develop too much gluten, leading to a tough and chewy texture rather than the soft, airy crumb we’re aiming for. Mix just until the flour is incorporated and the dough comes together. The dough will be sticky, which is perfectly normal. A light dusting of flour on your hands and work surface will help manage it.
For a beautiful, golden-brown crust, don’t skip the optional step of brushing the top of the loaf with olive oil or melted butter before baking. A sprinkle of flaky sea salt on top can also add a delightful textural contrast and enhance the flavor. Remember that oven temperatures can vary, so keep an eye on your bread during the last 10-15 minutes of baking. If it’s browning too quickly, you can loosely tent it with aluminum foil.
The beauty of this simple recipe lies in its versatility. Once you’ve mastered the basic loaf, the possibilities for customization are endless. For a savory twist, try incorporating a half cup of shredded cheddar cheese and a tablespoon of dried chives or rosemary into the dough. This makes a fantastic accompaniment to soups or stews. Alternatively, you could add a teaspoon of garlic powder and dried Italian herbs for a flavorful garlic herb bread. For a touch of sweetness, consider adding a tablespoon of sugar or honey to the yogurt before mixing, along with a half cup of dried cranberries or chopped nuts. This transforms it into a delightful breakfast or dessert bread. You could even fold in some chopped sun-dried tomatoes and a sprinkle of Parmesan cheese for a Mediterranean-inspired loaf. Just be mindful not to add too many wet ingredients, as this can alter the dough consistency and baking time.
Another great tip is to adjust the consistency if your dough seems too dry or too wet. If it’s too dry and crumbly, add an extra tablespoon of Greek yogurt at a time until it comes together. If it’s too wet and difficult to handle, add a tablespoon of self-rising flour until it’s manageable. The key is to have a dough that is sticky but cohesive.
Finally, for those who prefer individual portions or a different shape, this dough can also be used to make rolls or even flatbreads. Simply divide the dough into smaller portions, shape them as desired, and adjust the baking time accordingly. Rolls will typically bake in 15-25 minutes, depending on their size. This flexibility makes the miracle bread an even more indispensable recipe in your culinary repertoire.
Storage and Reheating
Once your glorious 2-ingredient bread has cooled completely, it’s ready for storage. For best results and to maintain its freshness, store the bread at room temperature in an airtight container or a bread bag. Placing it in a plastic bag or wrapping it tightly in plastic wrap works well to prevent it from drying out. This bread is best enjoyed within 2-3 days of baking. While it will still be edible after this time, its texture might start to degrade slightly.
If you anticipate not finishing the loaf within a few days, or if you simply want to have fresh bread on hand whenever the craving strikes, this miracle bread freezes beautifully. Once the loaf has completely cooled, slice it into individual portions. Wrap each slice tightly in plastic wrap, then place the wrapped slices into a freezer-safe bag or container. This method allows you to grab just one or two slices at a time without having to thaw the entire loaf. Frozen bread can be stored for up to 2-3 months. You can also freeze the entire loaf, wrapped tightly in plastic wrap and then aluminum foil, but thawing will take longer.
Reheating this bread is a breeze, whether it’s from room temperature or frozen. For room temperature bread, you can slice it and toast it in a toaster, toaster oven, or even a dry skillet for a few minutes until warmed through and slightly crispy. If you prefer to warm a larger piece or the entire loaf, you can place it in a preheated oven at 350°F (175°C) for about 5-10 minutes, or until heated through. Brush with a little butter before heating for an extra touch of deliciousness.
For frozen slices, you can pop them directly into a toaster or toaster oven. They might require a slightly longer toasting time than fresh slices, typically 3-5 minutes, depending on your appliance and desired crispness. If reheating a whole frozen loaf, unwrap it and place it directly into a preheated oven at 350°F (175°C) for about 15-25 minutes, or until it’s warmed through and the crust has revived. Always ensure the bread is fully thawed and heated through before serving for the best texture and flavor. This simple storage and reheating guide ensures you can enjoy your homemade miracle bread whenever you desire, minimizing waste and maximizing convenience.
Frequently Asked Questions
Can I make this bread gluten-free?
Unfortunately, this recipe relies heavily on the gluten structure provided by regular self-rising flour. While you can find gluten-free self-rising flour substitutes, they often contain different leavening agents and starches that may not react the same way with Greek yogurt to achieve the desired texture. It’s possible to experiment, but the results will likely be different from the traditional version.
What if I don’t have self-rising flour?
No problem! You can easily make your own self-rising flour substitute. For every cup of all-purpose flour, add 1 ½ teaspoons of baking powder and ¼ teaspoon of fine salt. Whisk these ingredients together thoroughly before using. This homemade version will work perfectly in this 2-ingredient bread recipe.
Can I use plain regular yogurt instead of Greek yogurt?
While plain regular yogurt can technically be used, it’s not recommended for the best results. Greek yogurt is much thicker and has a higher protein content, which contributes significantly to the bread’s structure and moisture. Regular yogurt has a higher water content, which would likely result in a much stickier dough and a denser, potentially gummy loaf. If you must use regular yogurt, you might need to add a bit more flour to achieve the correct dough consistency, but the final texture will still be different.