Soft Homemade Sourdough Sandwich Bread (No Yeast – Naturally Leavened, Perfectly Soft)
There’s something magical about baking your own bread at home — especially when it’s soft, fluffy, and made with natural sourdough. This sourdough sandwich bread is a true keeper: no commercial yeast, no complicated steps, and yet it yields the most pillowy texture and mild tang. Perfect for sandwiches, morning toast, or just slathered with butter straight from the oven.
If you’ve ever wondered how to get that soft bakery-style loaf using sourdough, this recipe delivers exactly that. It’s a simple, beginner-friendly version that uses your active sourdough starter to create loaves that rise beautifully, bake evenly, and stay soft for days.
Why You’ll Love This Recipe
- Soft and Fluffy Texture: The perfect combination of stretch and tenderness — not dense like some sourdoughs.
- No Commercial Yeast: 100% naturally leavened using your sourdough starter.
- Mild Flavor: Ideal for sandwiches — no overpowering sourness.
- Freezes Beautifully: Make extra loaves and freeze them for later.
- Simple Ingredients: Flour, water, salt, butter, and starter — that’s all!
Ingredients for Sourdough Sandwich Bread
For the Dough
- 1 cup (200g) active bubbly sourdough starter
- 1 ½ cups (360ml) warm water (around 80°F / 26°C)
- 5 cups (600g) bread flour (or all-purpose flour)
- 2 tablespoons sugar or honey
- 2 teaspoons sea salt
- 3 tablespoons softened butter (or olive oil)
Optional for Enhanced Softness
- 2 tablespoons milk powder (for a tender crumb)
- 1 tablespoon olive oil brushed on top before baking
Tools You’ll Need
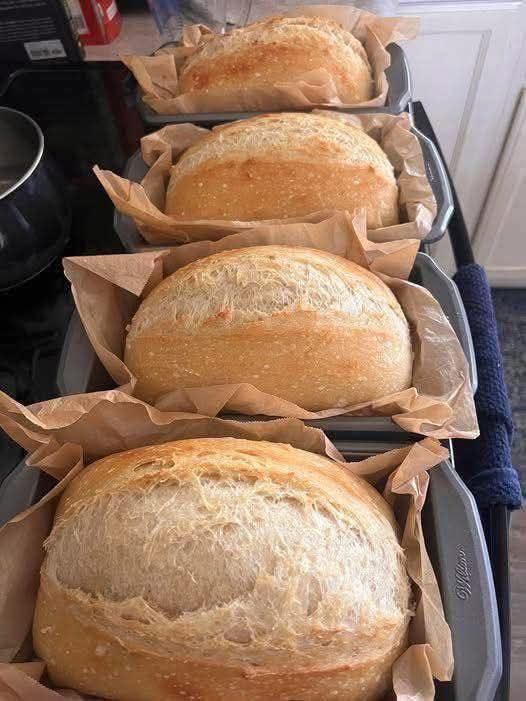
- 2 loaf pans or 4 mini pans (like in your photo)
- Mixing bowl
- Dough scraper
- Kitchen towel or plastic wrap
- Parchment paper
- Sharp knife or lame for scoring
Step-by-Step Instructions
1. Feed and Prepare Your Starter (Morning)
Make sure your sourdough starter is active and bubbly. Feed it about 4–6 hours before mixing the dough so it doubles in volume. A strong starter gives the bread its rise and structure.
2. Mix the Dough (Evening)
In a large mixing bowl, whisk together the warm water, sourdough starter, and sugar or honey. Add the flour and salt, and mix with a spoon or your hands until a shaggy dough forms. Add softened butter and knead until incorporated. The dough will feel slightly sticky but smooth.
Cover the bowl with a towel and let it rest for 30 minutes.
3. Stretch and Fold (Developing Gluten)
After the initial rest, perform 3–4 rounds of stretch and folds over the next 2 hours, spaced 30 minutes apart. To do this:
- Grab one side of the dough and stretch it upward, then fold it over the center.
- Rotate the bowl and repeat on all four sides.
This step strengthens the dough naturally without traditional kneading.
4. Bulk Fermentation (Overnight Rise)
Cover the bowl with a damp towel or plastic wrap and let it rise overnight at room temperature (8–12 hours). The dough should double in size and appear airy with visible bubbles.
Tip: If your kitchen is cool, you can let it rise inside a turned-off oven with the light on.
5. Shape the Loaves
In the morning, gently turn the dough onto a lightly floured surface. Divide it into two portions (or four if you’re using smaller pans). Flatten each portion slightly, then roll it tightly into a log shape.
Line your loaf pans with parchment paper and place each dough log seam-side down. Cover and let rise until the dough crowns slightly above the edge of the pan — about 2–4 hours, depending on room temperature.
6. Preheat and Bake
Preheat your oven to 375°F (190°C).
Right before baking, brush the tops lightly with olive oil or melted butter. Score the tops with a sharp knife or razor for that classic split look.
Bake for 35–40 minutes, or until the tops are golden brown and the loaves sound hollow when tapped.
7. Cool and Slice
Remove the loaves from the pans and cool them completely on a wire rack. Resist the urge to slice early — slicing too soon can compress the soft crumb. Once cooled, slice and enjoy your perfectly fluffy sourdough sandwich bread!
Storage Tips
- Room Temperature: Store in a bread box or airtight bag for up to 3 days.
- Freezer: Wrap cooled loaves in plastic wrap, then foil, and freeze up to 3 months.
- To Refresh: Thaw at room temp and warm in the oven for 5 minutes.
Expert Tips for Perfect Sourdough Sandwich Bread
- Active Starter = Strong Rise: If your starter doesn’t double within 6 hours after feeding, it needs more maintenance before baking.
- Hydration Control: Adjust flour slightly depending on humidity; dough should be soft but not sticky.
- Use Bread Flour: It gives better gluten structure and elasticity for that soft pull-apart crumb.
- Don’t Rush the Final Proof: Under-proofed dough can cause dense or split loaves.
- Brush After Baking: For extra shine and softness, brush warm loaves with butter right after they come out of the oven.
Variations
1. Whole Wheat Version
Replace 1–2 cups of bread flour with whole wheat flour. Add 1 tablespoon of olive oil or honey to keep the crumb soft.
2. Milk-Enriched Bread
Swap ½ cup of water for warm milk for a richer, more tender loaf.
3. Sweet Breakfast Loaf
Add 2 tablespoons of sugar and 1 teaspoon of cinnamon to the dough for a subtly sweet, aromatic loaf that’s perfect with butter and jam.
4. Seeded Sourdough
Sprinkle sesame, poppy, or flax seeds on top before baking for texture and nutrition.
5. Garlic Butter Crust
Before baking, brush the top with garlic butter and sprinkle a bit of salt — incredible flavor and aroma!
Troubleshooting Guide
| Problem | Possible Cause | Fix |
|---|---|---|
| Dense texture | Starter not active enough | Feed starter regularly and wait for it to double before using |
| Dough didn’t rise overnight | Too cold environment | Extend fermentation time or move to a warmer spot |
| Crust too hard | Overbaked or not covered during cooling | Brush with butter after baking and cover loosely while cooling |
| Gummy crumb | Sliced too early | Always let it cool completely before slicing |
| Flat top | Overproofed | Shorten final rise next time |
Serving Ideas
This soft sourdough loaf is versatile and perfect for every occasion:
- Breakfast: Toasted with butter and honey
- Lunch: As a sandwich base with turkey, lettuce, and mayo
- Dinner: Served alongside soups or stews
- Snack: Spread with cream cheese or nut butter
Why Sourdough is Better for You
Sourdough isn’t just delicious — it’s healthier than regular bread. The natural fermentation process breaks down gluten, increases nutrient absorption, and makes it easier to digest. It also has a lower glycemic index, meaning it doesn’t spike blood sugar as quickly as traditional breads.
Plus, it stays fresher longer without preservatives thanks to its natural acidity.
Homemade Caramelized Butter Spread (Bonus Idea)
For an extra indulgent touch, whip up a caramel butter spread for your sourdough:
- ¼ cup butter
- 2 tablespoons brown sugar
- ½ teaspoon cinnamon
Melt together until bubbly, then brush over warm bread slices. It’s divine!
FAQ
Q: Can I use discard instead of active starter?
A: No — discard won’t have the power to rise the dough properly. Use only active, bubbly starter.
Q: Can I make this bread without butter?
A: Yes, substitute olive oil or coconut oil for a dairy-free version.
Q: Why does my bread taste too sour?
A: It may have over-fermented. Try reducing the bulk rise time or use a younger starter.
Q: How can I make it softer?
A: Add 1 tablespoon of honey or milk powder — both help create a tender crumb.
Final Thoughts
This Soft Homemade Sourdough Sandwich Bread is the perfect balance of rustic tradition and everyday comfort. It’s proof that sourdough doesn’t have to be dense or overly tangy — it can be soft, fluffy, and absolutely delicious. Once you try it, you’ll never go back to store-bought sandwich bread again.
Whether you’re a sourdough beginner or a seasoned baker, this recipe is foolproof and incredibly rewarding. Make a few loaves, share them with family, and enjoy the aroma of freshly baked bread filling your kitchen — it’s pure happiness in every slice.